
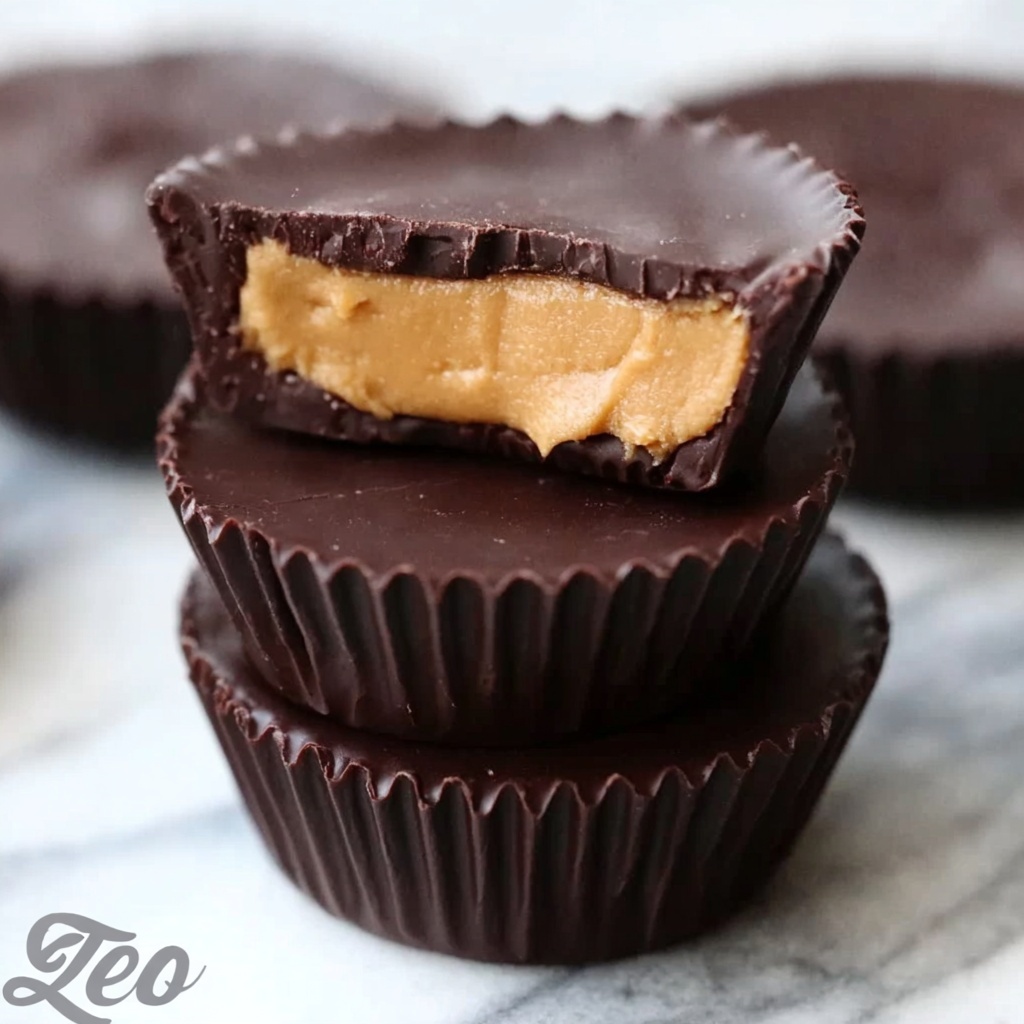
If you have a serious sweet tooth and a love for that perfect peanut-buttery indulgence, then this Creamy Peanut Butter Cups Recipe is about to become your new best friend in the kitchen. Imagine velvety layers of smooth, semi-sweet chocolate perfectly embracing a rich and luscious peanut butter filling that practically melts in your mouth. It’s a homemade treat that feels special but is incredibly simple to make, combining a handful of straightforward ingredients into a dessert that everyone will rave about. Whether you’re making these for a party, a snack, or just because, this recipe is a guaranteed crowd-pleaser.
Ingredients You’ll Need
The magic of the Creamy Peanut Butter Cups Recipe lies in its simplicity, requiring just a few essential ingredients that each play a definite role in creating its perfect balance of flavor and texture. From the luscious creaminess of peanut butter to the sweet, slightly bitter notes of semi-sweet chocolate, every item here brings the recipe to life.
- Semi-sweet chocolate chips: Use quality chocolate chips for a smooth, glossy finish and rich taste that forms the decadent shell and topping.
- Creamy peanut butter: Creamy peanut butter blends easily and gives the filling its irresistible silky texture.
- Powdered sugar: Sweetens the peanut butter without graininess, lending a delicate sweetness that balances the chocolate perfectly.
- Butter: Adds richness and a little extra creaminess to the peanut butter mixture, making the filling even smoother.
- Cupcake liners: Essential for easy removal and a neat presentation.
How to Make Creamy Peanut Butter Cups Recipe
Step 1: Prepare Your Workspace
Start by lining your muffin pan with cupcake liners. This simple prep ensures your peanut butter cups won’t stick and helps keep their shape beautiful when it’s time to enjoy.
Step 2: Melt the First Half of the Chocolate
Using a microwave-safe bowl, gently melt half of the semi-sweet chocolate chips. Heat in short intervals, stirring in between, until the chocolate becomes smooth and glossy. This will be the chocolate base layer that sets the tone for the entire treat.
Step 3: Create the Chocolate Base Layer
Drop spoonfuls of the melted chocolate into each cupcake liner, filling them about halfway. Place the pan in the freezer for 10-15 minutes to allow the chocolate to firm up, creating a sturdy foundation for the peanut butter filling.
Step 4: Make the Creamy Peanut Butter Filling
In a mixing bowl, combine the creamy peanut butter, powdered sugar, and butter. Stir until everything comes together in a smooth, creamy mixture. This luscious filling is the heart of the Creamy Peanut Butter Cups Recipe, offering a perfect contrast to the chocolate layers.
Step 5: Add the Peanut Butter Layer
Once the chocolate base is firm, spoon the peanut butter mixture over it, gently pressing it down to form an even layer. Pop the muffin pan back into the freezer for another 10 minutes to help the filling set nicely.
Step 6: Melt the Remaining Chocolate and Top
Now, melt the remaining chocolate chips just like before. Pour this melted chocolate over the peanut butter layer, making sure it completely covers the filling. This final layer seals in all the creamy goodness and gives your cups a beautiful finish.
Step 7: Chill Until Fully Set
Refrigerate or freeze your peanut butter cups for about 30 minutes until everything is fully firm. Once set, they are ready to be enjoyed or beautifully packaged as a homemade gift.
How to Serve Creamy Peanut Butter Cups Recipe
Garnishes
While the peanut butter cups are sensational on their own, adding a sprinkle of sea salt or a drizzle of white chocolate on top can elevate their flavor and make them look extra special. You can also try a few crushed peanuts for a little crunch contrast that’s simply divine.
Side Dishes
These peanut butter cups pair beautifully with a cold glass of milk or a cup of bold coffee. They also make a wonderful dessert alongside fresh berries or a scoop of vanilla ice cream when you want to impress your guests with minimal effort.
Creative Ways to Present
Try placing these peanut butter cups in colorful mini cupcake liners for a festive twist, or arrange them on a dessert platter garnished with a few fresh mint leaves for a pop of color. Wrapping individual cups in parchment paper tied with twine makes a charming gift for friends and family.
Make Ahead and Storage
Storing Leftovers
Store your Creamy Peanut Butter Cups Recipe in an airtight container in the refrigerator. They’ll stay fresh and delicious for up to a week, making them an excellent make-ahead treat for busy days or unexpected guests.
Freezing
If you want to keep these treats around even longer, freeze them! Wrap each cup individually in plastic wrap or parchment paper, then place them inside a freezer-safe container. They’ll maintain their flavor and texture beautifully for up to three months.
Reheating
When you’re ready to enjoy frozen peanut butter cups, just let them thaw in the fridge for a few hours or at room temperature for about 20 minutes. Avoid microwaving, as it can cause the chocolate to lose its texture and the peanut butter filling to melt too much.
FAQs
Can I use natural peanut butter instead of creamy peanut butter?
Natural peanut butter tends to be oilier and less creamy than the usual variety, which might affect the texture of the filling. If you use natural peanut butter, stir it well beforehand and consider reducing the butter slightly to maintain a smooth consistency.
Is it necessary to use powdered sugar instead of granulated sugar?
Powdered sugar dissolves smoothly into the peanut butter mixture, preventing any graininess. Using granulated sugar could leave a gritty texture, so powdered sugar is recommended for that perfect creamy filling.
Can I make these peanut butter cups dairy-free?
Yes! Substitute the butter with a dairy-free margarine or coconut oil, and use dairy-free chocolate chips. This will still give you a delicious creamy texture and decadent chocolate coating.
How long do these peanut butter cups last at room temperature?
Because of the peanut butter and butter in the filling, it’s best to keep these refrigerated. At room temperature, they may soften too much and lose their shape after a couple of hours, especially in warm conditions.
Can I add other flavors to the filling?
Absolutely! Mix in a touch of vanilla extract, a pinch of cinnamon, or even a dash of cayenne for a spicy kick. These tweaks can add a fun twist while keeping the heart of the Creamy Peanut Butter Cups Recipe intact.
Final Thoughts
Making the Creamy Peanut Butter Cups Recipe at home is such a joyful experience, and the results are nothing short of miraculous. With just a few simple ingredients and straightforward steps, you’ll have a batch of irresistible treats that impress every time. Whether you want to spoil yourself, share with loved ones, or whip up a thoughtful gift, this recipe never fails to deliver on flavor and happiness. So dive in, have fun, and get ready to make your new favorite peanut butter indulgence!
Print
Creamy Peanut Butter Cups Recipe
- Prep Time: 10 minutes
- Cook Time: 15 minutes
- Total Time: 35 minutes
- Yield: 12 servings
- Category: Dessert
- Method: No-Cook
- Cuisine: American
Description
This Peanut Butter Cups recipe is a delicious homemade treat that combines rich semi-sweet chocolate with a creamy peanut butter filling. Easy to make and perfect for satisfying your sweet tooth, these cups are ideal as snacks or desserts and require no baking.
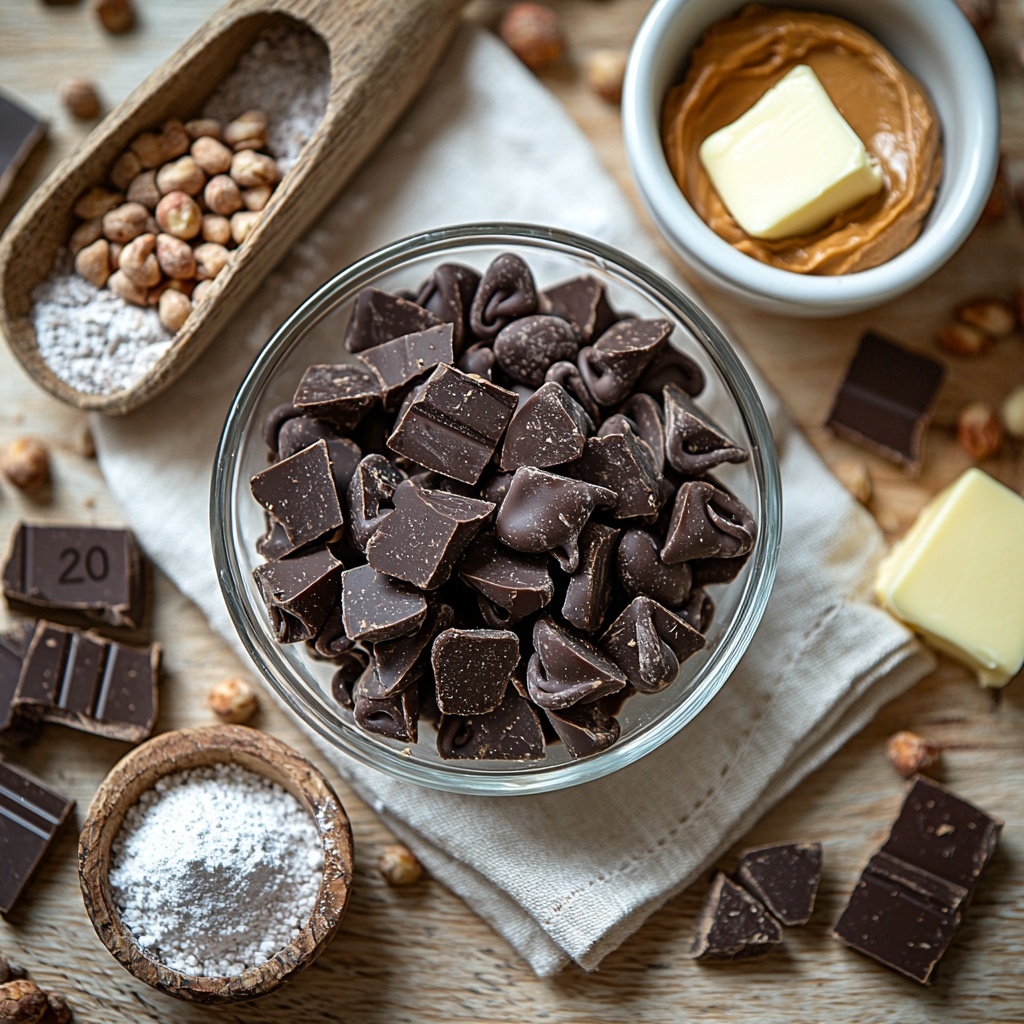
Ingredients
Chocolate Layer
- 14 ounces semi-sweet chocolate chips
Peanut Butter Filling
- 1 cup creamy peanut butter
- 6 tablespoons powdered sugar
- 4 tablespoons butter
Instructions
- Prepare the muffin pan: Line a muffin pan with cupcake liners to prevent sticking and make removal easier.
- Melt first half of chocolate: Place half of the semi-sweet chocolate chips in a microwave-safe bowl and microwave in short intervals until smooth and melted, stirring in between.
- Create chocolate base layer: Spoon the melted chocolate into the cupcake liners to fill them halfway. Place the muffin pan in the freezer for 10-15 minutes until the chocolate hardens.
- Make peanut butter filling: In a separate mixing bowl, combine the creamy peanut butter, powdered sugar, and butter. Mix thoroughly until the mixture is smooth and creamy.
- Add peanut butter layer: Spread the peanut butter mixture evenly over the set chocolate base in each cupcake liner. Return the pan to the freezer and chill for another 10 minutes to firm up the filling.
- Melt remaining chocolate: Melt the remaining semi-sweet chocolate chips in a microwave-safe bowl until smooth.
- Top with chocolate: Pour the melted chocolate over the peanut butter layer, making sure to cover it completely. Return to the freezer to chill for about 30 minutes until the peanut butter cups are fully set.
- Serve and enjoy: Once set, remove the peanut butter cups from the liners and enjoy as a sweet, homemade treat.
Notes
- For best results, use creamy peanut butter for a smoother texture.
- Be careful not to overheat the chocolate when melting to avoid seizing.
- You can substitute powdered sugar with confectioners’ erythritol for a lower sugar version.
- Store the peanut butter cups in the refrigerator or freezer to keep them firm.
- Add a pinch of salt to the peanut butter mixture if you prefer a salty-sweet flavor.

