

If you have a sweet tooth and a love for rich, nutty flavors, this Chocolate Hazelnut No-Bake Truffles Recipe is about to become your new favorite indulgence. These truffles combine the deep creaminess of dark chocolate with the toasty crunch of hazelnuts, all wrapped up in a smooth, luscious bite that requires no oven time at all. Whether you’re looking for a quick homemade treat or an impressive dessert to share at a gathering, these no-bake truffles hit the perfect sweet spot every single time.
Ingredients You’ll Need
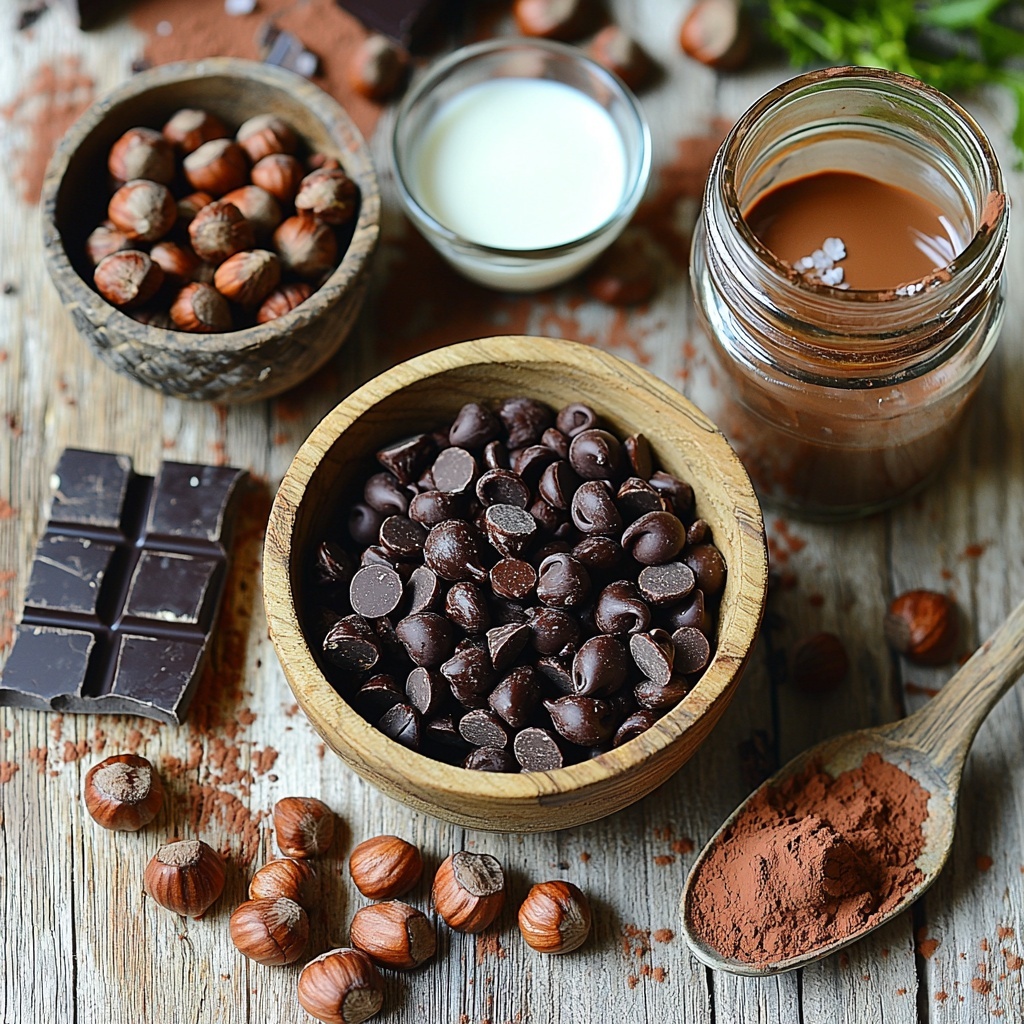
Believe it or not, the magic of these truffles lies in just a handful of simple yet powerful ingredients. Each one plays an important role, from building the rich texture to layering in that irresistible chocolate and nutty flavor.
- Hazelnuts: Toasted and chopped for a crunchy, aromatic bite that balances the sweet chocolate beautifully.
- Dark chocolate chips: The star of the show, providing a deep, intense cocoa flavor that melts effortlessly into the mix.
- Sweetened condensed milk: Adds smoothness and sweetness, binding the mixture into a creamy truffle base.
- Cocoa powder: Enhances chocolate richness and gives a fine dusting for coating if preferred.
- Vanilla extract: A splash of warmth and depth that brightens the overall flavor.
- Salt: Just a pinch to balance sweetness and intensify the chocolate notes.
- Extra cocoa powder or crushed hazelnuts: Perfect for rolling the truffles to add texture and visual appeal.
How to Make Chocolate Hazelnut No-Bake Truffles Recipe
Step 1: Toast the Hazelnuts
Toast your hazelnuts in a dry skillet over medium heat, stirring often for about 5 to 7 minutes until they smell fragrant and look lightly browned. This step is key because it unlocks the nuts’ natural oils and flavor, which perfectly complements the chocolate. Allow them to cool before chopping roughly to keep a satisfying crunch in your truffles.
Step 2: Melt Chocolate and Condensed Milk
In a microwave-safe bowl, stir together your dark chocolate chips and sweetened condensed milk. Heat the mixture in 30-second bursts, stirring in between each session to ensure even melting. This gentle process prevents burning and creates a glossy, smooth chocolate base that’s central to the truffle’s luscious texture.
Step 3: Combine Ingredients
Once melted, stir in the chopped hazelnuts, cocoa powder, vanilla extract, and a pinch of salt. Mixing these elements thoroughly gives the truffles their complex layers of flavor and a perfect balance of sweet, nutty, and chocolatey goodness.
Step 4: Chill the Mixture
Cover the bowl tightly with plastic wrap and pop it in the fridge for 30 minutes to 1 hour. This chilling step firms up the mixture, making it easier and less messy to shape into truffles instead of a sticky challenge.
Step 5: Shape the Truffles
Once the mixture is firm but still pliable, scoop or roll it into small balls roughly one inch in diameter. You can use a cookie scoop for uniformity or just roll with your hands for a delightful homemade touch.
Step 6: Roll in Coating
Roll each truffle in either extra cocoa powder for a rich, velvety finish or crushed hazelnuts for added crunch and a rustic look. This coating not only enhances flavor but offers a delightful texture contrast to the creamy center.
Step 7: Chill Again
Place the rolled truffles on a parchment-lined baking sheet and return them to the refrigerator for another 15 to 20 minutes to set completely. This final chill helps the truffles hold their shape and makes them easier to handle.
Step 8: Ready to Serve
After that last chill, your Chocolate Hazelnut No-Bake Truffles Recipe is ready to be enjoyed. These little bites of heaven are perfect as a quick afternoon pick-me-up or a stunning homemade gift for friends and family.
How to Serve Chocolate Hazelnut No-Bake Truffles Recipe
Garnishes
To elevate your truffles even further, garnish with a delicate dusting of powdered sugar, a sprinkle of crushed pistachios, or a few edible gold flakes for an elegant touch. Garnishes add flair and can complement the flavors you love the most.
Side Dishes
Serve these truffles alongside a cup of freshly brewed espresso or your favorite creamy hot chocolate for a luxurious pairing. They also pair beautifully with fresh berries or a dollop of whipped cream if you want to add a fresh and light contrast to the rich chocolate.
Creative Ways to Present
Get creative by arranging your truffles in decorative paper liners or placing them inside small glass jars tied with ribbon. You could also layer crushed hazelnuts and cocoa in clear containers for a beautiful display at parties or gifting occasions that will wow anyone lucky enough to receive them.
Make Ahead and Storage
Storing Leftovers
Keep your truffles fresh by storing any leftovers in an airtight container in the refrigerator. They will stay perfect for up to one week, maintaining both their flavor and texture so you can enjoy them anytime.
Freezing
If you want to make these truffles well in advance, they freeze wonderfully. Place them in a single layer on a baking sheet to freeze first, then transfer to a sealed freezer-safe container or bag. They can last frozen up to three months and thaw quickly at room temperature.
Reheating
Because this is a no-bake recipe, reheating isn’t necessary—in fact, it’s better to enjoy them cool or at room temperature to keep that decadent texture intact. Just take them out of the fridge or freezer shortly before serving and indulge.
FAQs
Can I use other nuts instead of hazelnuts?
Absolutely! While hazelnuts give a distinctive flavor, almonds, pecans, or walnuts can be delicious alternatives. Just toast them similarly to bring out their flavor before mixing.
Is it possible to make these truffles dairy-free?
You can try substituting the sweetened condensed milk with a dairy-free version, often made from coconut milk, but be aware it might change the texture slightly. Using high-quality dark chocolate that’s dairy-free will also help.
How long do these truffles last at room temperature?
Since these truffles contain dairy, it’s best to keep them refrigerated and only leave them out for short periods when serving. At room temperature, they may soften and lose shape quickly.
Can I add other flavors to the truffles?
Definitely! A splash of espresso, a pinch of cinnamon, or even a dash of chili powder can add exciting flavor twists. Just mix them in with the other ingredients before chilling.
What’s the best way to achieve a smooth texture?
Melting the chocolate gently and stirring well with the sweetened condensed milk ensures a silky texture. Also, don’t skip the chilling steps—they’re crucial to getting that ideal consistency for shaping.
Final Thoughts
Trust me when I say the Chocolate Hazelnut No-Bake Truffles Recipe is a total game changer. Easy enough for a last-minute treat yet impressive enough to share with friends and family, it brings together amazing flavors and textures in every bite. Give this recipe a try—you’ll end up with a batch of irresistibly delicious truffles that you just won’t be able to stop eating!
Print
Chocolate Hazelnut No-Bake Truffles Recipe
- Prep Time: 20 minutes
- Cook Time: 0 minutes
- Total Time: 50 to 70 minutes
- Yield: About 20 truffles
- Category: Dessert
- Method: No-Cook
- Cuisine: International
Description
Chocolate Hazelnut No-Bake Truffles are a decadent and easy-to-make treat combining toasted hazelnuts, rich dark chocolate, and creamy condensed milk. These bite-sized delights are coated with cocoa powder or crushed hazelnuts, offering a perfect balance of nutty crunch and smooth chocolate flavor without any baking required.
Ingredients
Truffle Mixture
- 1 cup hazelnuts, toasted and chopped
- 1 cup dark chocolate chips
- ½ cup sweetened condensed milk
- 1 tablespoon cocoa powder
- 1 teaspoon vanilla extract
- A pinch of salt
Coating
- Extra cocoa powder or crushed hazelnuts for rolling
Instructions
- Toast Hazelnuts: Heat a dry skillet over medium heat and toast the hazelnuts for about 5-7 minutes, stirring frequently until fragrant. Remove from heat and allow them to cool completely before chopping.
- Melt Chocolate: In a microwave-safe bowl, combine the dark chocolate chips and sweetened condensed milk. Microwave in 30-second intervals, stirring between each, until melted and smooth.
- Combine Ingredients: Add the chopped hazelnuts, cocoa powder, vanilla extract, and a pinch of salt to the melted chocolate mixture. Stir thoroughly to create a uniform blend.
- Chill Mixture: Cover the bowl with plastic wrap and refrigerate for 30 minutes to 1 hour, or until the mixture is firm enough to handle.
- Shape Truffles: Use a small cookie scoop or your hands to form the chilled mixture into small balls about 1 inch in diameter.
- Roll in Coating: Evenly coat each truffle by rolling it in extra cocoa powder or crushed hazelnuts. Arrange them on a parchment-lined baking sheet.
- Chill Again: Place the coated truffles back in the refrigerator for an additional 15-20 minutes to set completely.
- Serve: Once fully set, serve the Chocolate Hazelnut No-Bake Truffles and enjoy their rich and nutty flavor.
Notes
- Ensure hazelnuts are completely cool before chopping to avoid melting the chocolate mixture prematurely.
- You can substitute dark chocolate chips with semi-sweet or milk chocolate depending on preference.
- Store truffles in an airtight container in the refrigerator for up to one week.
- For a vegan version, replace sweetened condensed milk with a plant-based condensed milk alternative.
- Use parchment paper to prevent truffles from sticking to the baking sheet.

