
If you are craving a crowd-pleasing appetizer that combines savory, melty cheese with the irresistible saltiness of prosciutto, then this Crispy Prosciutto and Cheese Sliders Recipe is your new best friend. Picture soft slider rolls layered with thinly sliced prosciutto and a blend of provolone and mozzarella cheeses, all baked to golden, crispy perfection with a buttery, garlicky, and slightly tangy topping. These sliders are bursting with flavor and texture, making them perfect for game day, parties, or any time you want an easy but unforgettable snack.

Ingredients You’ll Need
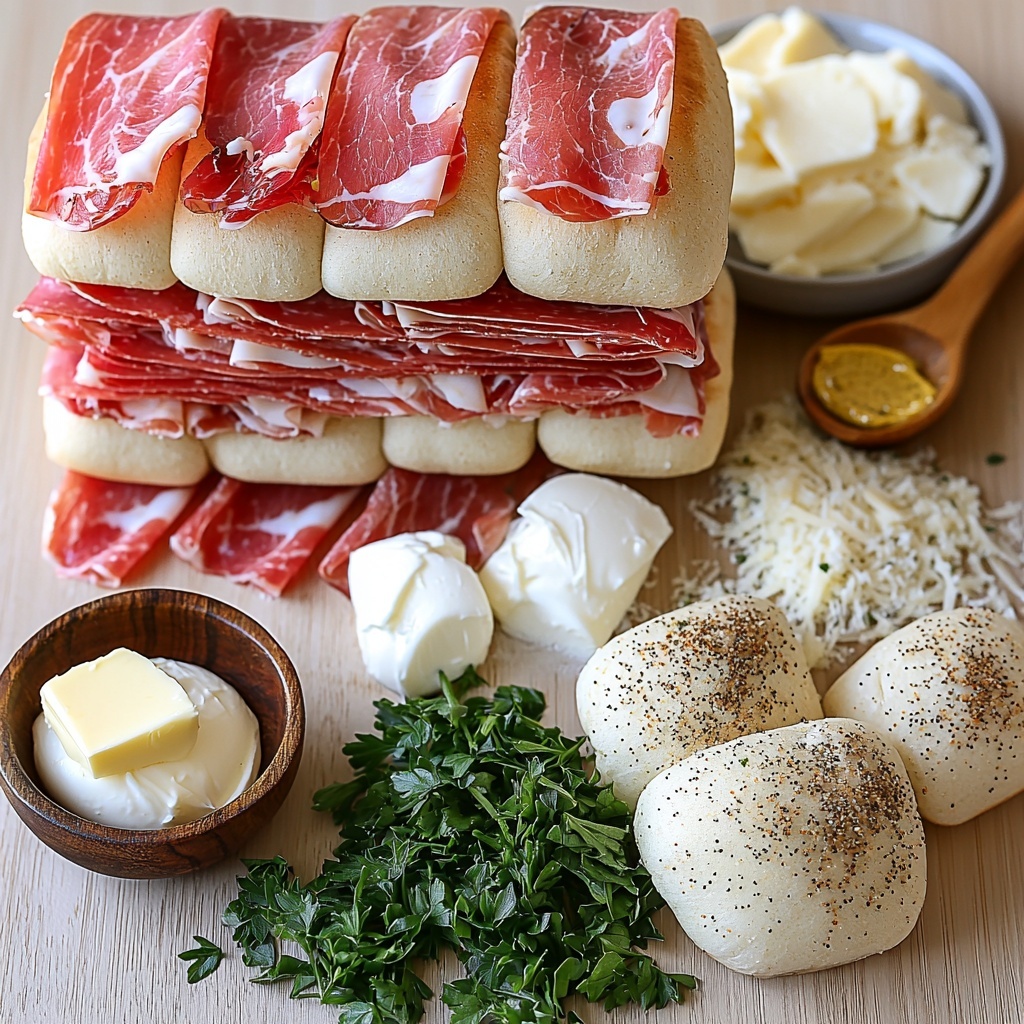
Gathering simple yet flavorful ingredients is the secret to making these sliders shine. Each component plays a role in balancing taste, texture, and color to elevate this recipe beyond ordinary sandwiches.
- 12 slider rolls connected: Soft and fluffy, they hold all the fillings beautifully and provide the perfect bite-size base.
- 6 ounces thinly sliced prosciutto: Delivers a salty, delicate ham flavor and crisps up wonderfully when baked.
- 8 slices provolone cheese: Melts smoothly, adding a mild, tangy richness to contrast the prosciutto.
- 4 slices mozzarella cheese: Brings a creamy, gooey texture that harmonizes with the provolone.
- 1/4 cup unsalted butter melted: Adds luscious moisture and helps to crisp the tops with a golden finish.
- 1 tablespoon Dijon mustard: Introduces a subtle zing that cuts through the richness.
- 1 teaspoon garlic powder: Infuses every bite with garlicky warmth without overpowering.
- 1 teaspoon dried Italian seasoning: Provides herby, aromatic notes that tie the flavors together beautifully.
- 1 tablespoon grated Parmesan cheese: Sprinkled on top for savory depth and a delightful crust.
- 1 tablespoon chopped fresh parsley (optional): Adds a fresh pop of color and flavor for garnish.
How to Make Crispy Prosciutto and Cheese Sliders Recipe
Step 1: Prep the Rolls and Layer the Prosciutto and Cheese
Start by preheating your oven to 350°F. Carefully slice the connected slab of 12 slider rolls in half horizontally without separating the individual rolls. Place the bottom half in a greased 9×13-inch baking dish so it fits snugly. Then, layer the thinly sliced prosciutto evenly over the rolls, ensuring full coverage. Follow this with a generous layer of provolone and mozzarella cheese slices, making sure to cover every roll. Finally, place the top half of the rolls back on to form a complete sandwich slab.
Step 2: Mix and Apply the Flavorful Topping
In a small bowl, whisk together the melted unsalted butter, Dijon mustard, garlic powder, and dried Italian seasoning. This mixture is key to adding that crispy, flavorful crust. Brush the topping evenly over the entire surface of the top slider rolls. The butter helps everything crisp up beautifully while the mustard and seasonings deliver a burst of flavor with every bite.
Step 3: Add Parmesan and Bake
Sprinkle the grated Parmesan cheese evenly on top of the butter mixture. This will melt and crisp in the oven, forming a golden, irresistible crust. Cover the baking dish loosely with foil to prevent the tops from burning during the initial baking stage. Bake for 10 minutes to allow the cheese to melt and the sliders to warm through.
Step 4: Finish Baking Until Crispy and Melted
After 10 minutes, remove the foil to expose the tops. Continue baking for an additional 8 to 10 minutes, or until the tops are golden brown and crispy, and the cheese inside has melted completely. For an extra crispy finish, you can leave the sliders uncovered for the final few minutes. Once done, garnish with the optional chopped fresh parsley to add a lovely touch of green and freshness.
How to Serve Crispy Prosciutto and Cheese Sliders Recipe
Garnishes
Garnishing your sliders with freshly chopped parsley not only brightens the appearance but also adds a subtle herbal note that complements the rich cheeses and prosciutto. You can also add a sprinkle of extra Parmesan or a drizzle of balsamic glaze for a sophisticated twist.
Side Dishes
Serve these sliders alongside a crisp green salad or some tangy coleslaw to balance their richness. They also pair wonderfully with crunchy vegetable sticks and a refreshing dip, creating a complete spread that will keep everyone coming back for more.
Creative Ways to Present
For parties, keep the slider slab intact and cut just before serving for neat, even portions. You can also serve them on a wooden board with small condiment bowls featuring mustard, aioli, or marinara sauce for dipping. Wrapping each slider individually in parchment paper or placing toothpicks in them makes grabbing and enjoying easy for guests on the go.
Make Ahead and Storage
Storing Leftovers
If you have any leftovers, store the slider slab or individual pieces in an airtight container in the refrigerator for up to 3 days. They remain moist and delicious but the crust may lose a bit of its crispness. Reheat gently to bring back melted cheese goodness.
Freezing
These sliders freeze well if wrapped tightly in plastic wrap and then aluminum foil to prevent freezer burn. Frozen sliders can be stored for up to 2 months. To enjoy, thaw completely in the refrigerator before reheating as directed below.
Reheating
Reheat sliders in the oven at 350°F for about 10 minutes covered with foil to warm through without drying out. For that crispy top once again, remove the foil during the last 3 minutes of reheating. Avoid microwaving as it tends to make the slider rolls soggy.
FAQs
Can I use different types of cheese in this recipe?
Absolutely! While provolone and mozzarella create a perfect creamy blend, feel free to experiment with Swiss, fontina, or even cheddar for a unique flavor profile. Just choose cheeses that melt well for best results.
Is prosciutto the only meat option for these sliders?
Prosciutto’s delicate saltiness works beautifully here, but you can swap it with thinly sliced ham, salami, or even turkey if preferred. Keep the slices thin and flavorful for the best texture and taste.
Can I prepare these sliders in advance?
Yes! Assemble the sliders and keep them covered in the refrigerator for up to 6 hours before baking. This makes them an ideal dish to prep before guests arrive and bake just before serving.
How do I get the tops of the sliders extra crispy?
Remove the foil during the last 8 to 10 minutes of baking, or extend the uncovered baking time slightly. Brushing the tops with the butter and mustard mixture before adding Parmesan helps them brown and crisp up perfectly.
Are these sliders suitable for kids?
Many kids love melty cheese and soft bread, making these sliders a great option. If your kids are sensitive to strong flavors, consider reducing the garlic powder or substituting Dijon mustard with a milder spread.
Final Thoughts
Now you have a recipe that is as easy to prepare as it is delicious to eat—this Crispy Prosciutto and Cheese Sliders Recipe is bound to become your go-to for gatherings big and small. The combo of melted cheeses, crispy prosciutto, and buttery, seasoned tops is simply irresistible. So grab those slider rolls, invite some friends, and dig into these warm, satisfying bites that everyone will adore.
Print
Crispy Prosciutto and Cheese Sliders Recipe
- Prep Time: 10 minutes
- Cook Time: 20 minutes
- Total Time: 30 minutes
- Yield: 12 sliders
- Category: Appetizer
- Method: Baking
- Cuisine: Italian American
Description
These Crispy Prosciutto and Cheese Sliders combine layers of tender prosciutto and gooey melted cheese inside soft slider rolls, topped with a flavorful seasoned butter and baked to golden perfection. Perfect as a party appetizer or a savory snack, these sliders offer a delightful blend of Italian-American flavors with a crispy, cheesy finish.
Ingredients
Sliders
- 12 slider rolls connected
- 6 ounces thinly sliced prosciutto
- 8 slices provolone cheese
- 4 slices mozzarella cheese
Butter Topping
- 1/4 cup unsalted butter, melted
- 1 tablespoon Dijon mustard
- 1 teaspoon garlic powder
- 1 teaspoon dried Italian seasoning
- 1 tablespoon grated Parmesan cheese
Garnish
- 1 tablespoon chopped fresh parsley (optional)
Instructions
- Preheat Oven: Preheat your oven to 350°F (175°C) to prepare for baking the sliders.
- Prepare Rolls: Without separating the rolls, slice the entire slab horizontally in half to create a top and bottom section. Place the bottom half inside a greased 9×13-inch baking dish to form the base layer.
- Layer Fillings: Evenly layer the thinly sliced prosciutto over the bottom rolls, then cover the prosciutto with the provolone and mozzarella cheese slices to ensure the cheese fully covers the meat.
- Add Top Rolls: Place the top half of the slider rolls back onto the cheese, forming the sandwich layers.
- Make Butter Mixture: In a small bowl, whisk together the melted butter, Dijon mustard, garlic powder, and dried Italian seasoning until well combined.
- Brush Rolls: Evenly brush the butter mixture over the tops of the slider rolls, then sprinkle grated Parmesan cheese over the buttered surface for added flavor and crispness.
- Bake Covered: Cover the baking dish loosely with foil and bake for 10 minutes to allow the cheese to melt and flavors to meld.
- Bake Uncovered: Remove the foil and continue baking for an additional 8 to 10 minutes or until the tops are golden brown, crispy, and the cheese is bubbly and fully melted.
- Garnish and Serve: Optionally sprinkle chopped fresh parsley over the top for a fresh herbal note. Allow the sliders to cool slightly, then cut into individual portions and serve warm.
Notes
- For extra crispiness, bake uncovered during the final minutes until the tops reach a deep golden color.
- Swiss or fontina cheese can be substituted for a different flavor profile.
- These sliders are ideal for parties, game days, or holiday gatherings as a convenient and crowd-pleasing appetizer.


