

If you’re looking to elevate your cake presentation with something simple yet stunning, the Chocolate Ganache Drip for Cakes Recipe is an absolute game-changer. This luscious, glossy ganache cascades beautifully down the sides of any cake, adding a professional finish that tastes as incredible as it looks. Whether you’re a seasoned baker or just getting started, this recipe brings richness, shine, and an irresistible chocolate hit that will have everyone asking for seconds. Get ready to transform your desserts into showstoppers with this easy and adaptable technique!
Ingredients You’ll Need
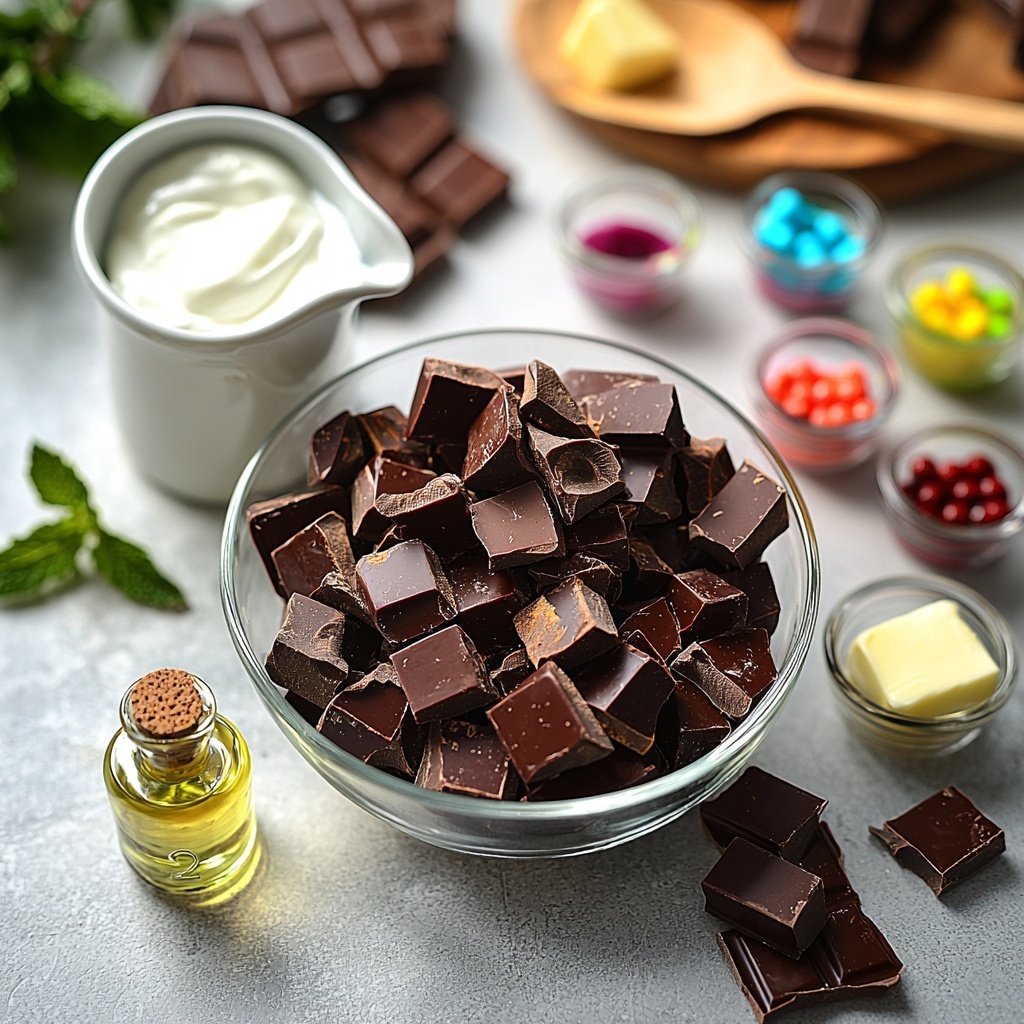
This recipe calls for just a handful of ingredients that work together perfectly to create a glossy, smooth chocolate ganache. Each one plays a crucial role—from the creamy texture to the shiny finish, every component counts in achieving that flawless drip effect.
- 8 oz semi-sweet or dark chocolate (chopped): This is the main flavor powerhouse; chopping finely helps it melt evenly and quickly.
- ½ cup heavy cream: Provides the rich, silky texture that makes the ganache pourable and glossy.
- 1 tablespoon unsalted butter (optional): Adds an extra shine and silky mouthfeel to the ganache.
- 1 teaspoon vanilla extract (optional): Enhances the chocolate with a subtle depth of flavor.
- Food coloring (optional): For those creative moments when you want colorful drips instead of classic chocolate tones.
How to Make Chocolate Ganache Drip for Cakes Recipe
Step 1: Chop the Chocolate
Start by chopping your semi-sweet or dark chocolate into small, even pieces. This step might seem simple, but it ensures the chocolate melts smoothly without any lumps, which is essential for a perfect drip.
Step 2: Heat the Cream
Next, gently heat the heavy cream in a small saucepan over medium heat, watching carefully until it just starts to simmer. It’s important not to let it boil, as overheating can affect the texture of your ganache.
Step 3: Combine Chocolate and Cream
Pour the hot cream over the chopped chocolate and let it rest for 2 to 3 minutes. This allows the chocolate to soften up, setting the stage for a silky smooth mixture.
Step 4: Stir Until Smooth
Using a spatula, stir the chocolate and cream gently but thoroughly until you achieve a shiny, smooth ganache. If you are adding butter for extra shine, fold it in now to give the ganache a beautiful glossy finish.
Step 5: Add Flavor and Color
If you want to add a touch of vanilla or create vibrant colored drips, stir in the vanilla extract and your chosen food coloring drops until perfectly blended. This step is where you can personalize the ganache to match your cake’s style or flavor profile.
Step 6: Cool Slightly
Let the ganache sit for about 5 to 10 minutes so it thickens just enough to drip down the sides of the cake without running off entirely. It should still be pourable but not too thin.
Step 7: Prepare the Cake
Make sure your cake is well chilled and placed on a wire rack or plate to catch any excess ganache. A cold cake helps the ganache set quickly as it drips, creating crisp, beautiful edges.
Step 8: Drip the Chocolate
Using a spoon or a squeeze bottle, carefully drizzle the ganache around the cake edges, letting it drip naturally down the sides. Then pour the remaining ganache over the top and gently spread it to cover evenly.
Step 9: Set the Drip
Place your cake into the refrigerator for at least 30 minutes. This chilling step helps the ganache solidify, locking in those gorgeous drips.
Step 10: Decorate
Once the ganache has set, feel free to add sprinkles, fresh fruits, edible flowers, or whipped cream for extra visual interest and flavor. Your cake is now ready to impress!
How to Serve Chocolate Ganache Drip for Cakes Recipe
Garnishes
Adding garnishes to your ganache drip cake takes it to the next level. Fresh berries like raspberries or strawberries complement the richness of the chocolate perfectly, while edible gold leaf or sprinkles add a festive sparkle. Nuts or chocolate shavings are also wonderful for texture and contrast.
Side Dishes
Serve your ganache-dripped cake with a scoop of vanilla ice cream, a dollop of whipped cream, or a fresh fruit salad to balance out the decadence. A lightly brewed coffee or tea can also be an excellent pairing to cleanse the palate and highlight the chocolate’s intensity.
Creative Ways to Present
Beyond traditional round cakes, use this Chocolate Ganache Drip for Cakes Recipe on cupcakes, donuts, or even layered bars. Play with piping colorful drips or layering the ganache to create an ombré effect. For a wow factor, try marbling white and dark chocolate for a stunning visual contrast.
Make Ahead and Storage
Storing Leftovers
If you have extra ganache after decorating, store it in an airtight container in the refrigerator for up to a week. Before using leftovers, bring it back to room temperature and stir gently until smooth.
Freezing
Ganache can be frozen for longer storage. Freeze in a sealed container for up to 3 months. Thaw overnight in the refrigerator and rewarm gently to restore its original silky texture.
Reheating
To reheat ganache, warm it slowly in a heatproof bowl over a pot of simmering water or microwave in short bursts, stirring frequently to prevent scorching. This will bring the ganache back to a pourable, glossy finish perfect for drips or glazing.
FAQs
Can I use milk or white chocolate for the ganache drip?
Absolutely! Milk and white chocolate both work well for ganache drips, though white chocolate tends to be sweeter and requires careful melting since it can seize easily. Adjust the cream quantity slightly if needed to maintain the right consistency.
What if my ganache is too thick or too thin?
If the ganache is too thick, gently reheat it or stir in a small amount of warm cream to loosen it. If too thin, let it cool for a few more minutes to thicken before dripping it on your cake.
Can I make the Chocolate Ganache Drip for Cakes Recipe dairy-free?
Yes! Substitute heavy cream with full-fat coconut milk or a dairy-free cream alternative. Use dairy-free chocolate to keep it completely vegan and dairy-free.
How do I get smooth, even drips every time?
The key is to have the right temperature and consistency. The ganache should be slightly thick but still pourable. Use a squeeze bottle or a spoon and work slowly, allowing gravity to create natural drips.
Can I add flavors other than vanilla?
Definitely! You can experiment with almond extract, coffee, liqueurs, or even spices like cinnamon. Just add these sparingly during the flavoring step to complement the chocolate without overpowering it.
Final Thoughts
There’s nothing quite like the joy of watching silky, glossy chocolate ganache drip down the sides of a beautifully decorated cake, and this Chocolate Ganache Drip for Cakes Recipe makes it so easy to achieve that magical effect. Whether you’re dressing up a birthday cake or adding a finishing touch to a special celebration, this recipe is sure to become one of your go-to secrets. So go ahead, grab your ingredients, and get ready to wow your friends and family with irresistible chocolate perfection!
Print
Chocolate Ganache Drip for Cakes Recipe
- Prep Time: 15 minutes
- Cook Time: 0 minutes
- Total Time: 45 minutes
- Yield: Enough chocolate drip for one 8-10 inch cake
- Category: Dessert Decoration
- Method: No-Cook
- Cuisine: International
Description
Learn how to create a stunning and glossy chocolate drip to elevate your cakes and desserts with this simple, quick recipe featuring a smooth ganache made from semi-sweet or dark chocolate and heavy cream.
Ingredients
Chocolate Ganache
- 8 oz semi-sweet chocolate or dark chocolate, chopped
- ½ cup heavy cream
- 1 tablespoon unsalted butter (optional, for shine)
- 1 teaspoon vanilla extract (optional)
- Food coloring (optional, for colored drips)
Instructions
- Chop the Chocolate: Finely chop the semi-sweet or dark chocolate and place it in a heatproof bowl to prepare it for melting.
- Heat Cream: In a small saucepan, heat the heavy cream over medium heat until it just begins to simmer, then immediately remove from heat to avoid boiling.
- Combine Chocolate and Cream: Pour the hot cream over the chopped chocolate and allow it to sit for 2-3 minutes so the chocolate softens properly.
- Stir Until Smooth: Stir the mixture gently until the chocolate ganache becomes smooth and glossy; add butter at this point if using, to enhance shine.
- Add Flavoring: Mix in vanilla extract for extra flavor and add a few drops of food coloring if you want colored drips, stirring until evenly combined.
- Cool Slightly: Let the ganache cool for 5-10 minutes until it thickens slightly but remains pourable for easy dripping.
- Prepare the Cake: Ensure your cake is well chilled and set it on a wire rack or plate to catch any excess ganache drips.
- Drip the Chocolate: Using a spoon or squeeze bottle, carefully drizzle the ganache around the cake edges to create drips, then pour extra ganache on top and spread gently with a spatula for a smooth finish.
- Set the Drip: Refrigerate the cake for about 30 minutes to allow the chocolate drip to set firmly before serving.
- Decorate: Once set, decorate with sprinkles, fruits, or whipped cream as desired to complete your masterpiece.
Notes
- Use a wire rack and plate underneath to catch drips and keep your workspace clean.
- Adjust the consistency by cooling longer if the ganache is too runny or gently reheating if too thick.
- For a glossy finish, adding butter is optional but recommended.
- You can customize color by adding food coloring to the ganache before dripping.
- Make sure the cake is well chilled before applying the drip to control the flow and set the ganache quickly.
