

If you’re craving a dessert that feels like a warm hug in every bite, you’ve got to try this Strawberry Oatmeal Crumble Bars Recipe. These bars are a perfect balance of sweet, tangy strawberries nestled between a buttery oat crust and a crispy crumble topping. With simple pantry ingredients coming together to create layers of texture and flavor, this treat is both comforting and irresistibly fresh. Whether you want a bake to share or a snack to brighten your day, these bars deliver that homemade goodness with ease and charm.
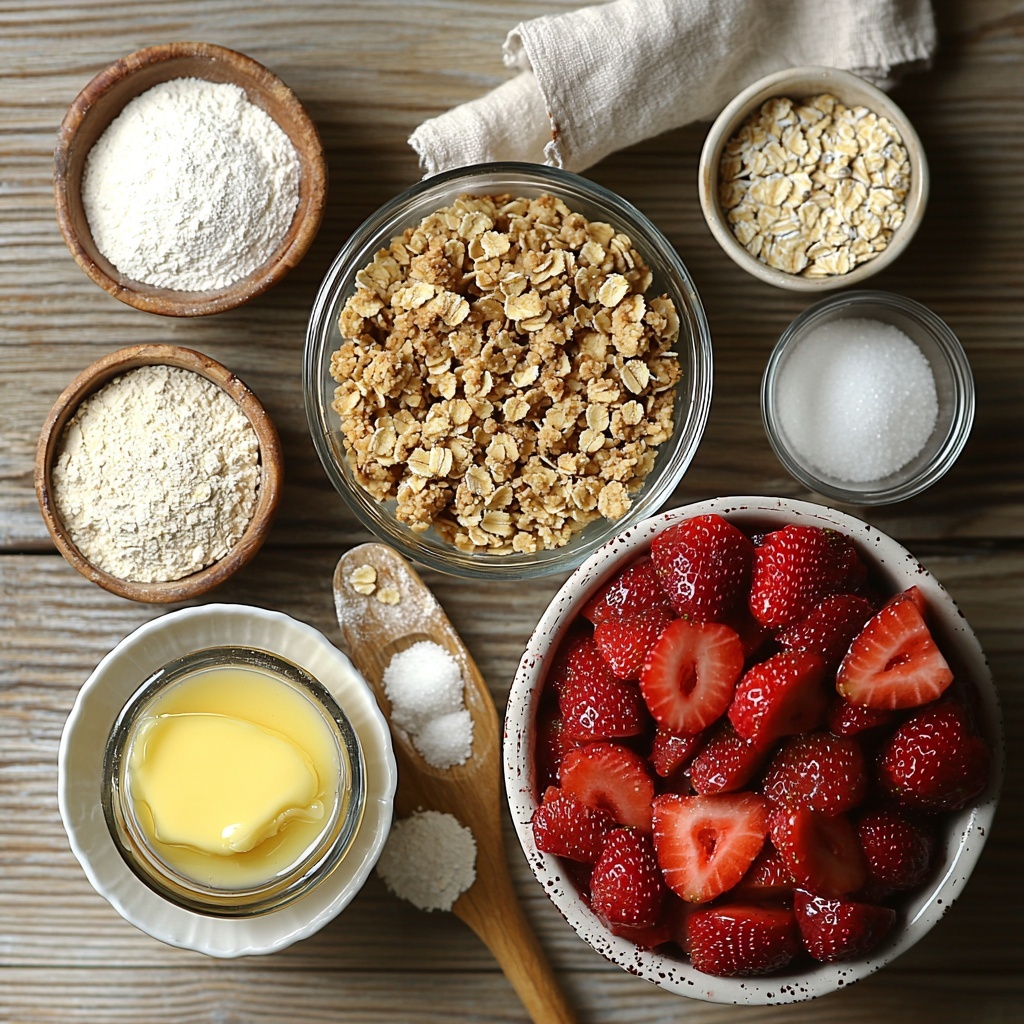
Ingredients You’ll Need
Trust me, the magic of this Strawberry Oatmeal Crumble Bars Recipe lies in its straightforward ingredients. Each one plays a vital role in delivering that perfect harmony of taste, texture, and color — from the golden buttery crust to the vibrant strawberry filling and the crunchy crumble topping.
- Unsalted butter (1/2 cup, melted): Provides richness and helps bind the crust and topping to perfection.
- All-purpose flour (1 cup): The base for the crust and crumble, giving structure without overpowering.
- Old-fashioned oats (3/4 cup): Adds wholesome texture and delightful chewiness to every bite.
- Granulated sugar (1/2 cup + 1/3 cup for filling): Sweetens both the crust and the strawberry filling just right.
- Light brown sugar (1/4 cup, packed): Brings a slight caramel note that deepens the crumble’s flavor.
- Salt (1/2 teaspoon or to taste): Enhances all the flavors and balances the sweetness.
- Fresh strawberries (2 cups, coarsely chopped): The star ingredient — juicy, fragrant, and bursting with natural sweetness.
- Lemon juice (2 tablespoons): Adds brightness and cuts through the richness for a perfectly balanced filling.
- Cornstarch (2 teaspoons): Thickens the strawberry filling so it stays put without getting soggy.
How to Make Strawberry Oatmeal Crumble Bars Recipe
Step 1: Prepare Your Pan and Ingredients
Start by preheating your oven to 350°F. Line an 8-inch square pan with aluminum foil for easy removal later, then give it a light spray with cooking spray. This simple prep ensures your bars come out clean and intact. While the oven warms, gather and measure out all your ingredients for a smooth baking flow.
Step 2: Melt Butter and Mix Crust
Pop your butter into the microwave for about one minute until melted and warm. Then, combine it in a bowl with the flour, oats, both sugars, and salt. Stir until everything is evenly mixed to form a crumbly, sandy texture. Set aside about one heaping cup of this mixture — this will become your heavenly crumble topping later.
Step 3: Press the Crust
Take the remaining oat mixture and firmly press it into the bottom of your prepared pan. This forms the sturdy, buttery base that supports the juicy strawberry layer. Pressing it evenly helps create a crust that holds together beautifully without falling apart.
Step 4: Make the Strawberry Filling
In a fresh bowl, toss the coarsely chopped strawberries with the extra granulated sugar, lemon juice, and cornstarch. This combination balances natural sweetness with tartness and thickens the filling so it’s not runny. Spread this luscious strawberry mixture evenly over the crust, making sure to reach every corner for fruity goodness in every slice.
Step 5: Add the Oatmeal Crumble Topping
Now sprinkle that reserved crumbly oat mixture over the strawberries. Don’t be shy — the thicker the topping, the more satisfying the crunch. This topping will bake into a golden, crispy layer that contrasts perfectly with the soft strawberries underneath.
Step 6: Bake to Golden Perfection
Slide your pan into the hot oven and bake for 30 to 35 minutes. You’ll know it’s done when the crumble topping is gloriously golden brown and the strawberry filling is bubbling around the edges. Let the bars cool completely in the pan — this helps the filling set up so you get neat, delicious bars when slicing.
How to Serve Strawberry Oatmeal Crumble Bars Recipe
Garnishes
These bars are lovely on their own, but for an extra special touch, garnish with a dusting of powdered sugar or a dollop of freshly whipped cream. A few fresh strawberry slices on top add a pop of color that makes them look as inviting as they taste.
Side Dishes
Pair your bars with a scoop of vanilla ice cream or a spoonful of Greek yogurt for a bit of creaminess that complements the crumbly texture and fruity filling. A warm cup of tea or coffee also makes for a cozy companion to this delightful treat.
Creative Ways to Present
If you want to impress at your next brunch or party, cut the bars into smaller bite-sized squares and arrange them on a pretty platter with fresh mint leaves. You can also drizzle a little melted white chocolate on top for a decadent flair that will have everyone asking for your Strawberry Oatmeal Crumble Bars Recipe.
Make Ahead and Storage
Storing Leftovers
These bars keep wonderfully in an airtight container at room temperature for up to two days. For longer keeping, refrigerate them and enjoy within five days to maintain freshness and texture. Just make sure they’re covered well to prevent drying out.
Freezing
Strawberry Oatmeal Crumble Bars Recipe is freezer-friendly! Wrap individual bars tightly in plastic wrap and place them in a freezer-safe bag or container. You can freeze them for up to three months — perfect for a make-ahead treat or an emergency sweet fix.
Reheating
When you want to enjoy a bar, thaw it overnight in the fridge and warm it slightly in the microwave or oven. Heating for about 15 to 20 seconds in the microwave or 5 minutes at 350°F in the oven brings back that fresh-from-the-oven magic without sacrificing the crumbly texture or juicy filling.
FAQs
Can I use frozen strawberries instead of fresh?
Absolutely! Frozen strawberries can work well in this Strawberry Oatmeal Crumble Bars Recipe. Just make sure to thaw and drain them well to avoid excess moisture, which can make the filling too runny.
Is it possible to make these bars gluten-free?
Yes! Substitute the all-purpose flour with a gluten-free flour blend, and ensure your oats are certified gluten-free. This way, you can enjoy the deliciousness without any gluten concerns.
Can I substitute the butter with a dairy-free alternative?
Definitely. You can swap the unsalted butter with coconut oil or a plant-based margarine to make these bars vegan-friendly. The texture and flavor might shift slightly, but the bars will still be delightful.
How thick should I press the crust?
Press it firmly but evenly until it’s about half an inch thick across the pan. This ensures a sturdy base that supports the filling without being too dense or crumbly.
Can I use other fruits for the filling?
Yes, this crumble recipe is versatile. Blueberries, raspberries, or even chopped peaches would be fantastic swaps or blends with strawberries, giving you a new twist on the classic Strawberry Oatmeal Crumble Bars Recipe.
Final Thoughts
There’s something so comforting and satisfying about a homemade Strawberry Oatmeal Crumble Bars Recipe. It’s that wonderful blend of textures, the burst of fresh strawberry flavor, and the nostalgic oat crumble that keeps me coming back for more. Whether you’re an experienced baker or just starting out, this recipe is straightforward, delicious, and sure to become a favorite in your kitchen — so go ahead and bake a batch today!
Print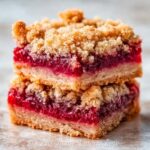
Strawberry Oatmeal Crumble Bars Recipe
- Prep Time: 10 minutes
- Cook Time: 35 minutes
- Total Time: 45 minutes
- Yield: 16 bars
- Category: Dessert
- Method: Baking
- Cuisine: American
Description
These Strawberry Oatmeal Crumble Bars combine a buttery oat crust and crumble topping with a fresh, sweet strawberry filling. Perfect for a snack or dessert, they offer a delicious balance of tart and sweet flavors with a satisfying crunchy texture.
Ingredients
Crust and Topping
- 1/2 cup unsalted butter (melted)
- 1 cup all-purpose flour
- 3/4 cup old-fashioned oats
- 1/2 cup granulated sugar
- 1/4 cup light brown sugar (packed)
- 1/2 teaspoon salt (or to taste)
Strawberry Filling
- 2 cups coarsely chopped fresh strawberries
- 1/3 cup granulated sugar
- 2 tablespoons lemon juice
- 2 teaspoons cornstarch
Instructions
- Preheat and Prepare Pan: Preheat your oven to 350°F (175°C). Line an 8-inch square baking pan with aluminum foil and lightly spray it with cooking spray to prevent sticking.
- Melt Butter: Melt the unsalted butter in a microwave-safe bowl for about 1 minute until fully melted and slightly warm.
- Mix Crust and Topping: In a medium bowl, combine the melted butter, all-purpose flour, old-fashioned oats, granulated sugar, light brown sugar, and salt. Stir until fully combined. Set aside about one heaping cup of this mixture for the crumb topping.
- Form Crust: Press the remaining oat mixture evenly into the bottom of the prepared pan to create a firm crust layer.
- Prepare Strawberry Filling: In a separate bowl, mix together the coarsely chopped strawberries, 1/3 cup granulated sugar, lemon juice, and cornstarch until the strawberries are well coated.
- Assemble Bars: Pour the strawberry filling evenly over the crust in the pan. Then crumble the reserved oat mixture evenly over the strawberry layer to form the crumble topping.
- Bake: Place the pan in the preheated oven and bake for 30 to 35 minutes, or until the topping is golden brown and the filling is bubbling at the edges.
- Cool and Serve: Remove from the oven and allow the bars to cool completely in the pan before slicing into 16 squares. This helps the filling set and makes slicing easier.
Notes
- Use fresh, ripe strawberries for the best flavor.
- You can substitute frozen strawberries, but thaw and drain excess liquid before using.
- The bars are best served at room temperature or slightly chilled.
- Store leftovers covered in the refrigerator for up to 4 days.
- For a gluten-free version, substitute all-purpose flour with gluten-free flour blend.


