

If you have a sweet tooth and love the classic combo of chocolate and peanut butter, you are in for a treat with this Homemade Reese’s Peanut Butter Cups Recipe. This delightful dessert captures all the rich, creamy goodness of a Reese’s cup but with the satisfaction of making it yourself from scratch. The balance of velvety peanut butter and luscious melted chocolate creates a bite-sized indulgence that’s perfect for sharing or keeping all to yourself. Once you try this recipe, you’ll see how easy it is to whip up these irresistible treats that everyone will adore.
Ingredients You’ll Need
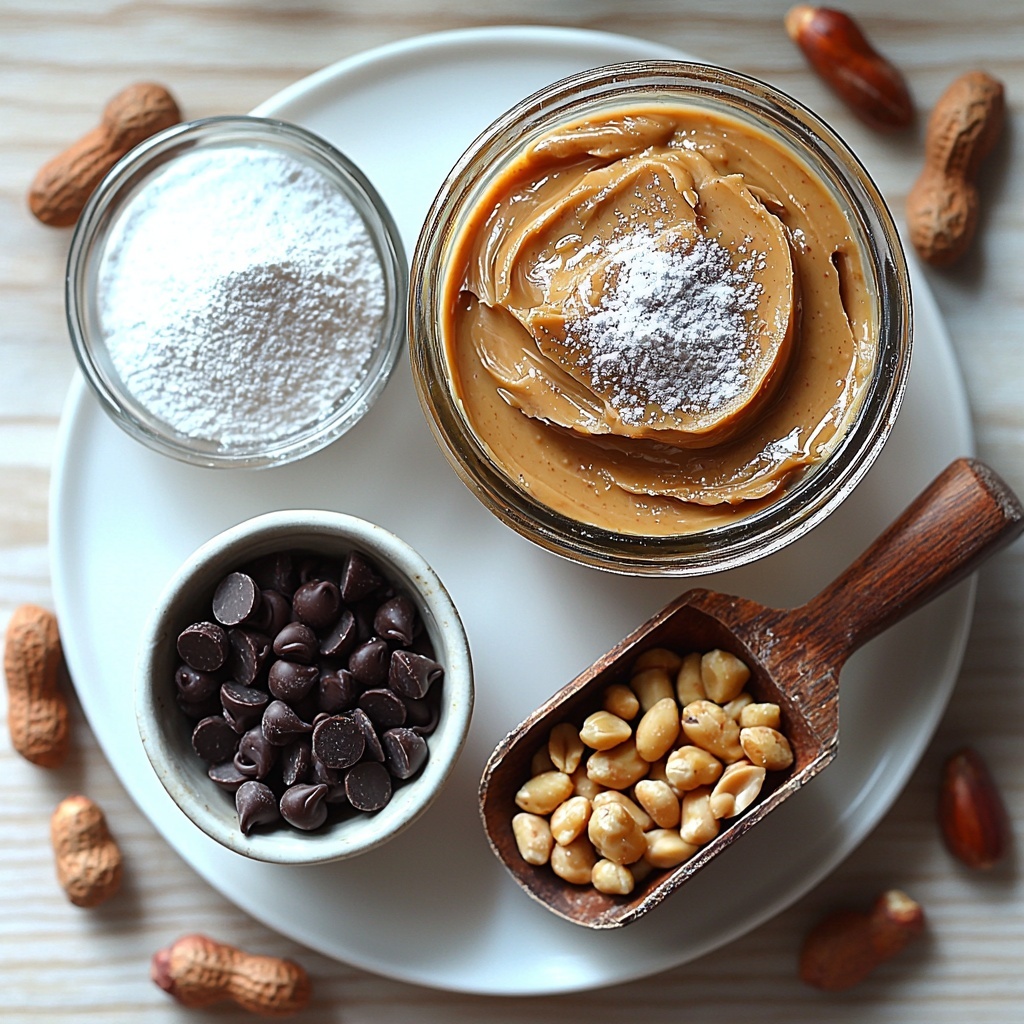
Getting the ingredients right is key to nailing that perfect texture and flavor balance in your Homemade Reese’s Peanut Butter Cups Recipe. These simple essentials come together to create a harmony of creamy peanut butter and smooth chocolate that feels both nostalgic and luxurious.
- 1 cup creamy peanut butter: Choose a smooth variety for the creamiest filling that melts in your mouth.
- 1/4 cup powdered sugar: Adds just the right hint of sweetness and helps thicken the peanut butter layer.
- 1/2 teaspoon vanilla extract: Enhances all the flavors with a subtle sweet aroma.
- 1 1/2 cups chocolate chips: The foundation of the chocolate coating, melt easily and set perfectly.
- Optional: 1/4 cup chopped peanuts for topping: Adds a delightful crunch and extra peanut flavor if you like a bit of texture.
How to Make Homemade Reese’s Peanut Butter Cups Recipe
Step 1: Prepare the Peanut Butter Filling
Start by combining the creamy peanut butter, powdered sugar, and vanilla extract in a mixing bowl. Stir everything together until smooth and totally well blended. This mixture is the star of your filling, creamy, sweet, and ready to bring all the peanut butter goodness to your cups.
Step 2: Melt the Chocolate
Next, melt the chocolate chips using a microwave-safe bowl or a double boiler. Be patient and stir often to avoid burning. The melted chocolate needs to be silky smooth to coat the peanut butter filling perfectly and give those cups their signature shine.
Step 3: Prepare the Molds
Line a muffin tin with cupcake liners or silicone molds to keep everything neatly contained. These liners will help your cups hold their shape and make them easy to pop out once chilled.
Step 4: Layer the Chocolate Base
Pour a spoonful of melted chocolate into each liner, just enough to cover the bottom. Spread it gently with the back of the spoon so every cup has a nice, even chocolate base to support the peanut butter layer.
Step 5: Add the Peanut Butter Filling
Spoon the peanut butter mixture into each cup on top of the chocolate. Use the back of your spoon or a small spatula to spread the filling evenly, making sure each cup is filled just right for that perfect bite.
Step 6: Seal with More Chocolate
Pour the remaining melted chocolate over the peanut butter layer, covering it completely to seal the cups. This step locks in all that creamy goodness and gives the classic chocolate shell we all love.
Step 7: Add Optional Toppings
If you want a little extra crunch, sprinkle the top of each peanut butter cup with chopped peanuts while the chocolate is still soft. It adds a pleasant texture and boosts the peanut flavor beautifully.
Step 8: Chill Until Firm
Place your cups in the refrigerator for about 30 minutes until the chocolate is hardened and the cups hold their shape firmly. This chill time is crucial to get that satisfying snap when you bite into your Homemade Reese’s Peanut Butter Cups Recipe.
How to Serve Homemade Reese’s Peanut Butter Cups Recipe
Garnishes
While these cups are beautiful as is, adding a light dusting of cocoa powder, a drizzle of white chocolate, or a few sea salt flakes on top can elevate their presentation and create a subtle contrast in flavor that’s unforgettable.
Side Dishes
Pair your peanut butter cups with a scoop of vanilla ice cream or fresh strawberries for a classic combination. They also work wonderfully as part of a dessert platter featuring other chocolates and nuts, making your gathering extra special.
Creative Ways to Present
Try wrapping each peanut butter cup in colorful foil or placing them in mini decorative boxes for gifting. They also look stunning served on a slate board with edible flowers and nuts sprinkled around, turning simple treats into showstoppers.
Make Ahead and Storage
Storing Leftovers
Keep your Homemade Reese’s Peanut Butter Cups Recipe fresh by storing them in an airtight container in the refrigerator. This will preserve the texture and prevent the chocolate from melting or the peanut butter from drying out. They should stay perfect for up to a week.
Freezing
You can freeze these peanut butter cups tightly wrapped or in a sealed container for longer storage. When frozen, they maintain their flavor and texture well and can be taken out and thawed in the fridge overnight for a quick treat whenever the craving hits.
Reheating
Since these cups are best enjoyed cold, reheating is not recommended. If you prefer a softer texture, letting them sit at room temperature for a few minutes after taking them out of the fridge can soften the chocolate just enough without melting it completely.
FAQs
Can I use natural peanut butter for this recipe?
Yes, natural peanut butter works too, but note that it’s usually less sweet and more oily, so your filling might be a bit softer. You might want to add a touch more powdered sugar to compensate for the texture and sweetness.
What kind of chocolate is best for melting?
Semi-sweet or milk chocolate chips are ideal because they melt smoothly and have a balance of sweetness that complements the peanut butter perfectly. Avoid using chocolate with additives that might affect melting quality.
Can I make these peanut butter cups vegan?
Absolutely! Use dairy-free chocolate chips and a plant-based peanut butter to make a vegan version of this Homemade Reese’s Peanut Butter Cups Recipe that’s just as delicious.
How long do Homemade Reese’s Peanut Butter Cups stay fresh?
Stored properly in the refrigerator, they stay fresh for about a week. They’re best enjoyed within this timeframe to keep the texture and flavor at their peak.
Is it necessary to use cupcake liners?
While not mandatory, cupcake liners or silicone molds make the process much easier and help the peanut butter cups keep their shape nicely. They also make for easier removal and cleaner presentation.
Final Thoughts
Making your own chocolatey, peanut buttery treats has never been so rewarding or simple. This Homemade Reese’s Peanut Butter Cups Recipe is perfect for impressing friends, satisfying cravings, or just enjoying a bit of homemade chocolate magic anytime. So go ahead, give it a try, and prepare to fall in love with this sweet little indulgence all over again!
Print
Homemade Reese’s Peanut Butter Cups Recipe
- Prep Time: 10 minutes
- Cook Time: 0 minutes
- Total Time: 40 minutes
- Yield: 12 servings
- Category: Dessert
- Method: No-Cook
- Cuisine: American
Description
Homemade Reese’s Peanut Butter Cups are a delightful and easy-to-make treat combining creamy peanut butter and rich chocolate. This no-bake recipe yields perfectly layered peanut butter cups that capture the classic flavor of the popular candy in a simple, homemade version.
Ingredients
Peanut Butter Filling
- 1 cup creamy peanut butter
- 1/4 cup powdered sugar
- 1/2 teaspoon vanilla extract
Chocolate Coating
- 1 1/2 cups chocolate chips
Optional Topping
- 1/4 cup chopped peanuts
Instructions
- Prepare the peanut butter mixture: In a mixing bowl, combine 1 cup creamy peanut butter, 1/4 cup powdered sugar, and 1/2 teaspoon vanilla extract. Stir until the mixture is smooth and well blended.
- Melt the chocolate: Place 1 1/2 cups chocolate chips in a microwave-safe bowl or double boiler. Melt the chocolate completely, stirring frequently to ensure it is smooth and ready to use.
- Line the muffin tin: Prepare a muffin tin by placing cupcake liners or silicone molds into each cup to prevent sticking and make handling easier.
- Add the bottom chocolate layer: Pour a spoonful of melted chocolate into each liner to cover the bottom evenly, creating the base layer for the peanut butter cups.
- Layer with peanut butter filling: Spoon the peanut butter mixture onto the chocolate layer in each cup. Spread it out evenly to form a smooth, consistent layer.
- Seal with chocolate: Cover the peanut butter layer with another layer of melted chocolate to completely seal the cups and create a chocolate shell.
- Add optional topping: If desired, sprinkle chopped peanuts on top of the final chocolate layer for extra crunch and flavor.
- Chill until firm: Place the muffin tin in the refrigerator for about 30 minutes or until the peanut butter cups are fully set and firm to the touch.
Notes
- Use silicone molds for easier removal instead of liners if preferred.
- Choose high-quality chocolate chips for richer flavor.
- Store peanut butter cups in an airtight container in the refrigerator for up to one week.
- Optional chopped peanuts add texture but can be omitted for a smoother finish.
- Ensure the peanut butter is well mixed to avoid graininess.


