
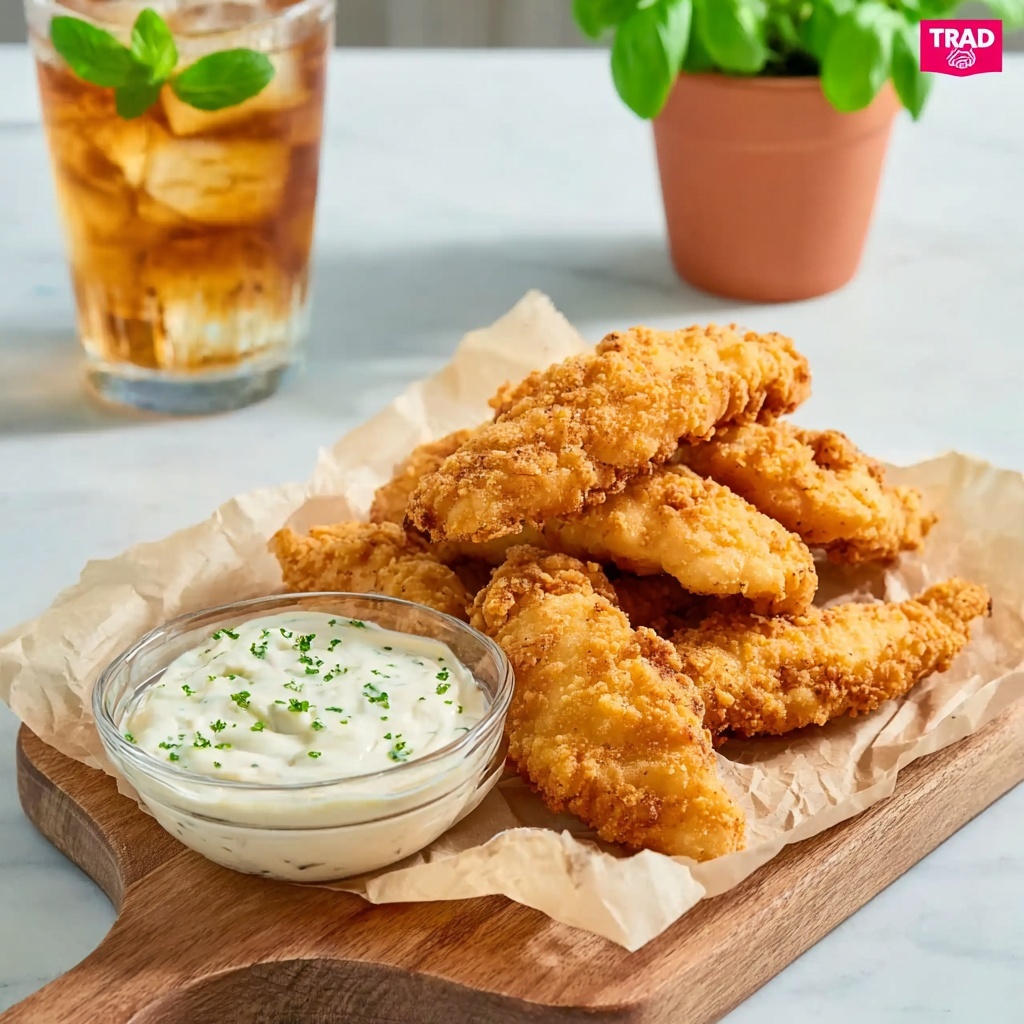
If you have been looking for that perfect, golden, crunchy delight to satisfy your cravings, this Homemade Crispy Chicken Tenders Recipe is the one to keep in your culinary arsenal. These tenders boast a crisp, perfectly seasoned exterior with juicy, tender chicken inside, making every bite a little celebration of flavor and texture. The balance of spices and the buttermilk soak create a tender, flavorful center that contrasts beautifully with the crisp coating that fries up just right. Whether you’re cooking for a casual family dinner or impressing friends at a weekend gathering, this Homemade Crispy Chicken Tenders Recipe is sure to steal the show.
Ingredients You’ll Need
Keeping the ingredient list straightforward makes this recipe a breeze to make while ensuring every flavor and texture element shines. Each component plays an essential role, from the tenderizing power of buttermilk to the flavorful, crispy crust created by the flour and seasonings.
- Chicken tenderloins: The star of the dish, naturally tender and perfect for quick cooking.
- All-purpose flour: Provides the base for the crispy coating, ensuring a satisfying crunch.
- Baking powder: Adds lightness to the coating for extra crispiness.
- Kosher salt: Seasoning that enhances all the flavors in every bite.
- Black pepper: Offers a subtle heat and depth to the crust’s seasoning.
- Garlic powder: Infuses the coating with a savory, aromatic note.
- Buttermilk: Tenderizes the chicken and adds slight tang that brightens the flavor.
- Large egg: Helps bind the coating to the chicken for a perfect crust.
- Hot sauce: Brings a mild kick that livens up the buttermilk marinade.
- Oil for frying: Necessary for achieving that golden, crispy exterior.
How to Make Homemade Crispy Chicken Tenders Recipe
Step 1: Prepare the Dry Coating Mix
Start by combining the all-purpose flour, baking powder, kosher salt, black pepper, and garlic powder in a medium bowl. This dry mixture is the foundation of your crunch, perfectly seasoned to coat the chicken tenders beautifully. Mixing these ingredients evenly ensures each tender gets that delicious, flavorful crust.
Step 2: Whisk the Wet Ingredients
In a separate bowl, whisk together the buttermilk, large egg, and hot sauce. This wet mixture not only adds moisture but also helps tenderize the chicken. The hot sauce gives a subtle heat that rounds out the tanginess of the buttermilk, making the flavor profile complex but approachable.
Step 3: Heat the Oil
Fill a heavy skillet with about 3 inches of oil and heat it to 325°F. Achieving the right frying temperature is crucial to get the coating crispy without burning or overcooking the chicken inside. A thermometer comes in handy here to maintain an even heat throughout frying.
Step 4: Coat the Chicken Tenders
Take each chicken tenderloin and dredge it in the dry flour mixture first, then dip it thoroughly in the buttermilk mixture. After that, dredge it a second time in the flour mixture, pressing firmly so the coating sticks well. This double-dip technique is what makes the tenders extra crispy and sturdy for frying.
Step 5: Fry to Golden Perfection
Fry the tenders in batches for 3 to 5 minutes per side until they are irresistibly golden brown and the internal temperature reaches 165°F. Don’t overcrowd the skillet—this keeps the oil temperature steady and ensures even cooking, giving you crisp and juicy tenders every time.
Step 6: Drain and Repeat
Place the cooked tenders on a wire rack to drain excess oil while keeping the crust crisp. Repeat the coating and frying process with the remaining chicken pieces until they are all perfectly cooked and ready to enjoy.
How to Serve Homemade Crispy Chicken Tenders Recipe
Garnishes
A sprinkle of freshly chopped parsley or a dash of smoked paprika can add a lovely pop of color and a subtle flavor kick that complements the crispy coating. A wedge of lemon on the side also brightens the dish wonderfully when squeezed over.
Side Dishes
Pair your crispy chicken tenders with classic sides like creamy coleslaw, crispy fries, or even a fresh garden salad for balance. For a bit of wholesome comfort, mashed potatoes or buttery corn on the cob are fantastic companions that complete the meal beautifully.
Creative Ways to Present
Serve these tenders on a platter lined with parchment paper for a casual vibe or stack them in a basket with your favorite dipping sauces like honey mustard, ranch, or spicy aioli. For a fun twist, try slicing them up and topping salads or wraps to add texture and flavor to your meal presentation.
Make Ahead and Storage
Storing Leftovers
If you happen to have any leftovers, keep them in an airtight container in the refrigerator for up to 3 days. To preserve that crispy exterior, placing a paper towel at the bottom of the container helps absorb moisture and keeps your tenders from getting soggy.
Freezing
You can freeze cooked chicken tenders for up to 2 months. Lay them out in a single layer on a baking sheet to freeze individually before transferring them to freezer bags. This prevents sticking and allows you to take out just what you need for a quick meal anytime.
Reheating
To reheat and retain that fabulous crispness, use an oven or air fryer set at 350°F and warm the tenders for about 10 minutes. Avoid microwaving as it tends to make the coating chewy and less enjoyable.
FAQs
Can I use regular milk instead of buttermilk?
While regular milk works in a pinch, buttermilk provides acidity that tenderizes the chicken and adds a subtle tang, making the coating crispier and more flavorful. If you don’t have buttermilk, you can make a quick substitute by adding a tablespoon of vinegar or lemon juice to a cup of milk and letting it sit for 5 minutes.
What oil is best for frying chicken tenders?
Oils with a high smoke point like vegetable oil, canola oil, or peanut oil are ideal for frying because they can sustain the high temperature needed without burning, ensuring your tenders come out perfectly golden and crispy.
How do I know when the chicken tenders are fully cooked?
The safest and most reliable way is to use a food thermometer. Chicken is fully cooked when it reaches an internal temperature of 165°F. The crust will be golden and crispy, and the juices should run clear when cut into.
Can I bake these chicken tenders instead of frying?
You certainly can! Place the coated tenders on a greased baking sheet and bake at 400°F for about 15-20 minutes, flipping halfway through. Baking results in a lighter crust but won’t have quite the same crunchy texture as frying.
What dipping sauces go well with these homemade chicken tenders?
The possibilities are endless! Traditional options like ranch and honey mustard are favorites, but don’t hesitate to try spicy sriracha mayo, tangy barbecue sauce, or even a cool blue cheese dressing to mix things up.
Final Thoughts
There is just something so comforting and satisfying about whipping up your own breaded, golden chicken tenders at home, and this Homemade Crispy Chicken Tenders Recipe makes it incredibly easy. The combination of simple ingredients with that guaranteed crunch will have you reaching for seconds and sharing this recipe with everyone you know. So, fire up your skillet and get ready to make some magic – your taste buds will thank you!
Print
Homemade Crispy Chicken Tenders Recipe
- Prep Time: 8 minutes
- Cook Time: 10 minutes
- Total Time: 18 minutes
- Yield: 4 servings
- Category: Appetizer
- Method: Frying
- Cuisine: American
Description
Crispy and flavorful homemade chicken tenders coated in a seasoned flour batter, dipped in a tangy buttermilk and hot sauce mixture, then perfectly fried to golden brown. A delicious and easy-to-make appetizer or main dish that’s juicy inside with a crunchy exterior.
Ingredients
Chicken
- 1 lb chicken tenderloins
Dry Coating
- 1 cup all purpose flour
- 1 teaspoon baking powder
- 1/2 teaspoon kosher salt
- 1/2 teaspoon black pepper
- 1/2 teaspoon garlic powder
Wet Mixture
- 3/4 cup buttermilk
- 1 large egg
- 2 teaspoons hot sauce
Others
- Oil for frying (enough for 3 inches depth)
Instructions
- Prepare Dry Coating: In a large mixing bowl, combine the all purpose flour, baking powder, kosher salt, black pepper, and garlic powder. Whisk thoroughly to ensure even distribution of spices.
- Mix Wet Ingredients: In a separate bowl, whisk together the buttermilk, egg, and hot sauce until fully blended and smooth.
- Heat Oil: Pour oil into a heavy skillet to a depth of about 3 inches and heat it over medium heat until it reaches 325°F (163°C). Use a thermometer for accuracy to ensure proper frying temperature.
- Coat Chicken: Take each chicken tenderloin and first dredge it in the flour mixture, ensuring it is fully coated. Then dip it into the buttermilk and egg mixture. Finally, dredge it again in the flour mixture, pressing the coating firmly onto the chicken to create a thick, even crust.
- Fry Chicken: Carefully place the coated chicken tenders into the hot oil in batches, avoiding overcrowding. Fry each side for 3 to 5 minutes or until golden brown and crispy. Use a meat thermometer to check the internal temperature, making sure it reaches 165°F (74°C) for safe consumption.
- Drain and Repeat: Remove the cooked tenders from the oil and place them on a wire rack to drain excess oil. Repeat the coating and frying process with remaining chicken tenders until all are cooked.
Notes
- Maintain oil temperature at 325°F to ensure even cooking and prevent sogginess.
- Use a wire rack to drain chicken tenders instead of paper towels to keep coating crisp.
- Adjust hot sauce quantity to taste for milder or spicier tenders.
- Ensure chicken tenders are fully cooked by checking the internal temperature with a meat thermometer.
