

If you are looking for a delightful treat that captures both simplicity and deliciously buttery flavor, this Easy Slice and Bake Cookies Recipe is your new best friend in the kitchen. With minimal effort and straightforward ingredients, these cookies come together to create perfectly tender, subtly sweet bites that are adorned with a fun sprinkle coating. They bring a warm, homemade charm that’s perfect for casual snacking, gifting, or any occasion where you want to impress without fuss. Once you try this recipe, you’ll see why slice and bake cookies are a timeless classic that never goes out of style.
Ingredients You’ll Need
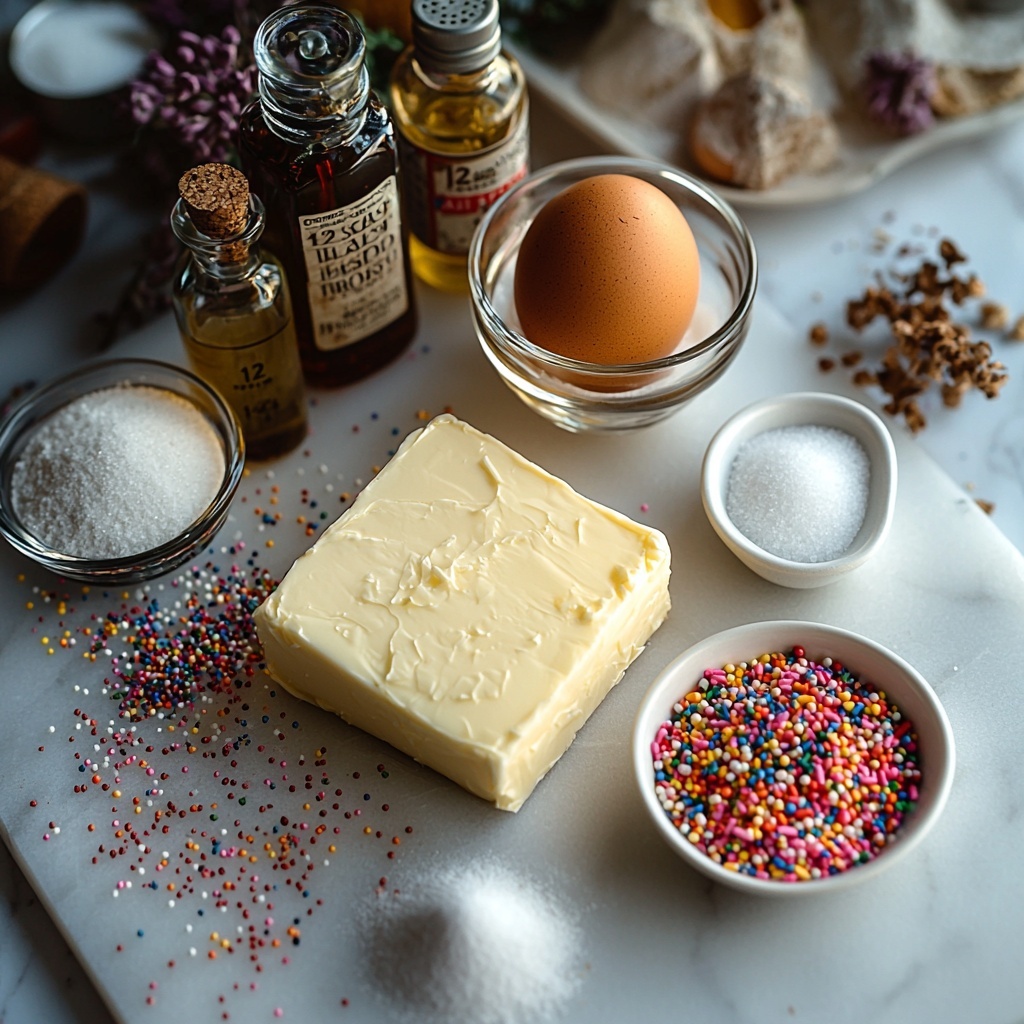
Each ingredient in this Easy Slice and Bake Cookies Recipe plays a special role, from creating that tender crumb to adding sweetness and a lovely aroma. You’ll appreciate how these basic pantry staples come together to create something truly scrumptious.
- 1 cup unsalted butter (room temperature): Provides rich flavor and a tender texture, so make sure it’s soft for easy mixing.
- 1 1/2 cups granulated sugar: Sweetens the dough evenly and helps with that lovely golden color during baking.
- 1 large egg: Acts as a binder and adds moisture for that perfect cookie consistency.
- 2 teaspoons vanilla extract or flavoring: Gives a warm, aromatic depth that enhances the overall flavor.
- 1 teaspoon almond extract or flavoring: Adds a subtle nutty note that elevates these cookies beyond the ordinary.
- 1/2 teaspoon salt: Balances the sweetness and enhances all the other flavors.
- 2 1/4 cups all-purpose flour: The base that gives structure, ensuring these cookies hold their shape well when sliced.
- Sprinkles: Optional but highly recommended for a pop of color and festive flair that makes each bite even more fun.
How to Make Easy Slice and Bake Cookies Recipe
Step 1: Cream Together the Butter and Sugar
Start by using a mixer to cream the softened butter with the granulated sugar until the mixture is smooth and pale. This step is crucial because it incorporates air into the dough, creating a light and tender cookie. Then, add the egg, vanilla, and almond extracts, mixing well to make sure all the flavors are evenly combined. Finally, sprinkle in the salt and flour, mixing just until everything is fully combined. Remember to scrape down the bowl sides to catch any stray flour or butter sticking to the edges.
Step 2: Shape Your Dough Into Logs
Divide the dough roughly in half to make it easier to handle. Place each half onto a large piece of double-layered plastic wrap. Using the plastic wrap itself, carefully shape the dough into logs roughly 2 1/2 inches wide. The dough will be soft, which can feel tricky, but don’t worry—just take your time and shape it as best as you can. This “log” style is what will make slicing and baking so easy.
Step 3: Chill the Dough
Wrap the logs tightly in the plastic wrap and pop them into the refrigerator for at least four hours. Chilling firms up the dough, making it much easier to slice thin, even cookies that keep their shape in the oven. Plus, this step enhances the flavor and texture, making each bite even more satisfying.
Step 4: Prepare to Bake
When you’re ready to turn that chilled dough into golden cookies, preheat your oven to 350°F (175°C). Line a baking sheet with parchment paper or a silicone baking mat for a cookie release that’s hassle-free and cleanup that’s quick.
Step 5: Refine the Dough Logs
Remove one of the cookie logs from the fridge and, still wrapped in plastic, gently roll it on the counter to perfect its round shape. This helps ensure consistent slices and a more beautiful finished cookie that bakes evenly.
Step 6: Add Sprinkles for Extra Fun
If you want to dress up your cookies, pour some sprinkles into a shallow plate or tray. Carefully remove the plastic wrap and roll the dough log around in the sprinkles until it’s fully coated. This step delivers a colorful, festive look that’s perfect for celebrations or brightening any snack time.
Step 7: Slice Your Cookies
Now, slice the dough into 1/4-inch thick rounds. Place them on the prepared baking sheet with a bit of space in between. If any slices aren’t perfectly round, gently pat or pinch them into shape. This personal touch can make your cookies look like they’re straight from a charming bakery!
Step 8: Bake to Perfection
Pop the cookies into the preheated oven and bake for 10 to 12 minutes. Watch for the edges to turn a subtle golden brown—this is your sign that they’re done. For those who love a little crunch, bake closer to 12 minutes; for softer, melt-in-your-mouth cookies, stay at 10.
Step 9: Cool and Enjoy
After baking, allow the cookies to rest on the pan for about 5 minutes so they firm up a bit before transferring them to a wire rack to cool completely. This cooling step is key for that perfect texture. Once cool, these cookies are ready to enjoy, share, or store!
How to Serve Easy Slice and Bake Cookies Recipe
Garnishes
Sprinkles are the star garnish here, adding not only vibrant colors but also a slight crunch to the outside. You can switch them up seasonally or go classic with rainbow mixes. For an elegant touch, try rolling the edges in finely chopped nuts or colored sugar crystals before baking.
Side Dishes
These cookies pair wonderfully with a wide range of beverages. A cold glass of milk is the classic choice, but they also shine alongside hot coffee, tea, or even a rich hot chocolate. For afternoon gatherings, consider serving them with fresh fruit or a dollop of whipped cream for an extra special snack.
Creative Ways to Present
Slice and bake cookies make for beautiful cookie trays, especially when displayed in neat rows or stacked with alternating sprinkle colors. For parties, arrange them in festive tins or wrap them in cellophane tied with ribbons. You can also serve them on decorative plates alongside other treats to create an inviting dessert spread.
Make Ahead and Storage
Storing Leftovers
Store your leftover baked cookies in an airtight container at room temperature, where they will stay fresh for up to two weeks. This makes them an easy grab-and-go snack whenever you need a sweet treat.
Freezing
If you bake a full batch but can’t finish them all at once, or if you want to freeze the dough for later, no problem. Wrap the dough logs tightly in plastic and place them in the freezer where they can be stored for up to 12 months. Baked cookies freeze well too when packed tightly in a freezer-safe container or zipped bag.
Reheating
To enjoy cookies fresh from the oven even after storing, warm them slightly in a low oven or microwave for a few seconds. This brings back that freshly baked softness and melty warmth that makes these cookies irresistible.
FAQs
Can I use salted butter instead of unsalted?
Yes, you can use salted butter, but reduce or omit the added salt in the recipe to prevent the cookies from becoming too salty. Using unsalted butter gives you more control over the flavor.
How thin should I slice the cookie dough?
Slicing about 1/4-inch thick is ideal. Thicker slices may result in cookies that need longer baking times and might be softer in the center, while thinner slices bake faster and become crisper.
What can I substitute for almond extract if I don’t have any?
If almond extract isn’t on hand, you can leave it out or replace it with another flavoring like a bit of extra vanilla, a splash of lemon zest, or even a few drops of coconut extract for a different twist.
Can I add chocolate chips or nuts to this recipe?
Absolutely! While this is a classic slice and bake cookie, feel free to fold in chocolate chips, chopped nuts, or dried fruit after mixing the wet and dry ingredients for added texture and flavor.
How long will the dough keep in the refrigerator?
The dough can be refrigerated for up to 3 days if you want to bake a fresh batch within a short timeframe. Just keep it tightly wrapped to prevent it from drying out or absorbing fridge odors.
Final Thoughts
This Easy Slice and Bake Cookies Recipe truly is a gem for any home baker looking for quick, reliable, and delicious results. It’s a rewarding recipe with minimal fuss that delivers delightful cookies every time. Whether you’re baking for a special occasion or simply craving a sweet homemade treat, these slice and bake cookies promise both simplicity and sweetness in every bite. Grab your ingredients, roll up your sleeves, and enjoy the wonderful aroma that fills your kitchen!
Print
Easy Slice and Bake Cookies Recipe
- Prep Time: 25 minutes
- Cook Time: 12 minutes
- Total Time: 4 hours 37 minutes
- Yield: 36 cookies
- Category: Dessert
- Method: Baking
- Cuisine: American
Description
These Easy Slice and Bake Cookies are a classic and simple treat perfect for any occasion. With a soft, buttery dough flavored with vanilla and almond extracts, these cookies are chilled, sliced, and baked to achieve the perfect tender texture and light golden edges. Coated optionally with colorful sprinkles, they add a fun and festive touch. This straightforward recipe yields about 36 delicious cookies that stay fresh for weeks when stored properly.
Ingredients
Cookie Dough
- 1 cup unsalted butter, room temperature
- 1 1/2 cups granulated sugar
- 1 large egg
- 2 teaspoons vanilla extract or flavoring
- 1 teaspoon almond extract or flavoring
- 1/2 teaspoon salt
- 2 1/4 cups all-purpose flour
Optional Decoration
- Sprinkles or nonpareils for coating
Instructions
- Cream Butter and Sugar: Use a mixer to cream the room temperature butter and granulated sugar together until smooth and fluffy. Add the egg, vanilla extract, and almond extract and mix well until combined. Then add the salt and all-purpose flour and beat until the dough is fully incorporated. Scrape the sides of the bowl and mix again to ensure even mixing.
- Form Dough Logs: Divide the dough roughly in half. Place each half onto a large double layer of plastic wrap. Use the plastic wrap to form each portion into a log shape approximately 2 1/2 inches wide. The dough may be soft and a bit challenging to shape, but don’t worry, it will firm up in the refrigerator.
- Chill the Dough: Wrap the dough logs tightly in the plastic wrap to keep their shape and refrigerate them for at least 4 hours to allow the dough to firm up for easier slicing.
- Preheat Oven and Prepare Baking Sheet: When ready to bake, preheat your oven to 350°F (175°C). Line a cookie sheet with parchment paper or use a silicone baking mat to prevent sticking.
- Shape the Logs: Remove one dough log from the refrigerator and with the plastic wrap still on, gently roll it on the counter to better define and round out the log shape.
- Coat with Sprinkles: If desired, pour sprinkles or nonpareils into a shallow tray or plate. Remove the plastic wrap from the dough log and roll it in the sprinkles to coat the outside evenly.
- Slice the Cookies: Slice the coated dough log into 1/4-inch thick slices using a sharp knife. Arrange the slices on the prepared baking sheet, spacing them adequately. If needed, gently shape the slices with your fingers to make them round.
- Bake: Bake the cookies in the preheated oven for 10 to 12 minutes, or until the edges just start to turn a light golden brown. Baking closer to 10 minutes will yield softer cookies, while 12 minutes will give a slightly crispier texture.
- Cool and Store: Remove the baking sheet from the oven and allow the cookies to cool on the sheet for about 5 minutes before transferring them to a wire rack to cool completely. Store the baked cookies in an airtight container at room temperature for up to two weeks or freeze tightly wrapped for up to 12 months.
Notes
- Chilling the dough logs is essential for easier slicing and to prevent the cookies from spreading too much during baking.
- The optional sprinkle coating adds a festive visual appeal but can be omitted if desired.
- For uniform cookies, use a sharp knife and slice consistently at 1/4-inch thickness.
- Store cookies properly to maintain freshness and flavor for a longer period.
- Butter should be at room temperature for easy creaming with sugar.


