

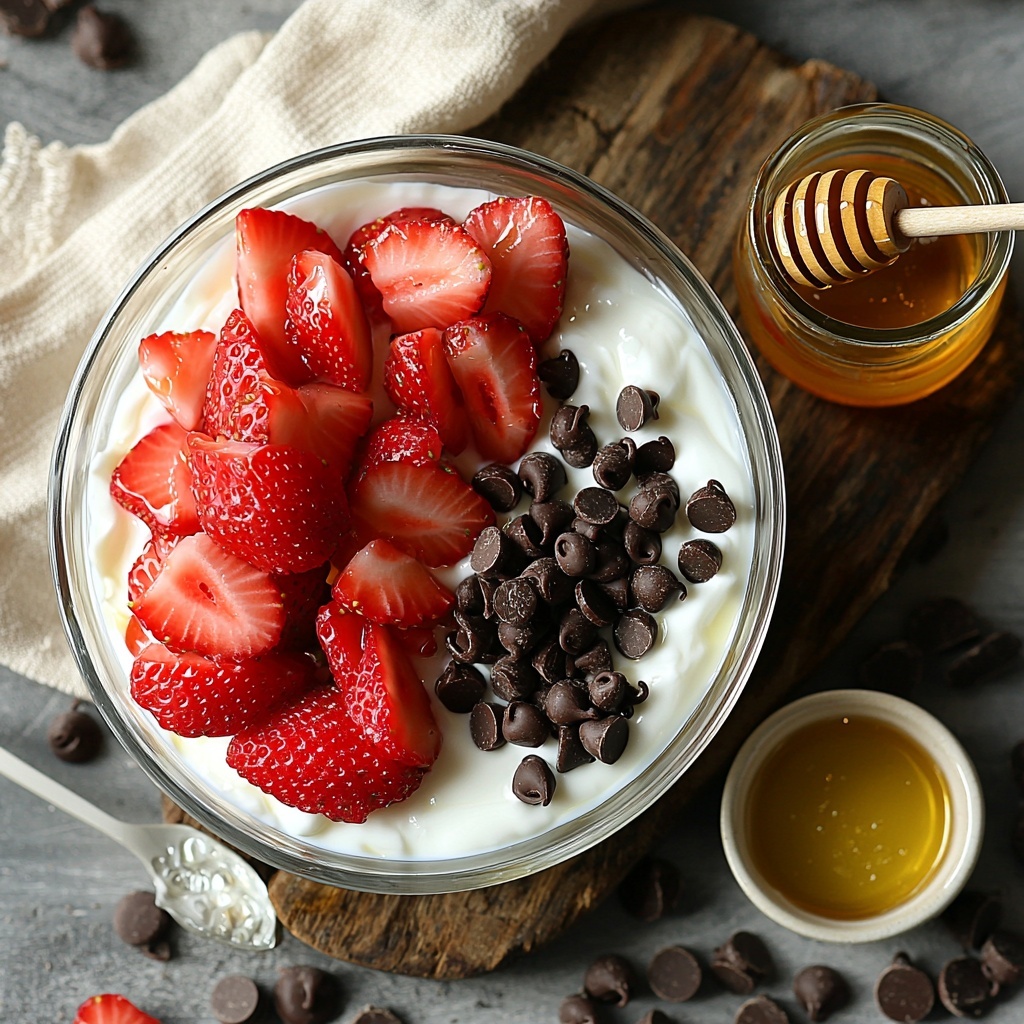
There is something truly magical about the refreshing burst of fruit combined with cool creaminess and a touch of chocolate bliss, which is exactly what makes the Chocolate Strawberry Frozen Yogurt Bites Recipe such a beloved treat. This recipe captures the essence of summer’s finest flavors in a perfect, bite-sized snack that’s as easy on the eyes as it is on the palate. Whether you’re looking for a healthy dessert, a fun party snack, or a way to cool down on a warm day, these frozen yogurt bites offer that delightful balance of sweetness, tanginess, and chocolaty goodness in every little morsel.
Ingredients You’ll Need
When making these frozen yogurt bites, simplicity is your best friend. Each ingredient has been thoughtfully chosen to contribute to the perfect flavor and texture, making the final result both wholesome and indulgent.
- 2 cups plain Greek yogurt: Provides a thick and creamy base with a nice tang that pairs beautifully with the sweet strawberries.
- 1 cup fresh strawberries, hulled and sliced: Adds natural sweetness, vibrant color, and juicy freshness that makes each bite pop.
- 1/4 cup honey or maple syrup: A natural sweetener to gently balance the tartness of the yogurt and heighten the fruit’s flavor.
- 1/2 cup semi-sweet chocolate chips: Imparts rich chocolate flavor with just the right amount of sweetness to complement the yogurt and berries.
- 1 tablespoon coconut oil (optional): Helps the chocolate melt smoothly and adds a subtle tropical hint to the chocolate drizzle.
How to Make Chocolate Strawberry Frozen Yogurt Bites Recipe
Step 1: Prepare the Strawberries
Start by washing your strawberries thoroughly, then hull and slice them thinly. These slices will be nestled inside the yogurt bites, so thin is best to ensure a nice blend of textures without overpowering a single bite.
Step 2: Mix the Yogurt
In a mixing bowl, combine your plain Greek yogurt with honey or maple syrup. Stir them together until the sweetness is evenly dispersed, creating a creamy, lightly sweetened base that sets the stage for all the other flavors.
Step 3: Prepare the Molds
Line a mini muffin tin or silicone molds with cupcake liners or lightly spray them with cooking spray. This simple step helps prevent sticking and makes removing those little frozen gems a cinch.
Step 4: Add Yogurt Mixture
Spoon a bit of the yogurt mixture into each mold, filling about halfway. This bottom layer will cradle the strawberry slices, giving a nice contrast in flavor and texture.
Step 5: Add Strawberries
Place a slice of strawberry on top of the yogurt layer in each mold. Press down gently so it adheres well and sits nicely within that creamy base. This is where the fun really starts to take shape!
Step 6: Top with Yogurt
Now, cover the strawberries with more yogurt mixture until the molds are filled to the very top. This seals in the fruity goodness and forms the perfect bite-sized treat.
Step 7: Melt the Chocolate
Combine the semi-sweet chocolate chips with the coconut oil (if using) in a microwave-safe bowl. Heat in 30-second bursts, stirring in between, until the chocolate is melted and silky smooth—this drizzle will be the crown jewel.
Step 8: Drizzle Chocolate
Use a spoon or a piping bag to elegantly drizzle the melted chocolate over the filled molds. This little finishing touch adds a glossy, decadent look and an irresistible chocolate hit.
Step 9: Freeze
Pop the muffin tin or molds into the freezer and leave them there for 2 to 3 hours until fully set and solid. This step transforms the yogurt into a cool, firm bite you’ll love picking up again and again.
Step 10: Serve
Once frozen solid, carefully remove the bites from their molds and enjoy right away or store them in an airtight container in your freezer for anytime snacking.
How to Serve Chocolate Strawberry Frozen Yogurt Bites Recipe
Garnishes
Sprinkle some crushed freeze-dried strawberries or finely chopped nuts on top of the chocolate drizzle before freezing for extra texture and a pop of color that will make these treats even more inviting.
Side Dishes
Pair your frozen yogurt bites with a fresh berry salad or a light fruit sorbet to turn this simple snack into a refreshing summery dessert spread that’s sure to impress your guests.
Creative Ways to Present
Serve the bites on a beautiful platter lined with fresh mint leaves or edible flowers for visual appeal. You could also thread a few on colorful skewers to create an interactive and fun frozen fruit yogurt kebab.
Make Ahead and Storage
Storing Leftovers
Keep any extra bites stored in an airtight container in the freezer. They stay fresh and flavorful for up to two weeks, which means you can prepare a batch ahead of time for spontaneous treat cravings.
Freezing
These frozen yogurt bites need a full 2 to 3 hours in the freezer to become perfectly firm. Make sure they’re completely solid before removing from molds to maintain their shape and texture.
Reheating
Since this is a frozen treat, reheating isn’t necessary or recommended. Instead, let them sit at room temperature for a few minutes if you prefer a softer bite before enjoying.
FAQs
Can I use flavored yogurt instead of plain Greek yogurt?
Absolutely! Flavored yogurts will introduce additional sweetness and nuances to the bites, but keep in mind that using plain yogurt allows better control over sweetness levels and keeps the flavors balanced.
Is there a dairy-free option for this recipe?
Yes! You can substitute Greek yogurt with coconut yogurt or any plant-based yogurt. Just use a creamy variety for similar texture, and adjust the sweetener to taste since some dairy-free yogurts can be sweeter or tangier.
What if I don’t have silicone molds or mini muffin tins?
No worries. You can use ice cube trays or even line a small baking dish with parchment paper and spoon the mixture in, then break into pieces once frozen.
Can I add other fruits besides strawberries?
Definitely! Blueberries, raspberries, or sliced kiwi would work well and add interesting flavors and colors. Just be sure to slice larger fruits thinly so every bite remains balanced.
How long do the bites last in the freezer?
Stored properly in an airtight container, they can last up to two weeks without losing their texture or flavor. Enjoy them within that time for the freshest taste!
Final Thoughts
Making these Chocolate Strawberry Frozen Yogurt Bites Recipe is such a rewarding adventure in flavors and textures, and the best part is how effortlessly they come together. They’re perfect for cooling down, treating yourself, or sharing with friends and family, and I genuinely hope you have as much fun making and enjoying them as I do. Give this recipe a try, and soon enough, these little bites will become one of your all-time favorite go-to desserts!
Print
Chocolate Strawberry Frozen Yogurt Bites Recipe
- Prep Time: 15 minutes
- Cook Time: 0 minutes
- Total Time: 2 hours 15 minutes
- Yield: 24 bites
- Category: Dessert
- Method: Freezing
- Cuisine: American
- Diet: Low Fat
Description
These Chocolate Strawberry Frozen Yogurt Bites are a refreshing and healthy treat combining creamy Greek yogurt with fresh strawberries and a drizzle of rich semi-sweet chocolate. Perfect as a guilt-free snack or dessert, they require minimal prep and freeze quickly, making them an ideal make-ahead option for warm days or anytime you crave a sweet, nutritious bite.
Ingredients
Yogurt Mixture
- 2 cups plain Greek yogurt (or any yogurt of your choice)
- 1/4 cup honey or maple syrup (adjust to taste)
Fruit
- 1 cup fresh strawberries, hulled and sliced
Chocolate Drizzle
- 1/2 cup semi-sweet chocolate chips
- 1 tablespoon coconut oil (optional for melting chocolate)
Instructions
- Prepare the Strawberries: Wash and hull the strawberries. Slice them into thin pieces and set aside.
- Mix the Yogurt: In a mixing bowl, combine the Greek yogurt and honey (or maple syrup). Stir until well blended to create a smooth and sweetened yogurt base.
- Prepare the Molds: Line a mini muffin tin or silicone molds with cupcake liners or spray lightly with cooking spray to prevent sticking, ensuring easy removal later.
- Add Yogurt Mixture: Spoon a small amount of the yogurt mixture into each mold, filling about halfway to create a base layer.
- Add Strawberries: Place a slice of strawberry on top of the yogurt mixture in each mold and press down gently so they stick well within the yogurt.
- Top with Yogurt: Add more yogurt mixture over the strawberries until the molds are filled to the top, encasing the fruit inside the yogurt.
- Melt the Chocolate: In a microwave-safe bowl, combine the chocolate chips and coconut oil if using. Microwave in 30-second intervals, stirring after each, until chocolate is fully melted and smooth.
- Drizzle Chocolate: Use a spoon or piping bag to drizzle the melted chocolate evenly over the filled molds for a delicious finishing touch.
- Freeze: Place the muffin tin or molds in the freezer and freeze for 2-3 hours, or until the bites are completely solidified.
- Serve: Once frozen, carefully remove the bites from the molds and enjoy immediately or store them in an airtight container in the freezer for later snacking.
Notes
- You can substitute plain Greek yogurt with flavored yogurt or plant-based yogurt to suit dietary preferences.
- Adjust the sweetness by varying the amount of honey or maple syrup according to taste.
- For easy removal, silicone molds are preferred, but using muffin tins with liners works well too.
- The coconut oil in the chocolate helps create a smooth, glossy drizzle but is optional.
- Store leftovers in an airtight container in the freezer for up to 1 week to maintain freshness.
- Feel free to experiment with other fruits like blueberries or raspberries as alternatives to strawberries.


