

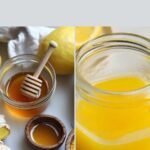
If you are looking for a vibrant, health-boosting elixir that is both refreshing and packed with powerful natural ingredients, this Homemade Ginger Shots Recipe is an absolute must-try. It combines bold flavors like spicy fresh ginger, zesty lemon, and earthy turmeric with a touch of sweetness and a hint of sea salt to create something truly invigorating. Whether you want to kickstart your day or need a quick pick-me-up, these ginger shots are simple to make yet incredibly effective, delivering a concentrated burst of wellness in every sip.

Ingredients You’ll Need
Gathering the right ingredients is key for this recipe, and luckily, they are straightforward but essential. Each one plays an important role in creating the perfect balance of flavor, nutrition, and color in your ginger shots.
- Fresh ginger (4 oz or 110g): The star ingredient that brings a spicy warmth and natural zing.
- Ground turmeric or fresh turmeric (1/2 tsp ground or 1 oz fresh): Adds a beautiful golden hue and anti-inflammatory benefits.
- Lemons (2 medium, juiced – 55g juice): Contributes bright acidity and vitamin C for a refreshing contrast.
- Coconut water (1 ½ cups or 12 oz / 345g): Provides a smooth, slightly sweet base that hydrates and balances the spice.
- Honey or maple syrup (1 tbsp or 20g): Sweetens naturally without overpowering the vibrant flavors.
- Celtic sea salt (1/4 tsp): Enhances the overall taste and supports electrolyte balance.
- Black pepper (a pinch): Helps unlock turmeric’s benefits and adds a subtle spicy kick.
How to Make Homemade Ginger Shots Recipe
Step 1: Prep the Ginger and Lemon
Start by giving your fresh ginger a good wash since you don’t need to peel it—the fibers will be strained later, so saving time here is a smart move. Next, juice your lemons, making sure to remove any seeds for a smooth, clean shot.
Step 2: Blend the Shots
Place the prepared ginger, turmeric, lemon juice, coconut water, honey, sea salt, and black pepper into a high-speed blender. Begin blending on low speed, then gradually increase to medium-high for a total of 2 minutes. This helps fully incorporate all the flavors and breaks down the ginger for maximum extraction.
Step 3: Strain and Store
Using a nut milk bag or a fine mesh sieve over a bowl or wide-mouth jar, strain the mixture carefully to remove the pulp. The resulting liquid is your potent and smooth homemade ginger shot. Pour it into a glass jar and store it in the fridge. It will stay fresh for up to 1 week. Remember, a serving size is about 2 oz.
How to Serve Homemade Ginger Shots Recipe
Garnishes
Although ginger shots are usually served plain, you can add a thin slice of lemon or a tiny sprig of fresh mint for a little visual appeal and an extra hint of freshness right before drinking.
Side Dishes
These shots are fantastic to enjoy alongside a light breakfast like fresh fruit, overnight oats, or a smoothie bowl. The zingy flavor cuts through gently creamy or sweet options beautifully.
Creative Ways to Present
For a fun twist, chill your shots in ice cube trays and drop a ginger-citrus cube into a glass of sparkling water for a sparkling, healthful refresher any time of day.
Make Ahead and Storage
Storing Leftovers
If you have any leftover ginger shots, store them in a sealed glass container in the fridge. They stay fresh and potent for about one week. Always give the jar a good shake before pouring as the ingredients may settle.
Freezing
You can freeze homemade ginger shots in small portions using ice cube trays. Once frozen, transfer the cubes to a freezer bag. This way, you preserve the freshness and can thaw small servings as needed.
Reheating
These shots are best enjoyed cold or at room temperature. If you prefer a warm sip, gently warm the shot in a saucepan but avoid boiling to preserve the delicate flavors and nutrients.
FAQs
Can I use powdered ginger instead of fresh?
While fresh ginger delivers the most vibrant flavor and health benefits, you can use powdered ginger if it’s what you have. Use about a third of the amount listed and adjust to taste, but expect a slightly different intensity.
How spicy are these ginger shots?
These shots have a nice, manageable kick thanks to the fresh ginger and black pepper. If you’re new to ginger shots, start with one ounce and increase as you get used to the heat.
Can I substitute honey with another sweetener?
Absolutely! Maple syrup is a great vegan alternative, or you can try agave nectar. Whatever you use, add it gradually and taste as you go to keep the balance just right.
Are homemade ginger shots good for digestion?
Yes! Ginger is well known for supporting digestion and alleviating nausea. Combined with turmeric and lemon, these shots make a natural digestive tonic that can stimulate your system gently.
How often can I drink these ginger shots?
Most people enjoy a 2 oz shot daily, especially in the morning or when they need an energy boost. However, listen to your body and adjust the frequency as needed, especially if you are sensitive to spicy foods.
Final Thoughts
Making your own Homemade Ginger Shots Recipe is such a rewarding and simple way to add a burst of health to your routine. The blend of fiery ginger, tangy lemon, and earthy turmeric creates a delicious, potent shot that your body will thank you for. So grab these ingredients, whip up a batch, and enjoy the uplifting zing of homemade goodness. Trust me, this will quickly become one of your favorite little wellness rituals.
Print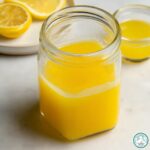
Homemade Ginger Shots Recipe
- Prep Time: 5 minutes
- Cook Time: 5 minutes
- Total Time: 10 minutes
- Yield: 6 servings (2 oz each)
- Category: Beverage
- Method: Blending
- Cuisine: Health / Wellness
- Diet: Vegan
Description
These Homemade Ginger Shots are a powerful and refreshing health boost, combining fresh ginger, turmeric, lemon juice, and coconut water with a touch of honey for natural sweetness. Easy to prepare in just 10 minutes, these potent shots can be enjoyed daily to support digestion, immunity, and overall well-being.
Ingredients
Primary Ingredients
- 4 oz (110g) fresh ginger
- 1/2 tsp ground turmeric or 1 oz fresh turmeric
- 2 medium lemons, juiced (about 55g juice)
- 1 ½ cups (12 oz or 345g) coconut water
- 1 tbsp (20g) honey or maple syrup (add more as needed)
- 1/4 tsp Celtic sea salt
- Pinch of black pepper
Instructions
- Prep the ginger and lemon. Wash the fresh ginger thoroughly, noting that peeling is optional since the mixture will be strained later. Juice the lemons to measure about 55g or the juice of two medium lemons.
- Blend the shots. In a high-speed blender, combine the fresh ginger, turmeric (ground or fresh), lemon juice, coconut water, honey, Celtic sea salt, and black pepper. Begin blending on low speed, then gradually increase to medium-high speed. Blend continuously for 2 minutes until all ingredients are well combined and smooth.
- Strain and store. Place a nut milk bag or a fine mesh sieve over a bowl or a wide-mouth jar. Pour the blended mixture through to strain out the fibrous solids, extracting the liquid ginger shot. Transfer the strained shots to a glass jar and refrigerate. Store the shots in the fridge for up to 1 week. Serve 2 oz as a single serving size.
Notes
- Peeling the ginger is optional because the fiber will be strained out later, saving prep time.
- If you prefer a sweeter shot, increase the honey or maple syrup to taste.
- Fresh turmeric can be used as an alternative to ground turmeric for a more vibrant flavor.
- Store the ginger shots in an airtight container in the refrigerator and consume within 7 days for best freshness.
- A nut milk bag yields a smoother shot than a mesh sieve but either works well.
- Adjust the amount of black pepper to enhance absorption of turmeric’s beneficial compounds.
