

If you have a sweet tooth and love a treat that brings a bit of drama to your dessert plate, you are going to adore this Chocolate Lava Cookies Recipe. Imagine biting into a soft, subtly chewy chocolate cookie that hides a molten, rich chocolate center—a little pocket of ooey-gooey bliss that spills out with each tempting bite. This dessert perfectly blends the indulgence of a molten lava cake with the convenience of a cookie, making it an irresistible delight for any chocolate lover. It’s a showstopper that’s not only delicious but fun to make and share with friends and family.
Ingredients You’ll Need
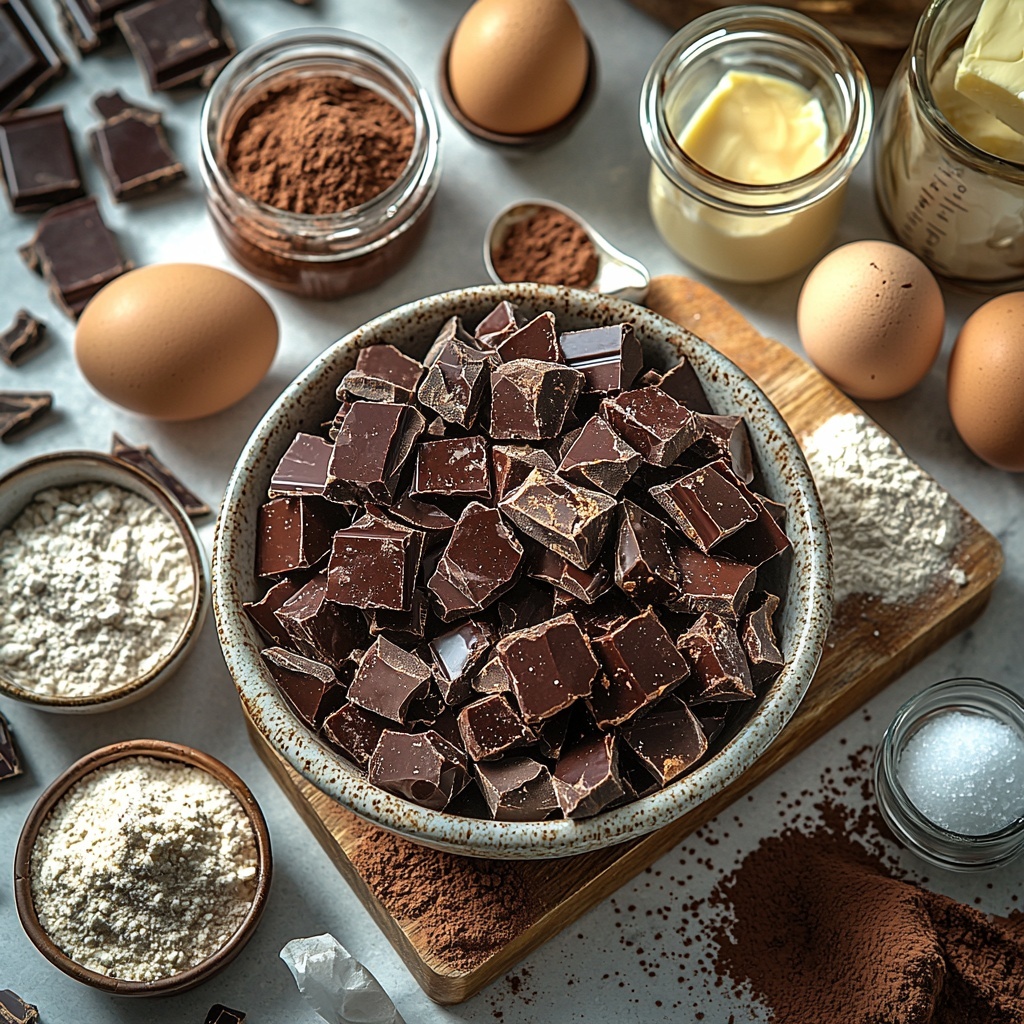
These ingredients are straightforward, but each plays a crucial role in delivering the perfect texture and deep chocolate flavor that makes this Chocolate Lava Cookies Recipe so special. From the butter that keeps the cookies tender to the espresso powder that intensifies the chocolate notes, every component is essential.
- Dark or semi-sweet chocolate (4 oz): Use high-quality baking chocolate for a rich ganache center that melts beautifully.
- Heavy whipping cream (½ cup): Creates a smooth, luscious ganache that becomes the gooey core of the cookie.
- Flour (2 cups plus 2 Tbsp): The foundation that provides structure without making the cookies tough.
- Dutch processed cocoa powder (½ cup plus 2 Tbsp): Gives the cookies deep chocolate flavor and a striking dark color.
- Espresso powder (½ – 1 tsp): Enhances the chocolate flavor, bringing out its complexity.
- Baking soda (½ tsp) and baking powder (½ tsp): Help the cookies rise just right to hold the molten center.
- Sea salt (¼ tsp): Balances the sweetness and intensifies the chocolate taste.
- Salted butter (1 cup, room temperature): Adds richness and moisture while helping create that tender crumb.
- White sugar (1 cup): Sweetens and adds to the cookie’s soft texture.
- Light brown sugar (½ cup): Brings a hint of caramel flavor and chewiness to the cookies.
- Large eggs (2, room temperature): Bind everything together and add moisture.
- Vanilla extract (1½ tsp): Rounds out all the flavors with a warm, sweet aroma.
- Powdered sugar (optional): A pretty dusting to mimic the look of molten lava cake and a touch of extra sweetness.
How to Make Chocolate Lava Cookies Recipe
Step 1: Prepare the Ganache
The magic starts by making the luscious ganache that becomes the molten center of these cookies. Chop your chocolate into tiny pieces—that way it melts more evenly. Heat the cream until it’s just about to boil, then pour it over the chocolate and let it sit to soften the chocolate. Stir gently until silky smooth. If there are stubborn chunks, a quick zap in the microwave helps everything melt perfectly. Chill this mixture for about 20 to 30 minutes so it thickens enough to scoop and freeze easily.
Step 2: Shape the Ganache Centers
Once chilled, spoon the ganache onto a parchment-lined baking sheet in small dollops—about a teaspoon each. Freeze these until firm, approximately 30 minutes, so they hold their shape when enveloped in cookie dough. If you prefer, you can roll the chunks into neat balls at this stage, but a rough shape is fine too; the cookie dough will cover and smoothen them later.
Step 3: Combine Dry Ingredients
In a separate bowl, whisk together the flour, cocoa powder, espresso powder, baking soda, baking powder, and sea salt. This mixture ensures your cookies will have an even rise and that irresistible deep chocolate taste.
Step 4: Cream Butter and Sugars
Using a mixer, beat the softened butter with both sugars until the mixture is airy and light in color—this takes about 3 to 4 minutes and is key for tender cookies. Adding the eggs and vanilla next creates a smooth base that will hold everything together.
Step 5: Incorporate Dry Ingredients
Slowly add the flour mixture in thirds, beating on low speed just until everything is combined. Overmixing here can make your cookies tough, so it’s best to stop as soon as you see no flour streaks.
Step 6: Assemble the Cookies
Scoop about two tablespoons of cookie dough and roll it into a ball. Press your thumb into the center to create a small cavity just big enough to hold a frozen ganache piece. Nestle the ganache inside and carefully mold the cookie dough around it, making sure the chocolate is fully covered. Arrange these on a parchment-lined baking sheet, spacing them evenly.
Step 7: Bake and Shape
Bake at 350°F for 8 to 11 minutes. You want the edges set and the tops to look puffed yet not wet—that’s the perfect point before the molten center is locked inside. For a professional touch, press the cookies gently with a biscuit or cookie cutter right after baking to create even, pretty circles. Let them cool for a few minutes before transferring them to a wire rack.
How to Serve Chocolate Lava Cookies Recipe
Garnishes
To elevate your presentation, dust the cooled cookies with powdered sugar. This simple touch mimics the elegant look of molten lava cake and adds a subtle sweetness that contrasts beautifully with the rich chocolate. You can also consider a sprinkle of flaky sea salt for a delightful flavor burst.
Side Dishes
These cookies shine when paired with something cool and creamy. Vanilla ice cream is a classic companion, offering refreshing balance to the warm, gooey centers. For an adult twist, a drizzle of salted caramel or espresso sauce complements the espresso powder in the cookies. Fresh berries or a dollop of whipped cream also enhance the experience.
Creative Ways to Present
For an impressive dessert platter, arrange the cookies around a small bowl of warm chocolate sauce or ganache for extra dipping fun. You can serve them on a rustic wooden board lined with parchment to invite casual sharing. If gifting, place a few in a decorative box with a note recommending enjoying them slightly warm to relive that molten center magic.
Make Ahead and Storage
Storing Leftovers
Leftover Chocolate Lava Cookies keep well in an airtight container at room temperature for up to three days. Keep them in a single layer or separated with parchment paper to prevent sticking and preserve their shape and texture.
Freezing
You can freeze both the ganache centers and completed cookie dough balls separately or assembled cookies. Freeze ganache balls until firm, then store in a sealed container or zip-top bag. For the dough balls, freeze well-wrapped to preserve freshness. Fully baked cookies freeze nicely too—just be sure to thaw them at room temperature.
Reheating
To enjoy that signature molten center even after storing, warm the cookies in a preheated oven at 300°F for 5-7 minutes or microwave briefly for 15-20 seconds. This brings the ganache back to its silky, molten glory without overcooking the cookie exterior.
FAQs
Can I use chocolate chips instead of baking chocolate?
Yes, chocolate chips can work in this recipe, but baking chocolate tends to melt more smoothly for the ganache. If using chips, choose high-quality ones for the best flavor and texture.
What does espresso powder do in the recipe?
Espresso powder doesn’t make the cookies taste like coffee; rather, it enhances and intensifies the chocolate flavor, giving it a richer depth and complexity.
Is it necessary to chill the ganache before scooping?
Absolutely. Chilling the ganache helps it firm up so you can shape it easily and prevent it from melting into the cookie dough prematurely during assembly or baking.
Can I make these cookies gluten-free?
Gluten-free versions are possible by substituting the flour with a suitable gluten-free blend, but the texture may be slightly different. Be sure to use a blend that includes xanthan gum or another binder for the best results.
How do I know when the cookies are perfectly baked?
The edges should be set and slightly firm to the touch, while the tops appear puffed but not wet or shiny. This ensures the cookie is baked through but still soft enough to keep the molten center intact.
Final Thoughts
There is something wonderfully satisfying about a dessert that surprises with each bite, and this Chocolate Lava Cookies Recipe does exactly that. Your friends and family will be amazed by the decadent, melting center tucked inside a tender chocolate cookie. The combination of simple ingredients and thoughtful technique makes these cookies a worthwhile baking adventure. I encourage you to give this recipe a try—you’ll discover your new favorite chocolate treat that’s perfect for sharing or savoring all to yourself.
Print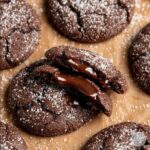
Chocolate Lava Cookies Recipe
- Prep Time: 35 minutes
- Cook Time: 11 minutes
- Total Time: 1 hour 45 minutes
- Yield: 24 servings
- Category: Dessert
- Method: Baking
- Cuisine: American
Description
Indulge in these decadent Chocolate Lava Cookies, featuring a rich, gooey chocolate ganache center encased in a soft and tender chocolate cookie. Combining deep cocoa flavors with a hint of espresso powder, these cookies bake up with a molten core that oozes irresistible chocolate goodness. Perfect for chocolate lovers seeking a delightful treat with a molten lava cake twist in cookie form.
Ingredients
Ganache
- 4 oz dark or semi-sweet chocolate, finely chopped
- ½ cup heavy whipping cream
Cookie Dough
- 2 cups plus 2 Tbsp all-purpose flour (270 g)
- ½ cup plus 2 Tbsp Dutch processed cocoa powder (67 g)
- ½ to 1 tsp espresso powder
- ½ tsp baking soda
- ½ tsp baking powder
- ¼ tsp sea salt
- 1 cup salted butter (227 g), room temperature
- 1 cup white sugar (200 g)
- ½ cup light brown sugar (110 g)
- 2 large eggs, room temperature
- 1½ tsp vanilla extract
- Powdered sugar (optional, for dusting)
Instructions
- Make the ganache: Chop the chocolate into small pieces and place in a bowl. Warm the heavy cream in the microwave in 20-second increments until hot but not boiling, about 40-50 seconds. Pour cream over chocolate and let sit for a few minutes, then stir until smooth and fully melted. If needed, microwave for an additional 5 seconds and stir.
- Chill ganache: Refrigerate the ganache for 20-30 minutes until firm enough to scoop.
- Prepare ganache portions: Scoop about 24 teaspoons of ganache onto a parchment-lined baking pan and freeze for 30 minutes to solidify. Optionally, roll into balls once set.
- Preheat oven: Set oven to 350°F (175°C) and line baking pans with parchment paper.
- Mix dry ingredients: In a medium bowl, whisk together flour, espresso powder, cocoa powder, baking soda, baking powder, and sea salt until evenly combined.
- Cream butter and sugars: Using a mixer, beat butter, white sugar, and brown sugar on medium-high speed for 3-4 minutes until light and fluffy. Add eggs and vanilla extract, mixing until incorporated.
- Combine dough: Add the dry ingredient mixture to the wet ingredients in thirds, mixing on low speed just until combined to avoid overmixing.
- Assemble cookies: Scoop 2 tablespoons of cookie dough and roll into balls. Use your thumb to create a cavity in the center, place a frozen ganache dollop inside, and cover it completely with dough. Arrange on prepared baking sheets.
- Bake: Bake cookies for 8-11 minutes or until edges are set and tops are slightly puffed but not wet.
- Shape and cool: Optionally, press cookies gently with a biscuit or cookie cutter for uniform shape. Let cookies cool for several minutes on the pan, then transfer to a wire rack to cool completely.
- Finish: Once cooled, dust the cookies lightly with powdered sugar to mimic a molten lava cake appearance.
Notes
- Use high-quality baking chocolate for the best ganache flavor; chocolate chips can be substituted if needed.
- Room temperature eggs and butter ensure proper mixing and texture.
- Be careful not to overmix the dough after adding the dry ingredients to keep cookies tender.
- The espresso powder enhances the chocolate flavor but can be omitted if unavailable.
- Cookies can be frozen after assembling to bake later; just increase bake time slightly if baking from frozen.


