

There is nothing quite like the combination of tender shrimp, bold garlic, and nutty Parmesan cheese to make your taste buds sing. This Garlic Parmesan Shrimp Skewers Recipe brings all those flavors together in a simple yet stunning dish that cooks in just minutes. Whether you’re looking for a quick weeknight dinner, a show-stopping appetizer, or a crowd-pleaser for your next gathering, these skewers deliver juicy, garlicky shrimp with a crispy Parmesan crust that will have everyone asking for seconds. Let me take you through how easy it is to whip up this delightful, flavor-packed seafood treat.
Ingredients You’ll Need
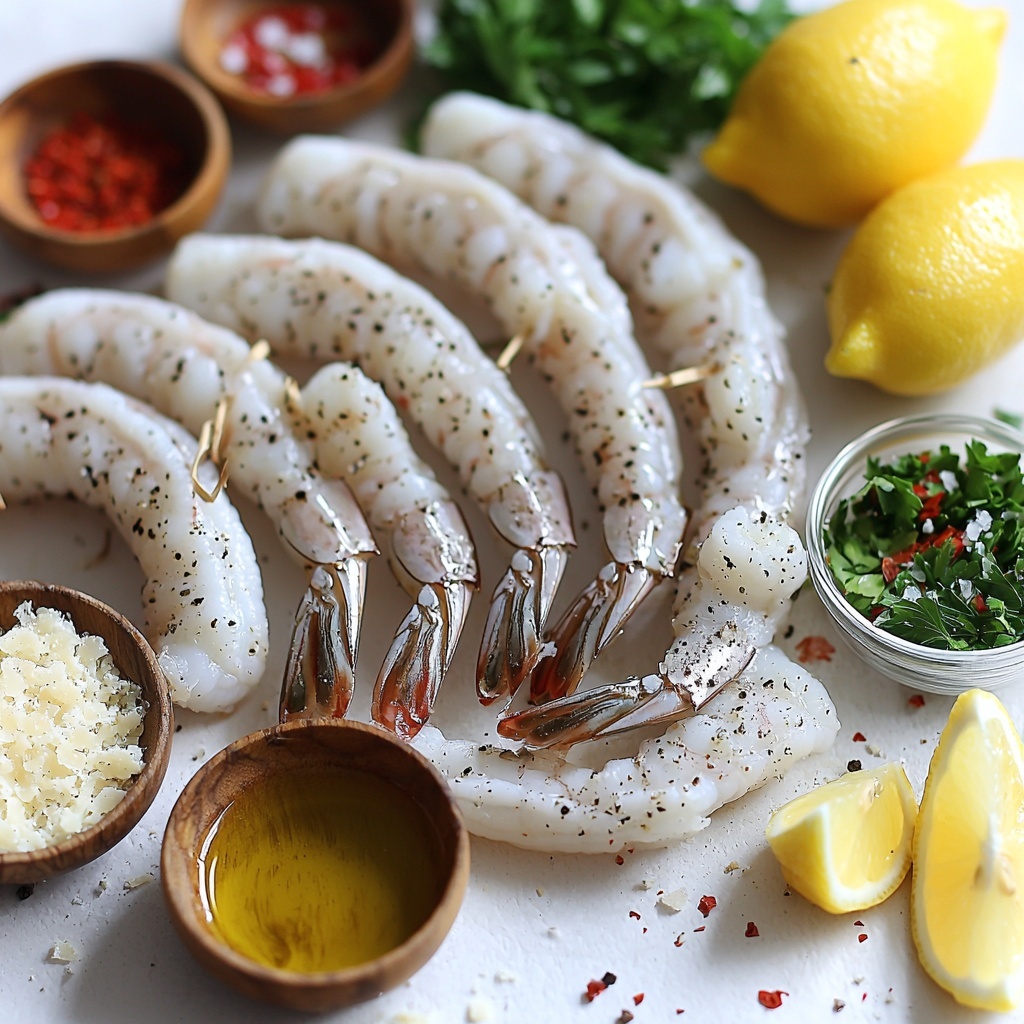
Getting the ingredients right is the first step to nailing this Garlic Parmesan Shrimp Skewers Recipe. The mix is straightforward but essential: each item plays a crucial role in balancing flavor, texture, and color to create the perfect skewer experience.
- 1 lb large shrimp (16–20 count): Fresh, peeled, and deveined shrimp provide the tender and juicy seafood base for the skewers.
- 2 tablespoons olive oil: Helps the garlic and Parmesan stick to the shrimp while adding a luscious richness.
- 4 garlic cloves minced: The star aroma and flavor, infusing every bite with a bold savory punch.
- 1/2 cup grated Parmesan cheese: Creates a crispy, golden crust bursting with umami goodness.
- 1/2 teaspoon smoked paprika: Adds a subtle smoky layer and warm color contrast to the shrimp.
- 1/4 teaspoon crushed red pepper flakes (optional): A hint of heat for those who enjoy a little kick in their seafood.
- 2 tablespoons chopped fresh parsley: Brightens the dish with fresh, herbaceous notes and vibrant green color.
- 1/4 teaspoon salt: Enhances all the flavors naturally without overpowering.
- 1/4 teaspoon black pepper: Adds a mild spiciness and depth to the seasoning.
- Lemon wedges for serving: Their zesty tang perfectly balances the rich Parmesan and garlic.
How to Make Garlic Parmesan Shrimp Skewers Recipe
Step 1: Prepare Your Skewers and Oven
Start by soaking 4 to 6 wooden skewers in water for at least 20 minutes. This little trick prevents them from burning under the intense heat of your broiler later on. While the skewers soak, preheat your broiler to high and line a baking sheet with foil to catch any drips—then lightly grease the foil either with olive oil or nonstick spray. Setting up this way makes cleanup a breeze.
Step 2: Toss Shrimp with Seasonings
Grab a large mixing bowl and toss your shrimp with olive oil, minced garlic, smoked paprika, salt, and black pepper. This step is where the magic begins—the oil helps coat each shrimp evenly, allowing the garlic and spices to cling and fully flavor every piece. The paprika brings a warm, smoky undertone that complements the shrimp beautifully.
Step 3: Add the Parmesan Cheese
Sprinkle in the grated Parmesan cheese and toss gently but thoroughly just enough to coat each shrimp. The oil you’ve already added is crucial here because it allows the cheese to stick perfectly. This coating promises a golden, crispy crust once broiled, making these shrimp absolutely irresistible.
Step 4: Thread the Shrimp Onto Skewers
Take your soaked skewers and thread 4 to 5 shrimp on each one. Be sure to pierce through the thick and thin ends of the shrimp to keep them secure and prevent spinning around while cooking. Arranging the shrimp this way ensures even cooking and a great presentation.
Step 5: Broil to Perfection
Place the shrimp skewers on your prepared baking sheet in a single layer. Broil for 2 to 3 minutes on each side, watching closely as the shrimp turn a beautiful pink with slightly browned edges and the Parmesan crust crisps up golden brown. The broiler works fast, so don’t walk away!
Step 6: Garnish and Serve
Once out of the oven, sprinkle chopped fresh parsley generously over the shrimp for a fresh, green pop of color and flavor. Serve immediately with lemon wedges on the side. The juice from fresh lemon brightens up the richness of the Parmesan and garlic, tying every bite together in perfect harmony.
How to Serve Garlic Parmesan Shrimp Skewers Recipe
Garnishes
Fresh chopped parsley is the classic finishing touch—it lends a fragrant, herbal contrast to the savory shrimp. Besides parsley, consider a light drizzle of extra virgin olive oil or a sprinkle of freshly cracked black pepper to enhance the visual and flavor appeal even more.
Side Dishes
These skewers pair wonderfully with crisp, refreshing side dishes like a simple green salad or a crunchy slaw. Garlic Parmesan Shrimp Skewers also complement fluffy rice pilaf, buttery garlic mashed potatoes, or even roasted vegetables for a heartier meal. The slight smokiness in the shrimp opens up room for many delicious pairings.
Creative Ways to Present
For parties or gatherings, serve the skewers standing upright in a rustic wooden block for a fun, interactive presentation. You can also place them over a bed of baby arugula, drizzle with a creamy lemon aioli, or serve alongside a tangy cocktail sauce for an eye-catching appetizer tray everyone will love.
Make Ahead and Storage
Storing Leftovers
If you happen to have leftovers, store the cooked shrimp skewers in an airtight container in the refrigerator. They will stay delicious for up to 2 days, making them great for quick lunches or an easy snack.
Freezing
You can freeze the cooked shrimp skewers by wrapping them tightly in plastic wrap and placing them in a freezer bag or airtight container. They will keep well for up to one month. When thawed, the texture might be slightly softer, but the flavors hold up nicely.
Reheating
To reheat, place the skewers on a baking sheet and warm them in a 350°F oven for about 5 to 7 minutes. This method helps maintain the crispy Parmesan crust better than the microwave, which can make shrimp rubbery. A quick broil for a minute at the end can refresh the crust’s crunch.
FAQs
Can I use frozen shrimp for this recipe?
Absolutely! Just be sure to thaw the shrimp completely and pat them dry before seasoning so they crisp nicely under the broiler rather than steam.
What can I substitute if I don’t have Parmesan cheese?
Pecorino Romano cheese is a great alternative with a similarly bold, salty flavor. You can also try finely shredded Asiago if you want something a bit milder.
Can I grill these shrimp skewers instead of broiling them?
Yes, grilling works wonderfully. Just preheat your grill to medium-high and cook the shrimp for 2 to 3 minutes per side until they are opaque and the cheese is golden.
Is it necessary to soak the wooden skewers?
Soaking prevents them from burning or catching fire under high heat, so it is highly recommended. If using metal skewers, this step can be skipped.
How spicy are these Garlic Parmesan Shrimp Skewers?
The recipe includes optional crushed red pepper flakes for a subtle kick. You can easily adjust or omit the red pepper flakes depending on your heat preference.
Final Thoughts
There’s something so satisfying about this Garlic Parmesan Shrimp Skewers Recipe—the quick prep, the amazing aroma of garlic and Parmesan baking together, and the juicy, flavorful shrimp that come out every time. It’s a perfect dish to impress friends or treat yourself on a busy night. I can’t wait for you to try it and experience how effortlessly delicious shrimp can be!
Print
Garlic Parmesan Shrimp Skewers Recipe
- Prep Time: 10 minutes
- Cook Time: 6 minutes
- Total Time: 16 minutes
- Yield: 12 servings
- Category: Appetizer
- Method: Broiling
- Cuisine: American
Description
These Garlic Parmesan Shrimp Skewers are a quick and flavorful appetizer or main dish, combining succulent shrimp with a savory garlic and Parmesan crust. Perfectly broiled to a golden finish, they deliver a deliciously crisp exterior while keeping the shrimp tender and juicy. Ready in just 16 minutes, these skewers are an easy and impressive seafood option for any gathering or weeknight dinner.
Ingredients
Shrimp and Marinade
- 1 lb large shrimp (16–20 count)
- 2 tablespoons olive oil
- 4 garlic cloves, minced
- 1/2 teaspoon smoked paprika
- 1/4 teaspoon crushed red pepper flakes (optional)
- 1/4 teaspoon salt
- 1/4 teaspoon black pepper
Topping and Garnish
- 1/2 cup grated Parmesan cheese
- 2 tablespoons chopped fresh parsley
- Lemon wedges for serving
Other
- 4–6 wooden skewers (soaked in water for 20 minutes to prevent burning)
- Nonstick spray or olive oil for greasing the baking sheet
Instructions
- Prepare skewers and broiler: Soak 4–6 wooden skewers in water for 20 minutes to prevent burning, then preheat the broiler to high. Line a baking sheet with foil and lightly grease it with nonstick spray or olive oil.
- Marinate shrimp: In a large mixing bowl, toss the shrimp with olive oil, minced garlic, smoked paprika, salt, and black pepper until evenly coated to infuse the shrimp with bold flavors.
- Add Parmesan cheese: Gently toss the shrimp with grated Parmesan cheese to create an even coating. The olive oil helps the cheese stick well to the shrimp.
- Thread shrimp onto skewers: Thread 4–5 shrimp onto each skewer, piercing through both thick and thin ends to secure them firmly on the skewers.
- Broil shrimp skewers: Place the prepared skewers on the baking sheet in a single layer and broil for 2–3 minutes on each side. Cook until shrimp turn pink and the Parmesan crust becomes golden and crispy.
- Serve: Remove skewers from the oven and sprinkle with fresh chopped parsley. Serve immediately with lemon wedges and your preferred dipping sauce for an extra burst of flavor.
Notes
- Soaking the wooden skewers prevents them from burning under the broiler.
- Adjust crushed red pepper flakes based on your heat preference or omit for a milder flavor.
- Ensure shrimp are fully cooked but not overcooked to keep them juicy and tender.
- If using metal skewers, soaking is not necessary.
- Serve with a side salad or crusty bread for a complete meal.


