

If you love the irresistible combo of creamy cheesecake and juicy strawberries, you are going to adore this Chocolate-Dipped Strawberry Mini Cheesecakes Recipe. These delightful little treats pack all the flavors of a classic strawberry cheesecake into bite-sized perfection, with a crisp graham cracker crust, a luscious, velvety filling, and the crowning glory of fresh strawberries dipped in rich, melted chocolate. They’re as charming to look at as they are delicious, making them perfect for sharing with friends or savoring as a special indulgence.
Ingredients You’ll Need
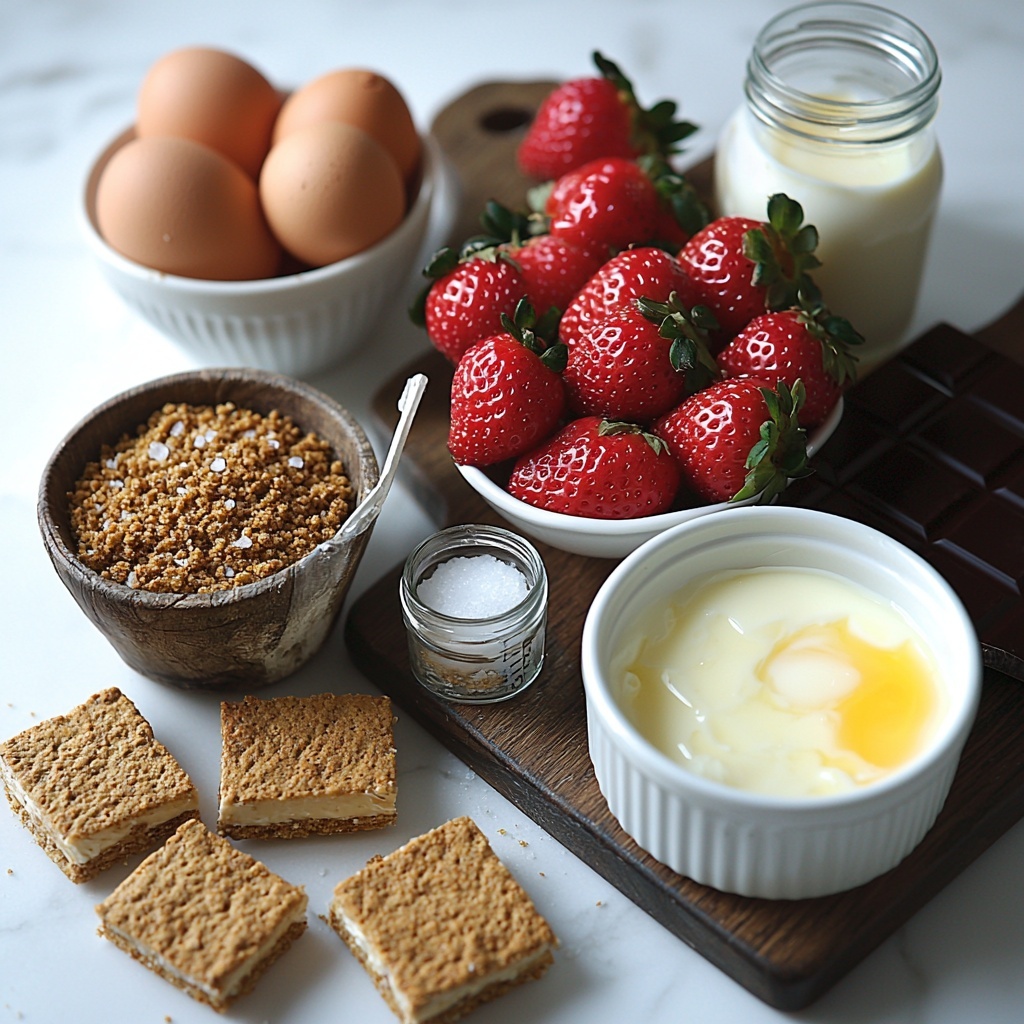
With just a handful of simple, wholesome ingredients, you can create these spectacular mini cheesecakes. Each component plays a crucial role: the graham cracker crumbs form a crunchy base, the cream cheese mixture provides that signature smooth texture, and the strawberries bring freshness and a pop of color that’s impossible to resist.
- 1 ¼ cups graham cracker crumbs: For that buttery, crunchy crust foundation that holds everything together.
- 6 Tablespoons salted butter (melted): Helps bind the crust and adds a mellow richness.
- 2 packages (8 ounces each) cream cheese (softened): The cornerstone of the creamy cheesecake filling with a smooth, tangy flavor.
- 3/4 cup granulated sugar: Balances the tartness with just the right touch of sweetness.
- 2 large eggs: Provide structure and help create the perfect creamy-but-set consistency.
- 1 large egg yolk: Adds extra richness for that luscious texture.
- 2 teaspoons vanilla extract: Infuses the cheesecake with warm, fragrant notes.
- 1/4 teaspoon fine sea salt: Enhances all the flavors and balances the sweetness.
- 18 whole strawberries (preferably small): Juicy, fresh, and perfectly sized for topping each mini cheesecake.
- 10 ounces good quality milk chocolate (melted): For dipping the strawberries and drizzling on the cheesecakes, adding a smooth, decadent finish.
How to Make Chocolate-Dipped Strawberry Mini Cheesecakes Recipe
Step 1: Prepare the Crust
Start by mixing the graham cracker crumbs and melted butter in a medium bowl until the crumbs are fully coated and can hold their shape when pressed. Spoon about 1 1/2 tablespoons of this mixture into each of the 18 cups across two standard 12-count silicone muffin pans. Press the mixture firmly with your fingers or the bottom of a glass to create an even, compact crust. Setting aside the crust at this point lets you focus on the delicious filling.
Step 2: Preheat the Oven
Set your oven to 325 degrees Fahrenheit. This moderate temperature ensures the cheesecakes will bake evenly and develop a silky texture without cracking or overcooking.
Step 3: Make the Cheesecake Filling
Using a stand mixer fitted with a paddle attachment, beat the softened cream cheese until it’s perfectly smooth with no lumps. Slowly add the sugar while mixing on low speed, then incorporate the eggs one at a time, followed by the egg yolk. Mix each only until just combined to avoid adding excess air. Scrape down the sides of the bowl as needed, then add the vanilla extract and fine sea salt. Continue mixing until everything is creamy and fully combined. This careful process results in that signature velvety texture we all love.
Step 4: Fill and Bake
Divide the cheesecake batter evenly among the muffin cups, smoothing the tops gently with the back of a spoon for an even surface. Bake for 20 to 25 minutes, watching carefully: the centers should be just set but still slightly jiggly. Don’t worry if they puff up during baking and then fall as they cool – this is completely normal and part of the charm. Allow the mini cheesecakes to cool in the pan to room temperature before moving on.
Step 5: Chill the Cheesecakes
Once cooled, place the cheesecakes in the refrigerator for at least 2 hours. This chilling time is key to achieving that firm, luscious finish that makes mini cheesecakes so irresistible, plus it helps them hold their shape when unmolded.
Step 6: Chocolate Dip and Assemble
After chilling, carefully run a sharp knife around each cheesecake’s edge to loosen it, then gently remove each one from the pan. Spoon a little melted milk chocolate over each cheesecake’s top for a glossy, indulgent layer. Then dip each strawberry into the melted chocolate and place it on top as the crowning jewel of this dessert masterpiece. Serve immediately and watch how everyone’s eyes light up!
How to Serve Chocolate-Dipped Strawberry Mini Cheesecakes Recipe
Garnishes
While the chocolate-dipped strawberries are already showstoppers, you can elevate your presentation with a few thoughtful garnishes. A light dusting of powdered sugar adds a snowy touch, while a sprinkle of chopped toasted nuts on the edge of the chocolate or a drizzle of white chocolate creates an elegant contrast. Fresh mint leaves are also gorgeous next to each strawberry to add a pop of green and a refreshing aroma.
Side Dishes
These mini cheesecakes are wonderfully versatile, pairing beautifully with an assortment of accompaniments. A scoop of vanilla bean ice cream or a dollop of lightly sweetened whipped cream turns this treat into an even richer dessert. For a brunch or tea time, consider serving alongside fresh fruit salad or a crisp, fruity sparkling wine that cuts through the richness.
Creative Ways to Present
For a fun twist, arrange these mini cheesecakes on a tiered dessert stand—perfect for parties or special occasions. You can also serve them in pretty individual dessert cups or even on decorative spoons for bite-sized tasting experiences. Wrapping each in a thin ribbon and placing them in mini gift boxes makes a charming edible gift that’s sure to impress.
Make Ahead and Storage
Storing Leftovers
Leftover mini cheesecakes can be kept fresh by storing them in an airtight container in the refrigerator. Make sure the chocolate has fully set before covering to avoid smudging. They will stay delicious and creamy for up to 3 to 4 days, making them a perfect treat to enjoy over several days without losing texture or flavor.
Freezing
If you’d like to prepare these ahead of time or save extras for later, mini cheesecakes freeze wonderfully. Place them on a baking sheet to freeze individually until firm, then transfer to a freezer-safe airtight container or resealable bag. They will keep well for up to 1 month. When ready to enjoy, thaw overnight in the refrigerator for best texture.
Reheating
Because these cheesecakes are best enjoyed chilled, reheating is not recommended and can affect their creamy texture and chocolate coating. Instead, allow frozen cheesecakes to defrost gently in the fridge for several hours before serving. This preserves the perfect balance of creamy filling and crisp crust every time.
FAQs
Can I use fresh strawberries other than small ones?
Yes! While small strawberries work best for portion size and appearance, you can substitute with medium or larger strawberries. Just slice larger strawberries in half or quarters so they sit nicely on top of each mini cheesecake.
What type of chocolate works best for dipping strawberries?
Good quality milk chocolate is ideal because of its smooth texture and sweet, creamy flavor, which pairs beautifully with the tartness of the strawberries and the richness of the cheesecake. However, you can also use dark or white chocolate depending on your preference.
Can I make these mini cheesecakes dairy-free?
While this recipe relies on cream cheese for its signature taste and texture, using dairy-free cream cheese alternatives could work with some adjustments. Keep in mind that texture may vary, and be sure to choose compatible dairy-free chocolates for dipping.
How do I prevent the cheesecake from cracking?
Be careful not to overbeat the batter or overbake the cheesecakes. Baking at 325°F and removing from the oven as soon as the centers are set but still slightly jiggly helps prevent cracks. Also, chilling the cheesecakes properly before removing from pans reduces cracking risks.
Can I double this recipe for a larger batch?
Absolutely! Just double all ingredient quantities and use additional muffin pans and strawberries for topping. Keep the baking time similar but monitor closely, as oven temperatures can vary with larger batches.
Final Thoughts
There’s something truly magical about sharing these Chocolate-Dipped Strawberry Mini Cheesecakes Recipe with friends and family. They’re small enough to indulge guilt-free but packed with big flavors that wow every time. Whether for a special occasion or just because you deserve a sweet escape, this recipe invites you to embrace joy in every bite. I hope you have as much fun making and enjoying them as I do!
Print
Chocolate-Dipped Strawberry Mini Cheesecakes Recipe
- Prep Time: 20 minutes
- Cook Time: 25 minutes
- Total Time: 2 hours 45 minutes
- Yield: 18 mini cheesecakes
- Category: Dessert
- Method: Baking
- Cuisine: American
Description
Indulge in these delightful Chocolate-Dipped Strawberry Mini Cheesecakes, featuring a buttery graham cracker crust, creamy vanilla cheesecake filling, and topped with fresh strawberries dipped in rich melted milk chocolate. Perfect for parties or a special treat, these bite-sized desserts combine classic flavors with an elegant presentation.
Ingredients
Crust
- 1 ¼ cups graham cracker crumbs
- 6 Tablespoons salted butter, melted
Cheesecake Filling
- 2 packages (8 ounces each) cream cheese, softened
- 3/4 cup granulated sugar
- 2 large eggs
- 1 large egg yolk
- 2 teaspoons vanilla extract
- 1/4 teaspoon fine sea salt
Topping
- 18 whole strawberries (preferably small)
- 10 ounces good quality milk chocolate, melted
Instructions
- Prepare the crust: In a medium bowl, combine the graham cracker crumbs and melted butter. Using two standard silicone 12-count muffin/cupcake tins, spoon about 1 1/2 tablespoons of the mixture into 18 cups total. Press the crumbs firmly into the cups to form a solid crust base. Set aside.
- Preheat the oven: Set the oven temperature to 325 degrees Fahrenheit (163 degrees Celsius) to ensure it is ready for baking the cheesecakes.
- Make the cheesecake filling: In the bowl of a stand mixer fitted with a paddle attachment, beat the softened cream cheese until smooth and creamy. Gradually add the sugar and continue beating on low speed. Incorporate the eggs one at a time, followed by the egg yolk, mixing just until combined. Scrape down the bowl as needed to ensure even mixing. Add vanilla extract and sea salt, then mix until the batter is smooth.
- Fill the molds and bake: Evenly distribute the cheesecake filling among the crust-lined muffin cups. Smooth the tops with the back of a spoon for an even surface. Bake for 20 to 25 minutes or until the centers are just set. The cheesecakes will puff up slightly during baking and flatten as they cool; this is normal.
- Cool and chill: Allow the cheesecakes to cool to room temperature right in the pan to avoid cracking. Once cooled, transfer the pan to the refrigerator and chill for at least 2 hours to set properly.
- Remove from pan: After chilling, carefully run a sharp knife around the edges of each cheesecake to loosen them, then gently remove each mini cheesecake from the silicone molds.
- Decorate with chocolate and strawberries: Spoon a small amount of melted milk chocolate over each individual cheesecake to create a glossy topping. Dip each strawberry into the melted chocolate, allowing excess chocolate to drip off, then place the dipped strawberry on top of the cheesecake. Serve and enjoy!
Notes
- Use high-quality cream cheese and chocolate for the best flavor and texture.
- Small strawberries work best as a topping to keep the mini cheesecakes proportionate and easy to eat.
- If you don’t have silicone muffin cups, grease a regular muffin tin thoroughly to prevent sticking.
- For a firmer crust, chill the crust mixture in the muffin tins for 10 minutes before filling.
- Keep cheesecakes refrigerated until serving to maintain firmness and freshness.


