

There is something truly magical about making candies from scratch, and the Bonbons Gélifiés Acidulés Maison Recipe is the perfect way to dive into that joy. These homemade sour gummy candies burst with vibrant fruity flavors and a delightfully tangy coating that awakens your taste buds. Not only are they incredibly fun to make, but their chewy texture and zesty punch make them irresistible treats to share with friends or enjoy as a personal little treasure. Trust me, once you try this recipe, you’ll wonder why you ever bought gummy candies from the store!
Ingredients You’ll Need
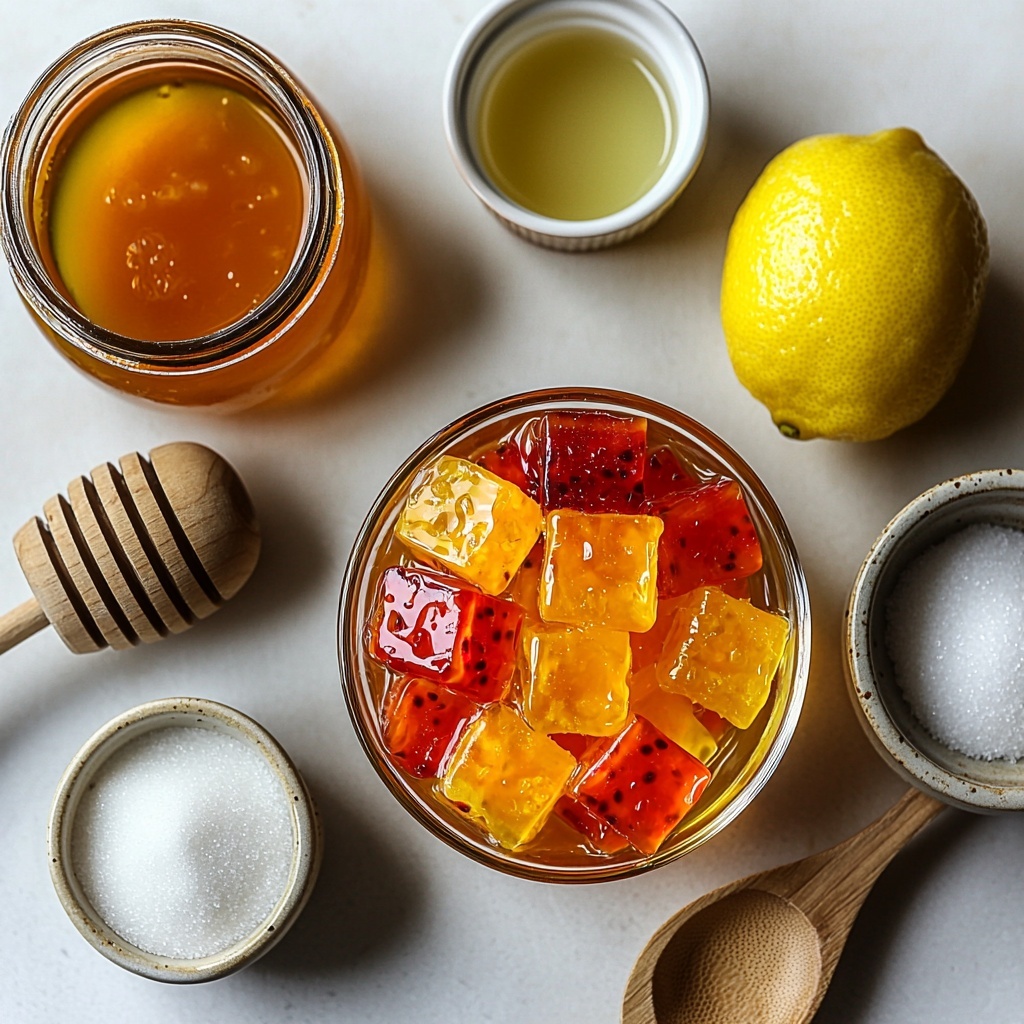
Getting your ingredients right is the first step to creating these luscious Bonbons Gélifiés Acidulés Maison. Each component plays a vital role, from sweetness to texture to that perfect sour zing, so having quality basics on hand really makes all the difference.
- 250 ml of fruit juice: Choose flavors like orange, strawberry, or lemon to naturally color and flavor the candies.
- 3 tablespoons of sugar: Adds sweetness and helps balance the tartness of the sour coating.
- 2 tablespoons of honey (optional): A natural sweetener that deepens the flavor and adds a gentle softness to the gummies.
- 2 tablespoons of gelatin powder (about 20 g): The magic ingredient to give your bonbons their perfect chewy texture.
- 1 tablespoon of lemon juice: Enhances the tangy notes and adds brightness.
- Sugar plus 1 teaspoon of citric acid: For the signature sour coating that makes these candies so addictive.
How to Make Bonbons Gélifiés Acidulés Maison Recipe
Step 1: Warm the Fruit Juice
Start by gently heating the fruit juice in a small saucepan over low heat. The goal here is to warm it just enough to dissolve your sugar and incorporate other ingredients easily, so avoid boiling as it might affect flavours.
Step 2: Add Sugar and Honey
Once the juice is warm, stir in your sugar and optional honey. Keep mixing until all the sugar has completely dissolved; this step ensures your bonbons have a smooth, sweet base balancing the acidity perfectly.
Step 3: Incorporate Gelatin
Remove the pan from heat and gradually whisk in the gelatin powder. Whisk steadily to prevent any lumps from forming and to ensure the gelatin disperses evenly throughout the mixture, which is key for those soft, chewy bites.
Step 4: Add Lemon Juice
Mix in the lemon juice thoroughly. This addition brightens the flavor profile and brings a fresh tartness that complements the sugar and fruit juice beautifully.
Step 5: Pour into Molds
Carefully transfer your mixture into silicone molds shaped like worms, rings, or any fun designs you prefer. Silicone is fantastic here because it helps the bonbons pop out easily without damage.
Step 6: Refrigerate Until Firm
Place the molds in the refrigerator and let them set for at least 2 to 3 hours. Patience is key—this chilling period allows the gelatin to fully set, creating that lovely chewiness we crave in gummy treats.
Step 7: Create the Sour Coating
Mix the sugar with citric acid to prepare your signature tangy sprinkle. Once the bonbons are firm, roll them in this mixture to coat each candy with a delightful sour finish that gives these bonbons their unique character.
How to Serve Bonbons Gélifiés Acidulés Maison Recipe
Garnishes
Sprinkling an extra pinch of powdered sugar or a little extra citric acid on top just before serving can add an elegant sparkle and a burst of tang with every bite. You can also dust them lightly with edible glitter for festive occasions, making the candies even more eye-catching.
Side Dishes
Bonbons Gélifiés Acidulés Maison are perfect on their own but also pair wonderfully with a refreshing iced tea or a fruity sparkling water to balance their intensity. For a playful party twist, serve alongside other homemade sweets or a fresh fruit platter for contrast.
Creative Ways to Present
Try arranging the bonbons in colorful jars or clear glass bowls to showcase their vibrant hues. Wrapping them in cute cellophane bags tied with bright ribbons makes them ideal gifts or party favors. You can also skewer several on cocktail sticks for a fun edible arrangement that guests will love grabbing.
Make Ahead and Storage
Storing Leftovers
Keep any leftover bonbons in an airtight container stored in the refrigerator. They maintain their freshness and chewy consistency best when chilled, and they should stay delicious for up to a week.
Freezing
If you want to extend their shelf life, you can freeze these gummies. Place them in a freezer-safe container separated by parchment paper to prevent sticking. When you’re ready to enjoy them, thaw in the fridge for a few hours for optimal texture.
Reheating
Since these bonbons are best served chilled and chewy, reheating isn’t necessary or recommended. If they become too firm in the fridge, letting them sit at room temperature for a few minutes will soften them slightly without losing their delightful texture.
FAQs
Can I use any fruit juice for the Bonbons Gélifiés Acidulés Maison Recipe?
Absolutely! The recipe is quite versatile, so you can experiment with orange, strawberry, lemon, or even mixed fruit juices depending on your taste preferences. Just be sure to use natural juices for the best flavor and texture results.
Is there a vegetarian alternative to gelatin for these bonbons?
If you prefer a vegetarian option, try using agar-agar powder. However, the texture will differ slightly since agar-agar sets more firmly and less chewy than gelatin. Adjust quantities according to package instructions to find your perfect consistency.
How sour can I make the bonbons?
You can easily control the sourness by adjusting the amount of citric acid in the coating mixture. Start with the recommended amount and add a bit more if you love that extra zing, but be cautious as too much can overpower the fruity flavors.
Can I skip the honey in this recipe?
Yes, honey is optional. It adds depth and a smooth sweetness, but the combination of sugar and fruit juice alone will still yield delicious bonbons. Feel free to omit it if you prefer a lighter or less sweet version.
What molds work best for making these bonbons?
Silicone molds are the best choice because they’re flexible and make removing the gummies simple and clean. You can find fun shapes like worms, rings, hearts, or classic cubes that enhance the playful appeal of your homemade bonbons.
Final Thoughts
Making your own Bonbons Gélifiés Acidulés Maison Recipe is such a joyful and rewarding experience. From the first warm stir of juice and gelatin to the final tangy coating, you connect with your candy in a way that store-bought just can’t match. Whether it’s a weekend project or a special treat to surprise someone you love, these sour gummies will quickly become a treasured favorite. So roll up your sleeves, pick your favorite juices, and dive into this irresistibly fun and flavorful adventure!
Print
Bonbons Gélifiés Acidulés Maison Recipe
- Prep Time: 10 minutes
- Cook Time: 5 minutes
- Total Time: 3 heures 15 minutes
- Yield: Environ 30 bonbons (selon la taille des moules)
- Category: Dessert
- Method: Stovetop
- Cuisine: French
Description
Découvrez la recette maison facile et gourmande des bonbons gélifiés acidulés, préparés avec du jus de fruits naturel et une touche de douceur. Ces bonbons fruités et légèrement acidulés sont parfaits pour une friandise saine et personnalisable à la maison.
Ingredients
Ingrédients principaux
- 250 ml de jus de fruits (orange, fraise, citron…)
- 3 c. à soupe de sucre
- 2 c. à soupe de miel (optionnel)
- 2 c. à soupe de gélatine en poudre (≈ 20 g)
- 1 c. à soupe de jus de citron
Pour l’effet acidulé
- Sucre
- 1 c. à café d’acide citrique
Instructions
- Chauffer le jus : Dans une petite casserole, faites chauffer le jus de fruits à feu doux sans le faire bouillir pour préserver les arômes naturels.
- Ajouter sucre & miel : Incorporez le sucre et le miel (si utilisé), mélangez bien jusqu’à dissolution complète pour une texture bien sucrée.
- Incorporer la gélatine : Retirez la casserole du feu et ajoutez la gélatine peu à peu en fouettant vigoureusement pour éviter toute formation de grumeaux.
- Ajouter le citron : Ajoutez ensuite le jus de citron et mélangez bien pour équilibrer le goût acidulé et renforcer la saveur fruitée.
- Mouler : Versez le mélange dans des moules en silicone de votre choix, comme des vers ou des anneaux, pour une présentation ludique.
- Repos : Placez les moules au réfrigérateur pendant 2 à 3 heures afin que les bonbons gélifiés prennent bien et deviennent fermes.
- Effet acidulé : Préparez un mélange de sucre et d’acide citrique, puis roulez les bonbons dedans afin de leur donner une finition acidulée typique et délicieuse.
Notes
- Veillez à ne pas faire bouillir le jus pour préserver ses saveurs et nutriments.
- Le miel peut être omis ou remplacé par un autre sirop naturel selon les préférences.
- Pour une texture plus ferme, ajustez la quantité de gélatine en fonction de la marque et de la consistance souhaitée.
- Les bonbons se conservent mieux au réfrigérateur dans un récipient hermétique.
- Vous pouvez varier les jus de fruits pour créer différentes variantes de saveurs.


