

If you have ever dreamed of filling your kitchen with the irresistible aroma of warm, buttery pastries fresh from the oven, this Classic Flaky Croissants from Scratch Recipe is exactly what you need. Making croissants from scratch is truly a rewarding experience, turning simple ingredients into golden, flaky layers of pure delight. This recipe guides you through every step, ensuring your croissants come out tender, buttery, and perfectly puffed — just like the ones from your favorite bakery, but better because you made them yourself!
Ingredients You’ll Need
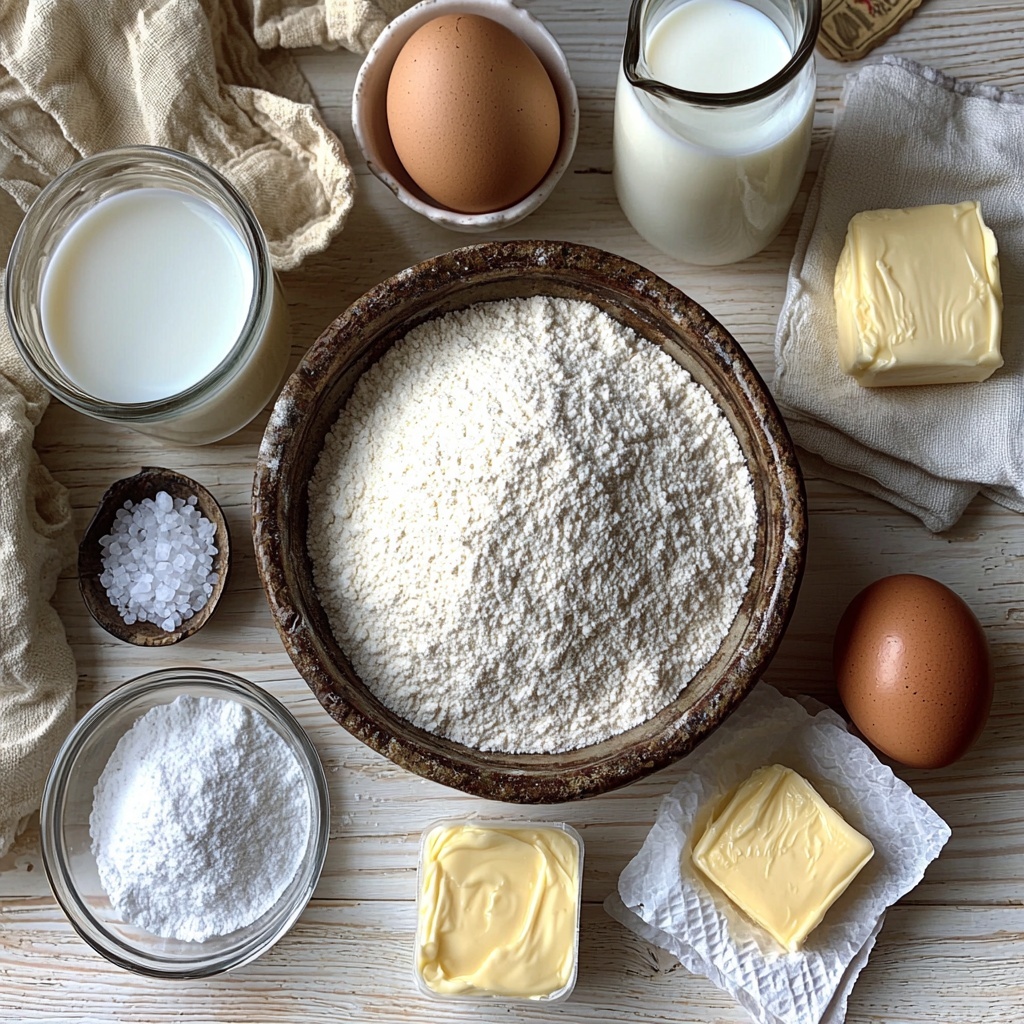
Each ingredient in this Classic Flaky Croissants from Scratch Recipe plays a crucial role, from the flour that forms the sturdy base to the cold butter that creates those signature flaky layers. With just a handful of simple items, you’ll be amazed at how they transform into something truly magical.
- 4 cups (500g) all-purpose flour: Provides the structure and chewiness crucial for classic croissants.
- 1/4 cup (50g) granulated sugar: Adds a subtle sweetness and aids in browning.
- 1 tablespoon (10g) salt: Enhances flavor and balances the sweetness.
- 1 tablespoon (10g) active dry yeast: The secret behind the croissants’ incredible rise and light texture.
- 1 1/4 cups (300ml) warm milk: Hydrates the dough and feeds the yeast for fermentation.
- 2 tablespoons unsalted butter, melted: Adds richness and helps tenderize the dough during mixing.
- 1 cup (225g) unsalted butter, cold and shaped into a flat square: The star ingredient for flaky layers through lamination.
- 1 egg: For brushing to give your croissants a glossy, golden finish.
- 1 tablespoon milk: Mixed with the egg to make the perfect egg wash.
How to Make Classic Flaky Croissants from Scratch Recipe
Step 1: Mix and Knead the Dough
Start by combining the flour, sugar, and salt in a large bowl or stand mixer. Meanwhile, dissolve the active dry yeast in warm milk and wait for it to become foamy—this is a good sign that the yeast is active and ready to work its magic. Add your yeast mixture and melted butter into the dry ingredients, then knead until the dough turns smooth, elastic, and beautiful, about 3 to 5 minutes. Shape this dough into a neat rectangle, wrap it up, and let it chill in the fridge for 1 hour. This resting period helps develop flavor and makes the dough easier to handle later.
Step 2: Prepare the Butter Block
The butter block is where all the flaky magic happens. Place your cold butter between two pieces of parchment paper and roll it out until it forms a 6-inch square. If the butter gets too warm or soft during this process, pop it back in the fridge so it stays firm. Keeping the butter cold is essential to creating those layers that croissants are famous for.
Step 3: Encapsulate the Butter with Dough
Roll out the chilled dough into a 12-inch square and place your butter block diagonally right in the center, resembling a diamond shape on a square canvas. Then fold each corner of the dough snugly over the butter, wrapping it like a present. This sealed package of dough and butter is where your layering begins.
Step 4: First Fold (Turn)
Roll the dough-and-butter package out into a long rectangle approximately 8 by 20 inches. Now, fold this rectangle into thirds as if folding a letter. Congratulations, you’ve completed your first “turn.” Wrap the dough up tightly and chill it in the refrigerator for 30 minutes. Chilling keeps the butter firm and the layers distinct.
Step 5: Repeat Folds
Repeat the rolling out, folding into thirds, and chilling two more times for a total of three turns. Each turn is essential to create those hundreds of delicate, flaky layers that make croissants so irresistible. Remember to keep the dough cold so the butter doesn’t melt into the dough.
Step 6: Roll Out Final Dough
After the last chilling, roll your dough out to a large rectangle about 1/4 inch thick. This is your sheet to cut into croissant shapes, so make it smooth and even for the best results.
Step 7: Cut Triangles
Trim the edges with a sharp knife or pizza cutter to get clean lines, then cut your dough into triangles about 5 inches wide at the base. These triangles will become the charming crescent shapes you know and love.
Step 8: Shape Croissants
Starting at the wide base of each triangle, gently stretch and roll the dough toward the tip to form the classic crescent shape. The light stretching helps elongate the layers so they puff nicely while baking.
Step 9: Proof Croissants
Place your shaped croissants on a baking tray, cover them loosely with plastic wrap or a clean kitchen towel, and allow them to rise at room temperature for 1.5 to 2 hours. This slow proof helps them become puffed and airy — the hallmark of perfect croissants.
Step 10: Preheat Oven and Prepare Egg Wash
While the croissants proof, preheat your oven to 400°F (200°C). Beat together the egg and milk to make a luscious egg wash that you’ll brush over the croissants just before baking. This wash gives a beautiful golden, glossy crust once baked.
Step 11: Bake Croissants
Pop those beauties into the oven and bake for 18 to 22 minutes until they puff fully and have a deep, inviting golden brown color. Don’t forget to rotate the baking pan halfway through to ensure even browning on all sides.
Step 12: Cool
Once out of the oven, transfer your croissants to a wire rack and allow them to cool for at least 10 minutes. This resting time lets the layers set perfectly, guaranteeing that wonderful flaky texture when you bite into them.
How to Serve Classic Flaky Croissants from Scratch Recipe
Garnishes
Simple is often best when it comes to garnishing these flaky croissants. A dusting of powdered sugar, a drizzle of honey, or a spread of homemade fruit jam will complement that buttery richness without overpowering the delicate layers you worked so hard to create.
Side Dishes
Classic croissants shine alongside simple breakfast or brunch companions. Serve with fresh berries, creamy yogurt, or a selection of cheeses. They also pair beautifully with scrambled eggs or smoked salmon for a more indulgent meal.
Creative Ways to Present
Feel adventurous? Turn your croissants into sandwiches filled with ham and cheese or filled with chocolate and almonds before baking for luscious filled treats. Or slice them in half and toast lightly to create croissant French toast—a delightful twist perfect for weekend mornings.
Make Ahead and Storage
Storing Leftovers
If you have leftovers of this Classic Flaky Croissants from Scratch Recipe, keep them in an airtight container at room temperature for 3 to 4 days. This keeps the croissants fresh without drying out those tender layers.
Freezing
You can freeze baked croissants by wrapping them individually in plastic wrap and then placing them in a freezer-safe bag. They will keep well for up to 2 months. When ready to enjoy, thaw at room temperature and reheat gently for that fresh-from-the-oven taste.
Reheating
To reheat, pop your croissants in a 350°F (175°C) oven for about 5 to 10 minutes. This brings back that crisp, flaky exterior and warms the soft interior beautifully. Avoid microwaving as it can make croissants soggy.
FAQs
Can I use bread flour instead of all-purpose flour?
Bread flour has a higher protein content which can make croissants chewier rather than light and flaky. For the best texture in this Classic Flaky Croissants from Scratch Recipe, stick to all-purpose flour.
What if my butter melts during the folding process?
If the butter gets too warm and soft, your layers may blend rather than remain distinct. Chill the dough in the fridge after each fold to keep the butter cold and firm for that perfect flakiness.
How long does it take to proof the dough properly?
Typically, you want to let shaped croissants proof for 1.5 to 2 hours at room temperature until they’re puffed and slightly risen. Patience here yields beautifully airy croissants.
Can I make the dough ahead of time?
Absolutely! After the initial dough preparation and first chill, you can refrigerate the dough for up to 24 hours before continuing the folding process. This can help develop deeper flavor and fit your schedule.
Why do my croissants sometimes bake unevenly?
Uneven baking can come from oven hotspots or crowding the baking sheet. To avoid this, use an oven thermometer to verify temperature accuracy and leave space between croissants, rotating the pan halfway through baking for even color and rise.
Final Thoughts
There is something incredibly satisfying about making croissants from scratch, and this Classic Flaky Croissants from Scratch Recipe will guide you every step of the way to buttery, flaky perfection. Whether you’re baking for a special occasion or just treating yourself, these croissants are sure to impress and become a beloved staple in your kitchen. Trust me, once you taste these fresh croissants you made yourself, you’ll never want another store-bought one again!
Print
Classic Flaky Croissants from Scratch Recipe
- Prep Time: 30 minutes
- Cook Time: 22 minutes
- Total Time: 2 hours 30 minutes
- Yield: 12 croissants
- Category: Breakfast
- Method: Baking
- Cuisine: French
Description
This Classic Flaky Croissants from Scratch recipe guides you through making light, buttery, and layered croissants using traditional techniques like lamination and multiple turns. Perfect for breakfast or brunch, these croissants offer a crisp golden exterior with soft, airy layers inside.
Ingredients
Dough Ingredients
- 4 cups (500g) all-purpose flour
- 1/4 cup (50g) granulated sugar
- 1 tablespoon (10g) salt
- 1 tablespoon (10g) active dry yeast
- 1 1/4 cups (300ml) warm milk
- 2 tablespoons unsalted butter, melted
Butter Block
- 1 cup (225g) unsalted butter, cold and shaped into a flat square
Egg Wash
- 1 egg
- 1 tablespoon milk
Instructions
- Mix and knead the dough: In a large bowl or stand mixer, combine the flour, sugar, and salt. Dissolve the active dry yeast in warm milk and let it rest until foamy (5 to 10 minutes). Add the yeast mixture and melted butter to the dry ingredients and knead until a smooth dough forms, about 3 to 5 minutes. Shape into a rectangle, wrap in plastic wrap, and refrigerate for 1 hour.
- Prepare the butter block: Place the cold unsalted butter between two sheets of parchment paper. Use a rolling pin to shape it into a 6-inch square. If the butter softens too much, chill it again briefly to keep it firm.
- Encapsulate the butter with dough: Roll the chilled dough into a 12-inch square. Place the butter block diagonally in the center (diamond shape). Fold the dough corners over the butter to completely enclose it, like wrapping a gift.
- First fold (turn): Roll the dough containing the butter into a long rectangle about 8 by 20 inches. Fold this rectangle into thirds like a letter. This completes the first “turn.” Wrap and chill the dough in the refrigerator for 30 minutes.
- Repeat folds: Repeat the rolling, folding into thirds, and chilling two more times, completing a total of three turns. This layering creates the flaky texture. Keep the dough cold during these steps.
- Roll out final dough: After the last chilling, roll the dough into a large rectangle about 1/4-inch thick to prepare for shaping.
- Cut triangles: Trim the edges if necessary and cut the dough into triangles roughly 5 inches wide at the base.
- Shape croissants: Starting at the wide base of each triangle, gently stretch and roll it toward the tip to form the classic crescent shape.
- Proof croissants: Loosely cover the shaped croissants and allow them to rise at room temperature for 1.5 to 2 hours until puffed and slightly risen.
- Preheat oven and prepare egg wash: Preheat oven to 400°F (200°C). Beat the egg and milk together and brush the mixture over each croissant for a glossy golden finish.
- Bake croissants: Place on a baking sheet and bake for 18 to 22 minutes until fully puffed and deep golden brown. Rotate pan halfway through baking for even color.
- Cool: Remove from oven and transfer to a wire rack to cool for at least 10 minutes to set the flaky layers before serving.
Notes
- Keep the dough and butter cold throughout the lamination process to ensure flaky layers.
- Do not rush the chilling steps; they are crucial for texture development.
- Proof the croissants in a draft-free, warm place for best rise.
- You can freeze shaped croissants before proofing and bake them later, adjusting proofing and baking times accordingly.
- Use unsalted butter for better control over saltiness and flavor balance.


