

If you are craving a fun, delicious, and utterly shareable appetizer, the Blooming Chicken Quesadilla Ring Recipe is about to become your new go-to. This vibrant ring combines the creamy richness of seasoned chicken and melted cheese with the satisfying crispness of toasted tortillas. It’s not just a feast for your taste buds but a showstopper on your table, perfect for parties, family gatherings, or whenever you want to impress without a ton of effort. Let’s dive into this scrumptious creation that’s bursting with flavor and guaranteed to bring everyone together.
Ingredients You’ll Need
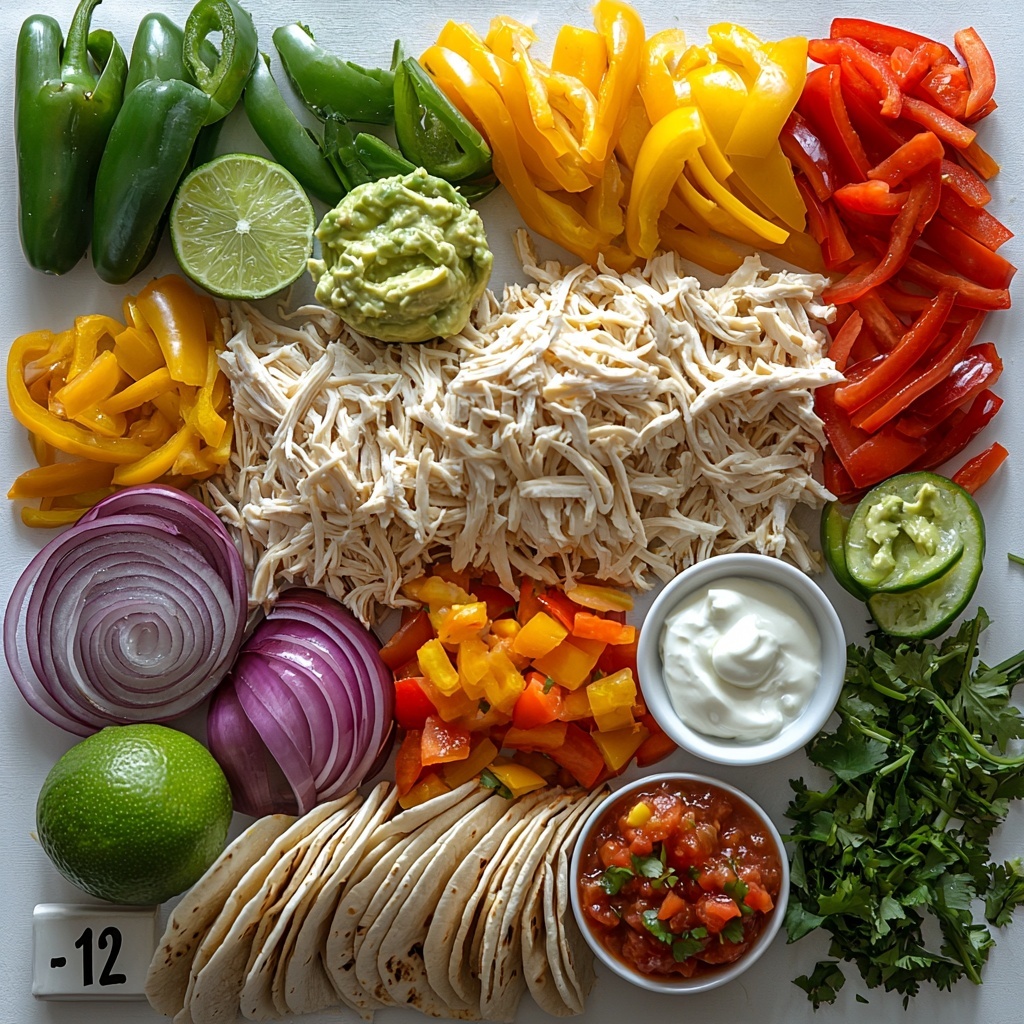
The magic of the Blooming Chicken Quesadilla Ring Recipe lies in its simplicity and the way every ingredient plays a vital role in building layers of flavor and texture. From creamy cheeses to fresh veggies, each component is essential for creating that signature melty, cheesy, and savory bite.
- Olive oil: Helps sauté the veggies to a lovely caramelized softness while adding a subtle richness.
- Medium onion (thinly sliced): Adds a natural sweetness and crunch when cooked just right.
- Bell peppers (sliced): A colorful mix contributes crunch, sweetness, and vibrant hues to brighten the dish.
- Cream cheese (8 ounces, room temperature): Gives the filling creamy texture and tangy depth.
- Sour cream (¼ cup): Adds tang and smoothness, or use Greek yogurt for a healthy twist.
- Lime juice (1 tablespoon): Brings a refreshing zest that lifts all the flavors.
- Mozzarella cheese (½ cup total, shredded): Melts perfectly for gooey cheesiness.
- Cheddar cheese (½ cup total, shredded): Offers sharpness and a great melty texture.
- Taco seasoning (1 1/2 tablespoons): Infuses the filling with authentic Mexican-inspired spices.
- Cooked shredded chicken (3 cups): The hearty star of the recipe, rich with flavor and protein.
- Flour tortillas (12 medium, 10″–12″ size): Essential for making the crispy, flavor-packed ring.
- Cooking spray: Ensures the tortillas bake up nicely crisp without sticking.
- Green onions (3, thinly sliced): Adds a fresh oniony kick as a final garnish.
- Salsa, guacamole, and sour cream: Perfect dipping companions that elevate every bite.
How to Make Blooming Chicken Quesadilla Ring Recipe
Step 1: Sauté Your Veggies to Perfection
Start by heating the olive oil in a skillet over medium heat and toss in your thinly sliced onions and colorful bell peppers. Cook them until soft and golden, about 5 to 6 minutes, stirring frequently. This step develops the base flavor for your filling with those sweet, tender veggies that add texture and vibrant color.
Step 2: Whip Up the Creamy Chicken Filling
While the veggies cool, mix together the cream cheese, sour cream, lime juice, shredded mozzarella, cheddar, and taco seasoning in a large bowl. Once well combined, fold in the shredded chicken along with the sautéed veggies, gently stirring so every bite is packed with flavor and creamy goodness.
Step 3: Prepare the Tortilla Cones
Slice each of the 12 tortillas in half, giving you 24 semi-circles. On each, spread about 1.5 to 2 tablespoons of filling, leaving room around the edges for rolling. Roll each tortilla half tightly into a cone shape, making sure the filling stays securely inside without squishing it out during baking.
Step 4: Assemble the Blooming Quesadilla Ring
Place a small round bowl in the center of your lined baking tray as an anchor. Arrange half of the tortilla cones around the bowl with their points touching the bowl to create a sturdy base. Sprinkle half of the additional cheddar and mozzarella cheeses on top to encourage delightful gooey pockets.
Step 5: Add the Second Layer and Bake
Now stack the remaining cones on top, forming a beautiful double-layered ring. Top the entire ring with the remaining shredded cheeses, then gently remove the bowl from the center. Lightly spray the edges of the tortillas with cooking spray so they crisp nicely in the oven. Bake at 375℉ for 15 to 20 minutes until golden, bubbly, and irresistible.
How to Serve Blooming Chicken Quesadilla Ring Recipe
Garnishes
The easiest and most flavorful garnish for your Blooming Chicken Quesadilla Ring Recipe is a sprinkling of thinly sliced green onions. They add a bright, fresh pop of mild onion flavor and a lovely vibrant contrast against the golden baked ring. For a fresh herb twist, chopped cilantro also works beautifully.
Side Dishes
This quesadilla ring pairs wonderfully with classic Mexican accompaniments. Serve with fresh salsa, creamy guacamole, and cool sour cream for dipping so your guests can customize each bite. For heartier sides, try a simple mixed green salad or Mexican street corn salad to keep things fresh and balanced.
Creative Ways to Present
Make your Blooming Chicken Quesadilla Ring Recipe even more festive by serving it on a large wooden or brightly colored platter. Position small bowls of dips right in the center for easy access. For gatherings, consider a layered appetizer spread with fresh veggies, chips, and mini tacos to complement the ring’s bold flavors.
Make Ahead and Storage
Storing Leftovers
If you have any leftovers (which might be rare!), store them in an airtight container in the refrigerator for up to 3 days. The quesadilla ring holds up well, and the flavors often deepen after resting, making it an excellent next-day snack or lunch.
Freezing
To freeze, assemble but do not bake the quesadilla ring. Flash freeze it on the tray until firm, then wrap it tightly in plastic wrap and aluminum foil. It can be stored in the freezer for up to 2 months. When ready to enjoy, bake directly from frozen, adding extra time to ensure it’s heated all the way through.
Reheating
Reheat leftovers in a 350℉ oven until warmed through and crispy again, about 10–12 minutes. Avoid the microwave if possible, as it tends to soften the tortillas and cheese instead of keeping that perfect crispy texture.
FAQs
Can I use a different type of cheese in this recipe?
Absolutely! While cheddar and mozzarella melt beautifully for the Blooming Chicken Quesadilla Ring Recipe, feel free to experiment with Monterey Jack, pepper jack, or a Mexican cheese blend for added flavor complexity.
Is it okay to use homemade chicken instead of rotisserie chicken?
Yes! Whether you use shredded rotisserie chicken or your own cooked chicken, the key is to shred it finely so it mixes well with the creamy filling and fits perfectly inside the tortilla cones.
Can I make this recipe vegetarian?
Definitely! Replace the chicken with beans, grilled veggies, or a meat substitute like seasoned tofu or tempeh. Just be sure to keep the texture creamy and flavorful for the best result.
What if I don’t have flour tortillas the right size?
Try to get tortillas between 10 and 12 inches for the perfect cone shape. If you can only find smaller ones, you can adjust by using more to form the layers or by making mini rings that bake up faster.
How do I prevent the filling from leaking out during baking?
Rolling the tortillas firmly but not too tight is the secret. Also, leaving a small border around the edges when spreading the filling helps seal it inside, ensuring every cone holds together beautifully.
Final Thoughts
There is something truly special about sharing the Blooming Chicken Quesadilla Ring Recipe with friends or family — it’s a dish that sparks joy, invites smiles, and adds a little excitement to any occasion. From its layers of melty cheese and savory chicken to the crispy tortilla bites, this recipe feels like a warm hug from the inside out. Give it a try; I promise it will become a favorite that you want to make again and again!
Print
Blooming Chicken Quesadilla Ring Recipe
- Prep Time: 15 minutes
- Cook Time: 15-20 minutes
- Total Time: 30-35 minutes
- Yield: 24 servings
- Category: Appetizer
- Method: Baking
- Cuisine: Mexican-inspired
Description
This Blooming Chicken Quesadilla Ring is a visually stunning and delicious appetizer perfect for parties or family gatherings. Layered with a creamy, cheesy chicken filling tossed with sautéed peppers and onions, this ring bakes into a crispy, gooey masterpiece that’s ideal for dipping into salsa, guacamole, and sour cream.
Ingredients
Vegetables
- 1 medium onion, thinly sliced
- 2 bell peppers (red, yellow, green, or orange), sliced
- 3 green onions, thinly sliced (for garnish)
Filling
- 8 ounces cream cheese, at room temperature (1 brick, 250 grams)
- ¼ cup sour cream or plain Greek yogurt
- 1 tablespoon lime juice
- ¼ cup shredded mozzarella cheese
- ¼ cup shredded cheddar cheese
- 1½ tablespoons taco seasoning
- 3 cups cooked chicken, shredded (rotisserie or homemade)
Other
- 12 medium flour tortillas (10″-12″)
- Additional ¼ cup shredded cheddar cheese
- Additional ¼ cup shredded mozzarella cheese
- 2 tablespoons olive oil
- Cooking spray or oil for brushing
Dips and Garnish
- Salsa
- Guacamole
- Sour cream
Instructions
- Preheat Oven: Preheat your oven to 375℉ (190℃) and line a large baking sheet or pizza tray with parchment paper or greased foil to prevent sticking.
- Sauté Vegetables: Heat 2 tablespoons olive oil in a large frying pan or skillet over medium heat. Add the thinly sliced onion and bell peppers and sauté, stirring often, until softened and golden brown, about 5-6 minutes. Set aside to cool.
- Prepare Chicken Filling: In a large mixing bowl, combine the softened cream cheese, sour cream, lime juice, ¼ cup shredded mozzarella, ¼ cup shredded cheddar, and taco seasoning. Mix thoroughly until smooth and well combined.
- Add Chicken and Veggies: Gently fold in the shredded cooked chicken and cooled sautéed onions and peppers until evenly distributed throughout the mixture. Set aside.
- Prepare Tortillas: Slice each of the 12 medium flour tortillas in half to create 24 semicircles.
- Fill Tortillas: Evenly divide the chicken filling among the tortilla halves, spreading about 1.5 to 2 tablespoons onto each, leaving a small border around the edge.
- Roll into Cones: Carefully roll each filled tortilla half into a cone shape, making sure to roll tightly enough to hold the filling without squeezing too hard to avoid the filling oozing out.
- Arrange Base Layer: Place a small round bowl in the center of the prepared baking sheet. Arrange half of the rolled cones around the bowl with the pointed ends touching it to form a ring base.
- Add Cheese Layer: Sprinkle half of the additional ¼ cup cheddar cheese and ¼ cup mozzarella cheese over the base layer of cones.
- Arrange Second Layer: Place the remaining cones on top of the base layer to complete the ring. Then, sprinkle the remaining cheddar and mozzarella cheese evenly over this top layer. Carefully remove the bowl from the center.
- Prepare for Baking: Lightly spray the edges of the tortillas with cooking spray or brush them with oil to encourage crispiness.
- Bake: Bake on the middle rack for approximately 15-20 minutes or until the cheese has melted and the tortilla edges are golden and crispy.
- Garnish: Carefully transfer the blooming quesadilla ring onto a serving platter. Optionally garnish with thinly sliced green onions.
- Serve: Place a small bowl of salsa in the center of the ring. Serve alongside bowls of sour cream and guacamole for dipping. Enjoy warm!
Notes
- Use room temperature cream cheese for easy mixing and a smooth filling.
- Adjust the taco seasoning amount to your taste preference for spice level.
- Make sure to not overfill the tortilla cones to prevent leaking during baking.
- Cooking spray helps the edges brown and become crispy but you can substitute with a light brush of olive oil.
- Leftovers can be refrigerated and reheated in an oven or air fryer for best texture retention.
- Substitute with gluten-free tortillas to make this dish gluten-free.

