

Nothing quite beats the comforting combination of chewy cookie goodness and fudgy brownie richness in one irresistibly delicious treat, which is why the Easy Brookie Bars (Ultimate Recipe) Recipe has become one of my absolute favorites to bake and share. This delightful dessert brings together the best of both worlds in a simple, straightforward way that never fails to impress, whether for a casual snack or a special occasion. If you’ve been searching for a crowd-pleasing, fun-to-make dessert that hits all the right notes, these brookie bars are your new go-to.
Ingredients You’ll Need
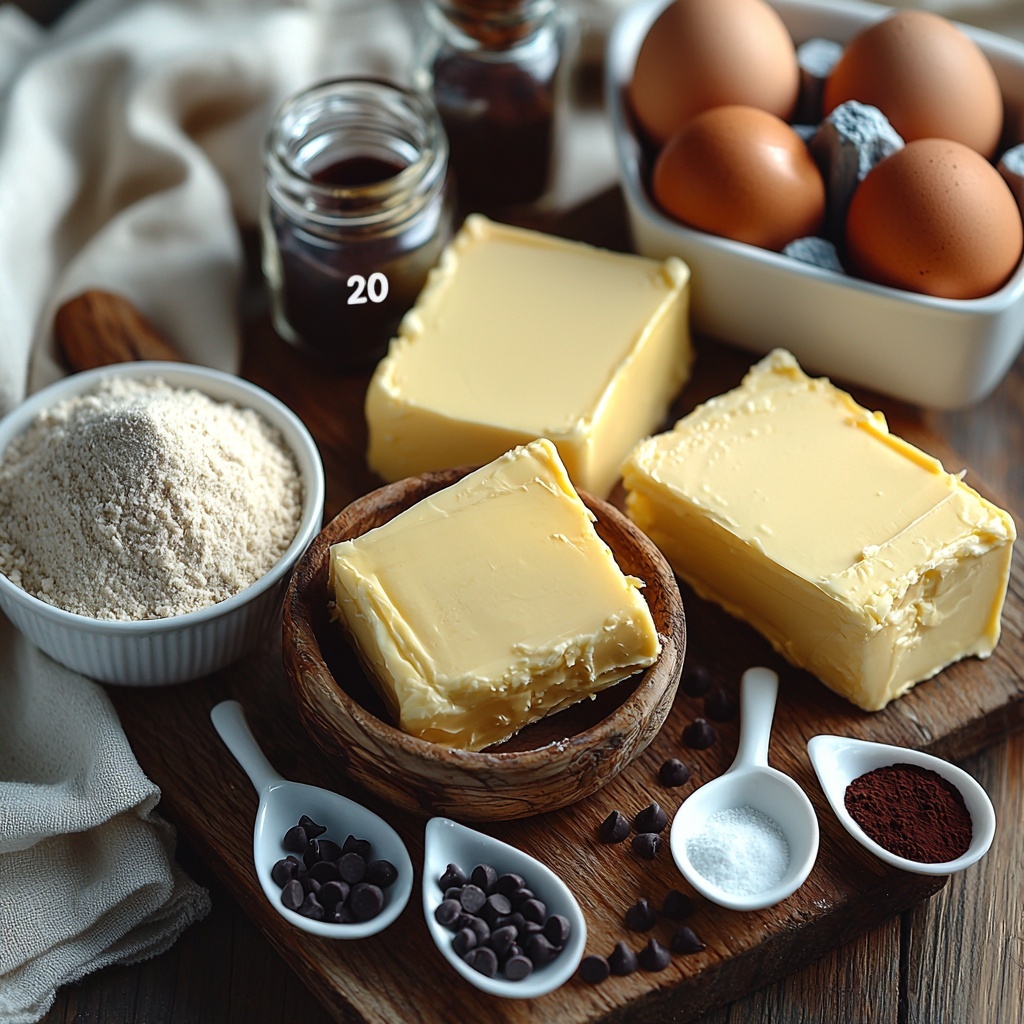
The beauty of the Easy Brookie Bars (Ultimate Recipe) Recipe lies in its simplicity—using everyday ingredients that come together to create an extraordinary treat. Each component plays a crucial role: buttery softness for the cookie base, rich cocoa for that deep chocolate flavor in the brownie layer, and just the right amount of sugar and flour to balance texture and sweetness perfectly.
- ½ cup (1 stick) unsalted butter, softened: Creams into the cookie dough for tenderness and flavor.
- ½ cup brown sugar: Adds moisture and a slight caramel undertone to the cookie layer.
- ¼ cup granulated sugar: Balances sweetness and helps with texture.
- 1 large egg: Binds the cookie dough ingredients together beautifully.
- 1 tsp vanilla extract: Elevates flavor with a warm, inviting note.
- 1¼ cups all-purpose flour: The structural base for the cookie layer’s perfect chewiness.
- ½ tsp baking soda: Lightens the cookie texture so it’s soft but not cakey.
- ¼ tsp salt: Enhances all the flavors and balances sweetness.
- ¾ cup chocolate chips: Melts into pockets of chocolate joy throughout the cookie layer.
- ½ cup (1 stick) unsalted butter, melted: Creates a rich, fudgy texture for the brownie layer.
- 1 cup granulated sugar: Sweetens the brownie and helps with moisture retention.
- 2 large eggs: Provide structure and richness in the brownie batter.
- 1 tsp vanilla extract: Adds depth to the chocolate flavor in the brownie.
- ⅓ cup unsweetened cocoa powder: Delivers that signature, intense chocolate punch.
- ½ cup all-purpose flour: Gives the brownie structure without overpowering fudginess.
- ¼ tsp salt: Balances the sweetness and emphasizes chocolate notes.
- ¼ tsp baking powder: Lightens the brownie just enough for the perfect texture.
How to Make Easy Brookie Bars (Ultimate Recipe) Recipe
Step 1: Make the Cookie Dough
Start by creaming together the softened butter and both sugars until the mixture is fluffy and light—that’s the secret to tender cookies. Then, beat in the egg and vanilla extract for richness and flavor. Combine the dry ingredients—flour, baking soda, and salt—before folding them in gently to maintain a soft crumb. Don’t forget those luscious chocolate chips, which add little bites of melted chocolate throughout. Press this dough evenly into your lined baking pan, creating a sturdy cookie base that’s ready to support the brownie layer.
Step 2: Make the Brownie Batter
Whisk together the melted butter and sugar until smooth and glossy, which ensures a perfectly fudgy brownie. Adding eggs and vanilla next enriches the batter, building a luscious texture. Incorporate the cocoa powder, flour, salt, and baking powder carefully to get a silky batter that will bake into a gooey, chocolatey top layer. Pour this evenly over your cookie base—it’s the moment where cookie meets brownie perfection.
Step 3: Bake
Bake your brookie bars at 350°F (175°C) for about 30 to 35 minutes. You’ll want the toothpick test to come out with just a few moist crumbs, signaling fudgy perfection, not wet batter. Once baked, be patient and let the bars cool completely. This step is crucial to ensure you achieve clean, neat layers when slicing—every cut reveals that gorgeous cookie and brownie combo that looks just as good as it tastes.
How to Serve Easy Brookie Bars (Ultimate Recipe) Recipe
Garnishes
Sprinkling flaky sea salt on top just before baking gives an irresistible flavor pop that balances the sweetness beautifully. For serving, a dusting of powdered sugar or a drizzle of caramel sauce can add an extra touch of decadence and visual appeal.
Side Dishes
A scoop of vanilla ice cream is a classic pairing that melts over the warm brookie bars for a dreamy dessert experience. Fresh berries or a dollop of whipped cream can also complement the rich chocolate flavors and add brightness to each bite.
Creative Ways to Present
For parties, serve your Easy Brookie Bars (Ultimate Recipe) Recipe on a rustic wooden board with small ramekins of toppings like chopped nuts, chocolate sauce, or marshmallow fluff, letting guests customize their bars. Wrapping individual squares in parchment paper makes these bars perfect for gifting, giving them a personal, homemade touch.
Make Ahead and Storage
Storing Leftovers
Store your brookie bars in an airtight container at room temperature, where they will stay fresh and delicious for up to 3 days. Keeping them covered helps the bars hold their moisture without drying out.
Freezing
If you want to save these treats for later, freeze the brookie bars uncut in a tightly wrapped foil or container for up to 3 months. When ready to indulge, thaw them overnight in the refrigerator to preserve their perfect texture.
Reheating
For a freshly baked feel, warm individual brookie bars in the microwave for about 10 seconds or until just soft—not too hot to lose that fudgy charm. This quick reheating brings out the gooey chocolate and soft cookie layers beautifully.
FAQs
Can I use store-bought cookie dough or brownie mix instead?
Absolutely! While the Easy Brookie Bars (Ultimate Recipe) Recipe shines with homemade doughs, using quality store-bought cookie dough and brownie mix can save time and still deliver tasty results. Just layer them as directed and watch the magic happen.
What if I don’t have parchment paper?
You can grease your baking pan generously with butter or non-stick spray, but parchment paper makes lifting the bars out easier and cleanup a breeze—highly recommended if you have it.
Can I add nuts or other mix-ins?
Yes! Chopped walnuts, pecans, or even a handful of butterscotch chips mix wonderfully into either layer for added crunch and flavor complexity.
Why do the layers sometimes mix together when baking?
Pour the brownie batter gently over the cookie layer to maintain separation. Also, ensuring the cookie dough is pressed firmly can help keep distinct layers during baking.
How do I get clean slices without crumbling?
Let the brookie bars cool completely before slicing, or chill them for an hour. Using a sharp knife and wiping it clean between cuts helps achieve neat, bakery-quality slices.
Final Thoughts
If you’re craving a treat that’s both fun to make and totally unforgettable in taste, you can’t go wrong with the Easy Brookie Bars (Ultimate Recipe) Recipe. This dessert brings together two of the most beloved baked goods into one perfect bar that’s rich, chewy, and oh-so-satisfying. So grab your ingredients, turn on your oven, and surprise yourself and everyone around you with these incredible brookie bars. Trust me—they’ll be gone before you know it!
Print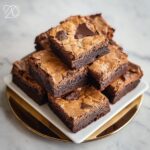
Easy Brookie Bars (Ultimate Recipe) Recipe
- Prep Time: 15 minutes
- Cook Time: 30-35 minutes
- Total Time: 45-50 minutes
- Yield: 9-12 bars
- Category: Dessert
- Method: Baking
- Cuisine: American
Description
This easy brookie bars recipe combines a rich cookie layer with a luscious brownie layer for the ultimate dessert treat. With simple ingredients and straightforward steps, you’ll get perfectly fudgy and chewy bars that are ideal for snacks, parties, or anytime sweet cravings strike.
Ingredients
Cookie Layer
- ½ cup (1 stick) unsalted butter, softened
- ½ cup brown sugar
- ¼ cup granulated sugar
- 1 large egg
- 1 tsp vanilla extract
- 1¼ cups all-purpose flour
- ½ tsp baking soda
- ¼ tsp salt
- ¾ cup chocolate chips
Brownie Layer
- ½ cup (1 stick) unsalted butter, melted
- 1 cup granulated sugar
- 2 large eggs
- 1 tsp vanilla extract
- ⅓ cup unsweetened cocoa powder
- ½ cup all-purpose flour
- ¼ tsp salt
- ¼ tsp baking powder
Instructions
- Preheat the Oven and Prepare Pan: Preheat your oven to 350°F (175°C) and line an 8×8-inch baking pan with parchment paper to ensure easy removal after baking.
- Make the Cookie Dough: Cream together the softened butter, brown sugar, and granulated sugar until the mixture is fluffy. Beat in the egg and vanilla extract, then gradually mix in the all-purpose flour, baking soda, and salt until combined. Fold in the chocolate chips carefully. Press this cookie dough evenly into the bottom of the prepared pan to form the first layer.
- Make the Brownie Batter: In a separate bowl, whisk melted butter and sugar until smooth. Add eggs and vanilla extract, mixing until the batter is silky. Stir in unsweetened cocoa powder, flour, salt, and baking powder until fully incorporated. Pour this brownie batter evenly over the cookie dough layer in the baking pan.
- Bake: Place the pan in your preheated oven and bake for 30–35 minutes. The bars are ready when a toothpick inserted near the center comes out with a few moist crumbs but no wet batter. This will ensure a fudgy texture.
- Cool and Slice: Remove the pan from the oven and allow the brookie bars to cool completely in the pan. This ensures the layers set well and makes slicing neat and clean. Once cooled, cut into 9 to 12 bars depending on your preferred size.
Notes
- For a fudgier texture, slightly underbake the brookie bars by reducing baking time by 3-5 minutes.
- Add ½ cup chopped walnuts to the brownie batter for added crunch and nutty flavor.
- Sprinkle flaky sea salt on top before baking to enhance the chocolate and sweetness balance.
- Chill the brookie bars for at least 1 hour before slicing to achieve sharp, bakery-style edges.

