

“`html
There is something undeniably irresistible about the Garlic Parmesan Shrimp Skewers Recipe that makes it a go-to for gatherings, weeknight dinners, or even a fancy appetizer to impress your guests. This dish brings together succulent shrimp bathed in a fragrant garlic and olive oil marinade, coated lovingly with sharp Parmesan cheese, and kissed with just a hint of smoky paprika. The quick broiling locks in all those vibrant flavors, while the golden crust adds that perfect savory crunch. Every bite feels fresh, brightened by a squeeze of lemon, making this skewer recipe an absolute must-try that delivers big on taste with minimal effort.
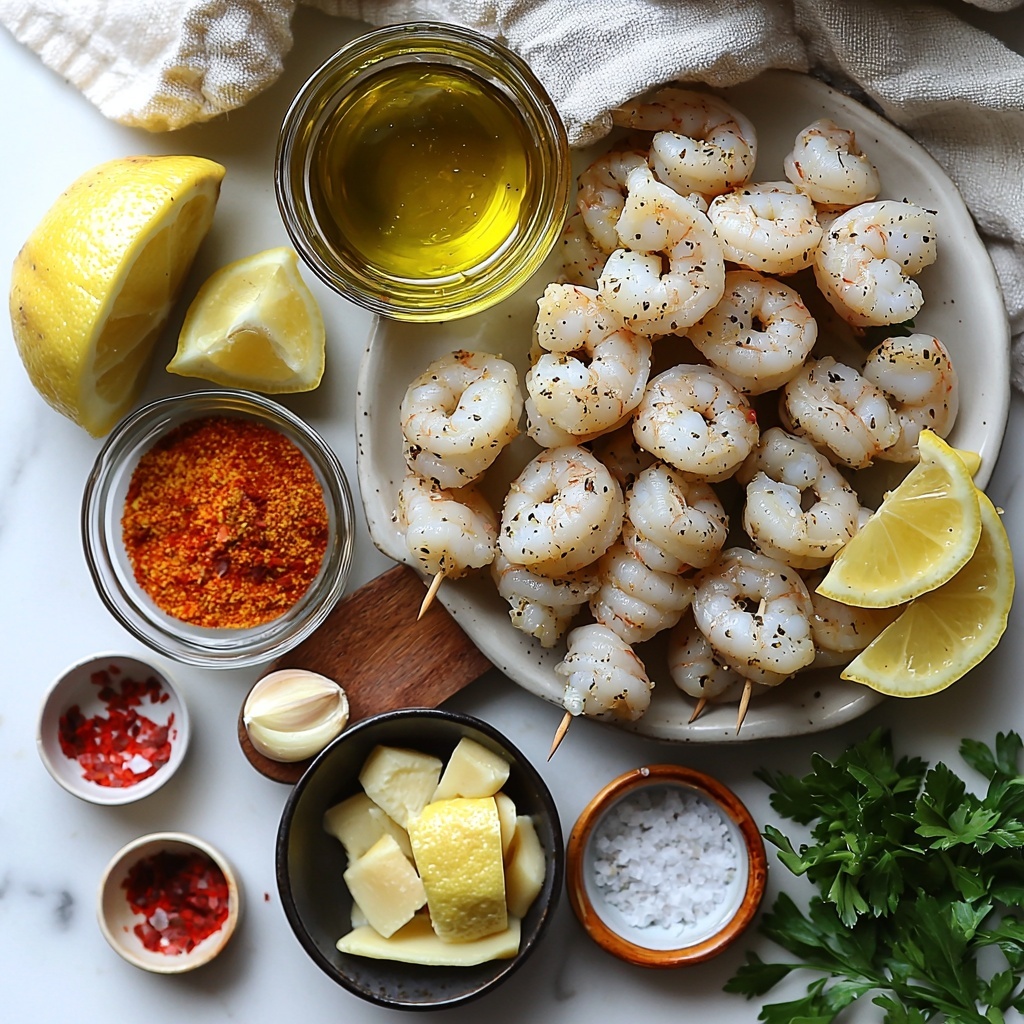
Ingredients You’ll Need
The magic of this Garlic Parmesan Shrimp Skewers Recipe lies in its simple, yet carefully selected ingredients that perfectly complement one another. Each item helps build layers of flavor and texture—from the juicy shrimp to the sharp Parmesan and the zing of garlic. Here’s what you’ll need to bring this dish to life:
- 1 lb large shrimp (16–20 count): The star of the dish that’s meaty and tender, perfect for quick cooking.
- 2 tablespoons olive oil: Adds richness and helps the cheese and spices cling to the shrimp.
- 4 garlic cloves minced: Infuses the shrimp with bold, aromatic flavor.
- 1/2 cup grated Parmesan cheese: Creates a deliciously crispy, cheesy crust.
- 1/2 teaspoon smoked paprika: Brings a subtle smoky depth without overpowering the shrimp.
- 1/4 teaspoon crushed red pepper flakes (optional): Offers a gentle hint of heat for those who enjoy a little kick.
- 2 tablespoons chopped fresh parsley: Adds a fresh, vibrant color and taste at the finish.
- 1/4 teaspoon salt: Enhances all the flavors without being too salty.
- 1/4 teaspoon black pepper: Provides a mild earthiness and balances the seasoning.
- Lemon wedges for serving: Brightens every mouthful with a citrusy zing.
How to Make Garlic Parmesan Shrimp Skewers Recipe
Step 1: Prep Your Skewers and Oven
Start by soaking your wooden skewers in water for about 20 minutes to keep them from burning under the heat of the broiler. Meanwhile, preheat your broiler to high and line a baking sheet with foil for easy cleanup. Lightly grease the foil with nonstick spray or olive oil to ensure your shrimp don’t stick during cooking.
Step 2: Marinate the Shrimp
In a large mixing bowl, toss the shrimp with olive oil, minced garlic, smoked paprika, salt, and black pepper until every shrimp is evenly coated. This simple marinade brings a ton of flavor that seeps into the shrimp, making sure each bite is packed with that garlic-Parmesan goodness.
Step 3: Add the Parmesan Coating
Gently fold in the grated Parmesan cheese, ensuring the cheese sticks to the shrimp thanks to the olive oil. This step is crucial for forming the irresistible golden crust that defines this Garlic Parmesan Shrimp Skewers Recipe.
Step 4: Skewer the Shrimp
Thread 4 to 5 shrimp onto each soaked skewer, being careful to pierce through the thick and thin ends to keep the shrimp secure while cooking. This also makes for easy handling and beautiful presentation.
Step 5: Broil to Perfection
Arrange the shrimp skewers in a single layer on your prepared baking sheet. Place them under the hot broiler and cook for 2 to 3 minutes per side, or until the shrimp turn to a lovely pink and the Parmesan crust becomes beautifully golden and crisp.
Step 6: Garnish and Serve
Once cooked, remove the skewers from the oven and immediately sprinkle with chopped fresh parsley for a burst of color and freshness. Serve right away with tangy lemon wedges to squeeze over the top, bringing all the flavors together wonderfully.
How to Serve Garlic Parmesan Shrimp Skewers Recipe
Garnishes
Fresh parsley is a classic garnish here, adding both color and a mild herbal note that balances the richness. Lemon wedges are essential—they brighten and lift the flavors with just the right amount of acidity. For an extra touch, you might also sprinkle a tiny pinch of extra Parmesan or some crushed red pepper flakes for spice lovers.
Side Dishes
These shrimp skewers are incredibly versatile when it comes to sides. Pair them with a crisp, vibrant salad to keep things light and fresh, or opt for a creamy risotto or buttery garlic mashed potatoes to soak up any leftover juices. Grilled vegetables or a simple garlic bread are also excellent companions to round out the meal.
Creative Ways to Present
Consider serving the shrimp skewers on a rustic wooden board with a bowl of garlic aioli or spicy marinara for dipping—this makes for a gorgeous presentation perfect for entertaining. You can also place the cooked shrimp over a bed of arugula or mixed greens with a drizzle of lemon vinaigrette for a quick and elegant appetizer.
Make Ahead and Storage
Storing Leftovers
If you have any leftovers from your Garlic Parmesan Shrimp Skewers Recipe, store them in an airtight container in the refrigerator. They’ll keep well for up to 2 days, retaining much of their flavor and texture if reheated gently.
Freezing
While shrimp skewers are best enjoyed fresh, you can freeze the cooked shrimp skewers if needed. Wrap them tightly in plastic wrap and place in a freezer-safe bag or container. For best quality, consume within 1 month. Thaw in the refrigerator overnight before reheating.
Reheating
To reheat, gently warm the shrimp skewers in a preheated oven at 300°F for about 5 to 7 minutes, or until heated through. Avoid microwaving if possible, as it can make the shrimp rubbery. A quick reheat under the broiler for a minute or two will help revive that crispy Parmesan crust.
FAQs
Can I use frozen shrimp for this Garlic Parmesan Shrimp Skewers Recipe?
Absolutely! Just be sure to thaw the shrimp completely and pat them dry before marinating to ensure the best flavor and texture. Frozen shrimp can work just as well as fresh in this recipe.
What if I don’t have a broiler? Can I grill these instead?
Yes, grilling the skewers on medium-high heat works wonderfully. Just watch them closely and cook for 2–3 minutes per side until pink and cooked through. Grilling will add a lovely smoky char to the shrimp.
Is this recipe spicy?
The basic Garlic Parmesan Shrimp Skewers Recipe is mild, but you can add crushed red pepper flakes as listed in the ingredients for a bit of heat. Adjust the amount according to your spice preference.
Can I use other types of cheese instead of Parmesan?
Parmesan is ideal because it crisps up nicely and adds a sharp, nutty flavor. However, you could try Pecorino Romano for a similar effect. Softer cheeses won’t give the same crusty texture.
How do I prevent shrimp from sticking to the skewers?
Soaking wooden skewers in water helps a lot, but also lightly oiling the skewers before threading the shrimp ensures they won’t stick during cooking.
Final Thoughts
This Garlic Parmesan Shrimp Skewers Recipe is a little treasure of flavor and simplicity that you’re going to keep reaching for again and again. It’s quick to prepare but delivers bold, fresh, and satisfying tastes that anyone can appreciate. Whether for a casual dinner or a party appetizer, these skewers are a joyous way to celebrate the wonderful pairing of shrimp, garlic, and Parmesan. Trust me—you’ll love having this easy, show-stopping recipe in your cooking repertoire.
“`
Print
Garlic Parmesan Shrimp Skewers Recipe
- Prep Time: 10 minutes
- Cook Time: 6 minutes
- Total Time: 16 minutes
- Yield: 12 servings
- Category: Appetizer
- Method: Broiling
- Cuisine: American
Description
These Garlic Parmesan Shrimp Skewers are a quick, flavorful appetizer featuring juicy large shrimp coated in a garlicky, cheesy Parmesan blend, broiled to perfection with a hint of smoked paprika and a touch of heat from red pepper flakes. Perfect for entertaining or a speedy weeknight treat, they pair wonderfully with fresh lemon wedges and parsley for a bright finish.
Ingredients
Shrimp and Marinade
- 1 lb large shrimp (16–20 count)
- 2 tablespoons olive oil
- 4 garlic cloves, minced
- 1/2 teaspoon smoked paprika
- 1/4 teaspoon crushed red pepper flakes (optional)
- 1/4 teaspoon salt
- 1/4 teaspoon black pepper
Cheese and Garnish
- 1/2 cup grated Parmesan cheese
- 2 tablespoons chopped fresh parsley
- Lemon wedges for serving
Instructions
- Soak Skewers: Soak 4–6 wooden skewers in water for 20 minutes to prevent burning during broiling. Meanwhile, preheat your broiler to high and line a baking sheet with foil. Lightly grease the foil with nonstick spray or olive oil.
- Marinate Shrimp: In a large mixing bowl, toss the shrimp with olive oil, minced garlic, smoked paprika, salt, and black pepper until all shrimp are evenly coated with the mixture.
- Add Parmesan: Gently toss the shrimp with grated Parmesan cheese ensuring each piece has an even coating; the oil helps the cheese stick to the shrimp.
- Thread Shrimp: Thread 4 to 5 shrimp onto each soaked skewer, piercing through the thick and thin ends to secure them so they stay in place while cooking.
- Broil Shrimp: Arrange the shrimp skewers on the prepared baking sheet in a single layer. Broil for 2 to 3 minutes on each side until the shrimp are pink and opaque, and the Parmesan crust is golden and slightly crisp.
- Finish and Serve: Remove the skewers from the oven and sprinkle them with freshly chopped parsley. Serve immediately with lemon wedges and your choice of dipping sauce.
Notes
- Soaking wooden skewers prevents them from burning under the broiler.
- Keep an eye on the shrimp as broiling happens quickly; overcooked shrimp can become tough.
- The addition of crushed red pepper flakes adds heat, but you can omit it for a milder flavor.
- If you don’t have a broiler, shrimp can also be grilled or cooked under a high oven setting.
- Use large shrimp for best results as they hold well on skewers and cook evenly.

