

There is something utterly magical about cracking through a perfectly caramelized sugar crust to reveal a luxuriously smooth custard underneath, and this Easy Crème Brûlée Recipe captures just that magic with simplicity and elegance. Whether you’re impressing guests or indulging in a personal treat, this recipe combines basic, wholesome ingredients to create a classic French dessert that’s creamy, sweet, and gorgeously textured. The best part is, you don’t need to be a pastry pro to pull it off — just a bit of patience and love, and you’re set to enjoy a restaurant-quality delight at home.
Ingredients You’ll Need
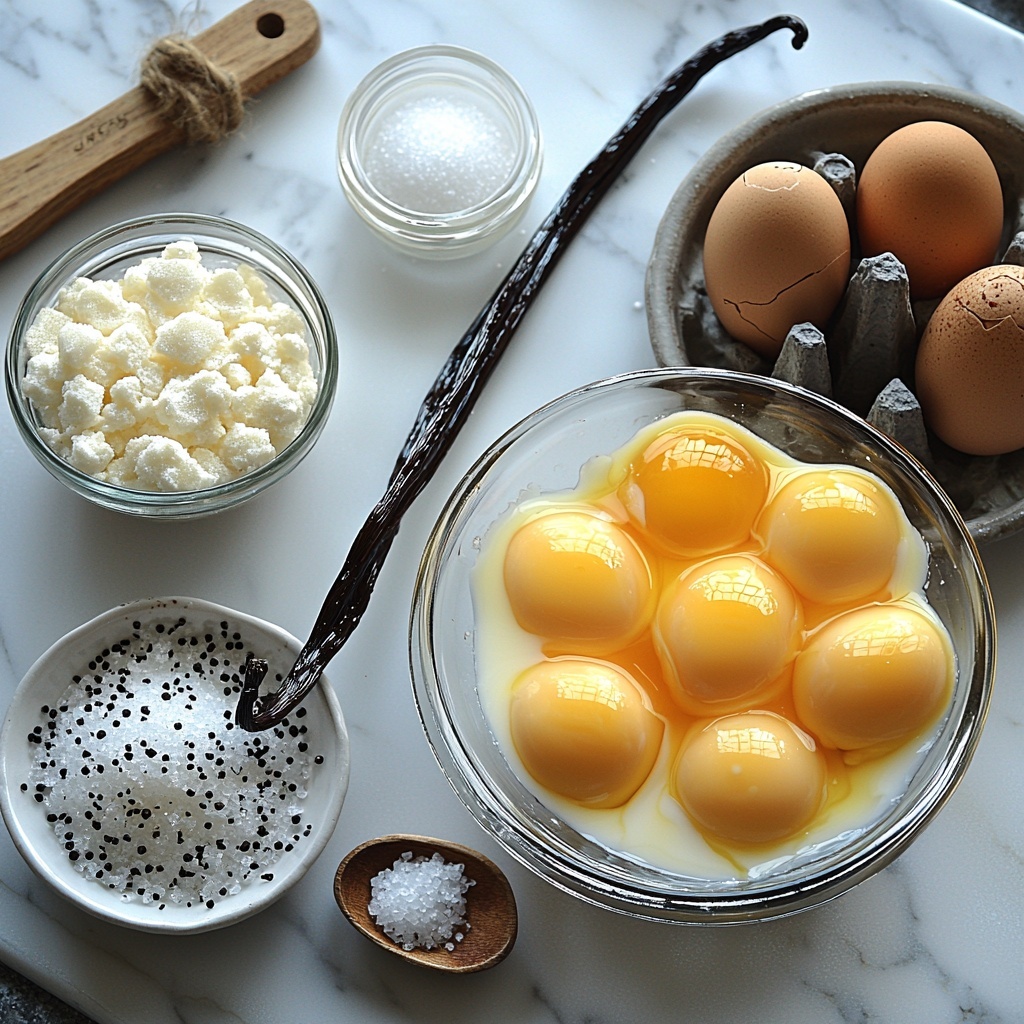
The magic of this Easy Crème Brûlée Recipe really lies in a short, straightforward list of ingredients you likely already have in your kitchen. Each component plays a vital role in building flavor, texture, and that irresistible creamy consistency that defines this dessert.
- 2 cups heavy cream: Provides the rich, silky base that’s essential for that luscious custard texture.
- 1 vanilla bean or 1 tablespoon vanilla extract: The star flavor that imparts that aromatic warmth and delicacy to the dish.
- 5 large egg yolks: These give the custard its velvety thickness and golden color.
- 1/2 cup granulated sugar (plus extra for caramelizing): Sweetens the custard and creates the iconic crunchy caramel top.
- Pinch of salt: Enhances and balances the sweetness while rounding out the overall flavor.
How to Make Easy Crème Brûlée Recipe
Step 1: Preheat and Prepare Your Oven
Start by preheating your oven to 325°F (160°C) and setting aside 4 to 6 ramekins depending on their size. The gentle, controlled heat is key to cooking your custards evenly without scrambling the eggs.
Step 2: Infuse the Cream
Pour the heavy cream into a medium saucepan. If you’re using a vanilla bean, split it lengthwise and scrape out the seeds, adding both seeds and pod to the cream. Heat this mixture over medium heat until it starts to simmer gently — be careful not to let it boil. This step allows the vanilla to slowly lend its fragrant essence to the cream, becoming the soul of your custard.
Step 3: Whisk Together Egg Yolks and Sugar
In a separate bowl, whisk the egg yolks with the granulated sugar and pinch of salt until the mixture looks smooth and pale yellow. This airy, light base will blend with the warm cream to create that perfect custard texture we all adore.
Step 4: Temper the Eggs
To avoid any scrambled surprises, slowly pour a small amount of the hot cream into the egg mixture while whisking continuously. Gradually add the rest of the cream, whisking all the while to ensure a smooth, uniform custard base that’s silky and lump-free.
Step 5: Strain and Pour
If you used a vanilla bean, remove the pod now and strain the custard through a fine-mesh sieve into a clean bowl to catch any curdled bits or pod pieces. Then, pour the smooth custard evenly into your prepared ramekins, filling them almost to the top for that perfect finish.
Step 6: Bake in a Water Bath
Place the ramekins inside a large baking dish, then pour hot water into the dish until it reaches halfway up the sides of the ramekins. This water bath gently and evenly cooks the custard, helping it set with that signature wobble. Bake for 30 to 40 minutes, checking for just-set custards that still slightly jiggle in the center.
Step 7: Cool and Chill
Remove the ramekins from the water bath and let them come to room temperature before refrigerating for at least 2 hours or overnight. This resting period lets the custard thicken up beautifully and develop its full flavor.
Step 8: Caramelize the Sugar Top
When you’re ready to serve, sprinkle a thin layer of granulated sugar across each custard’s surface. Use a kitchen torch to melt and caramelize the sugar by moving it gently in circular motions until it turns golden brown and crisp. If you don’t have a torch, carefully place the ramekins under a broiler for 1 to 2 minutes, watching closely to avoid burning.
Step 9: Serve and Enjoy!
Let the caramelized sugar harden for a minute or two before digging in, so you get that addictive crack when tapping your spoon. This moment is pure joy, and it highlights the best of what this Easy Crème Brûlée Recipe has to offer.
How to Serve Easy Crème Brûlée Recipe
Garnishes
A light dusting of powdered sugar or a few fresh berries can brighten up your crème brûlée, adding a pop of color and contrasting freshness that makes every bite more exciting.
Side Dishes
Pairing your crème brûlée with a simple fruit salad, shortbread cookies, or a whisper of whipped cream elevates the dessert experience, balancing the rich custard with a delightful textural variety.
Creative Ways to Present
Try serving your custard in mini glass jars or unique-shaped ramekins for a personalized touch, or accompany the caramelized tops with edible flowers or thin chocolate shards to impress your guests visually and flavorfully.
Make Ahead and Storage
Storing Leftovers
Leftovers are best kept covered tightly in the refrigerator for up to 3 days. This keeps the custard fresh and prevents it from absorbing any fridge odors, although the caramelized topping is best freshly torched before serving again.
Freezing
This custard doesn’t freeze well because the texture can become grainy when thawed. It’s really best enjoyed fresh or within a few days refrigerated.
Reheating
If you want to warm the custard slightly, do so gently by placing the ramekins in a warm water bath for a few minutes, but remember to always re-caramelize the sugar topping just before serving to retain that iconic crunch.
FAQs
Can I use vanilla extract instead of a vanilla bean?
Absolutely! While a vanilla bean offers a richer aroma and little specks that look beautiful, a good-quality vanilla extract works perfectly and is added at the end of heating the cream to preserve its flavor.
What if I don’t have a kitchen torch?
No worries! You can caramelize the sugar under a broiler for 1 to 2 minutes, but keep a close eye on it to prevent burning. A broiler works well for even caramelization when you don’t have a torch handy.
How do I know when the custard is done baking?
The custard should be set around the edges but still gently wobble in the center when you jiggle the ramekin. Overbaking can lead to a rubbery texture, so it’s best to check closely as it cooks.
Can I prepare the custard mixture ahead of time?
Yes, you can prepare the custard mixture and store it in the refrigerator for up to 24 hours before baking. Just make sure to give it a gentle whisk before pouring into ramekins.
Is there a substitute for heavy cream?
Heavy cream is key for the creamy texture of crème brûlée, but a combination of half-and-half with a bit of butter can work in a pinch. However, the custard might be less rich and silky.
Final Thoughts
There’s something so satisfying about mastering this Easy Crème Brûlée Recipe: a timeless dessert that feels fancy but is actually quite approachable. From its fragrant vanilla-infused custard to the crackly caramel top, every spoonful is a celebration of simple ingredients transformed into something unforgettable. So grab your ramekins, heat that cream, and enjoy the sheer joy of cracking into your very own crème brûlée creation!
Print
Easy Crème Brûlée Recipe
- Prep Time: 15 minutes
- Cook Time: 40 minutes
- Total Time: 2 hours 55 minutes
- Yield: 4-6 servings
- Category: Dessert
- Method: Baking
- Cuisine: French
Description
This Easy Crème Brûlée recipe guides you through making a classic French dessert with a creamy vanilla custard base topped with a perfectly caramelized sugar crust. Using simple ingredients and a water bath baking technique, you’ll achieve a silky texture and crispy top that’s sure to impress.
Ingredients
Custard Base
- 2 cups heavy cream
- 1 vanilla bean (or 1 tablespoon vanilla extract)
- 5 large egg yolks
- 1/2 cup granulated sugar (plus extra for caramelizing)
- Pinch of salt
Instructions
- Preheat Oven: Preheat your oven to 325°F (160°C). Prepare 4-6 ramekins depending on their size for baking.
- Heat the Cream: Pour the heavy cream into a medium saucepan. If using a vanilla bean, split it lengthwise, scrape the seeds into the cream, and add the pod as well. Heat over medium heat until the cream begins to simmer, stirring occasionally to avoid scalding, but do not let it boil. If using vanilla extract, hold off adding it for now.
- Whisk Egg Yolks: In a mixing bowl, whisk together the egg yolks, granulated sugar, and a pinch of salt until the mixture is smooth and pale yellow.
- Temper the Eggs: Slowly add a small amount of the hot cream into the egg yolk mixture while whisking constantly to prevent scrambling. Gradually pour in the remaining cream while continuing to whisk until well combined.
- Strain the Mixture: Remove the vanilla pod if used, and strain the custard through a fine-mesh sieve into another bowl to eliminate any solids or egg bits.
- Pour into Ramekins: Evenly distribute the custard mixture into the prepared ramekins, filling them almost to the top.
- Bake: Place the ramekins in a large baking dish. Pour hot water into the dish so it reaches halfway up the sides of the ramekins, creating a water bath. Bake in the preheated oven for 30 to 40 minutes, or until the custard is set but still slightly jiggly in the center.
- Cool: Remove ramekins from the water bath and allow them to cool to room temperature. Then refrigerate for at least 2 hours or overnight to fully set the custard.
- Caramelize the Sugar: Just before serving, sprinkle a thin, even layer of granulated sugar over the custard tops. Use a kitchen torch to caramelize the sugar by moving the flame in circular motions until golden brown. Alternatively, place under a broiler for 1-2 minutes, watching carefully to avoid burning.
- Serve: Let the caramelized sugar cool and harden for a minute or two before serving for the best texture contrast between creamy custard and crisp topping.
Notes
- If using vanilla extract instead of a bean, add it to the custard mixture after tempering the eggs and before straining.
- Be careful to not overcook the custard; it should be set but still have a slight jiggle in the center.
- A water bath is essential to ensure even cooking and prevent cracking or curdling.
- If you don’t have a kitchen torch, broiling works but watch closely to prevent burnt sugar.
- For best flavor, refrigerate overnight to allow flavors to meld.


